


When you create a request or an SOW, you can add the applicable cost allocation strings to ensure costs are tracked correctly. You can modify cost allocation details on a request any time before onboarding. Once a candidate is onboarded and an assignment is created, cost allocation details are locked in on an assignment.
You can also set effective dates for cost allocation strings and ensure that only valid strings are available when a timesheet or an expense is created. Currently, effective dating cost allocation strings is available only in the Contingent Staffing module.
TIP: Effective dates are based on your program’s in-house accounting and Enterprise Resource Planning (ERP) systems.
Information in this article reflects a standard Enterprise configuration. Your Enterprise platform is based on your organization’s configuration. Settings and/or data visibility rules may vary slightly from what is described.
This topic shows you how to set add a string and set an effective date when creating a requisition where units are used to allocate costs.
To add cost allocation strings and set effective dates, complete these steps from your Enterprise dashboard.
TIP: Data may automatically display in some fields based on your profile. In addition, the cost allocation information may or may not include a Cost Allocation Reference list from which you can select a different template.
-
Initiate your requisition using one of these options:
Beeline Classic-
Select New and then select the requisition type from the New Request list. A Create Request page displays.
OR
Hiring Manager Experience-
Select the Create app, and then select the Contingent Staffing Request card.
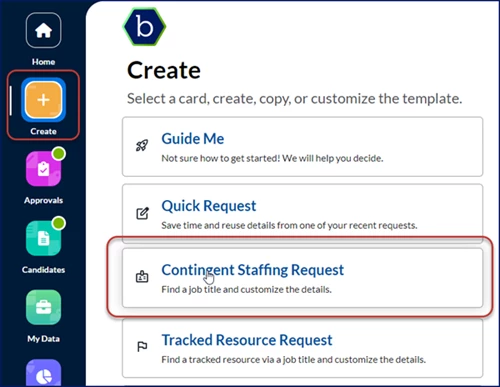
A Create page displays.
-
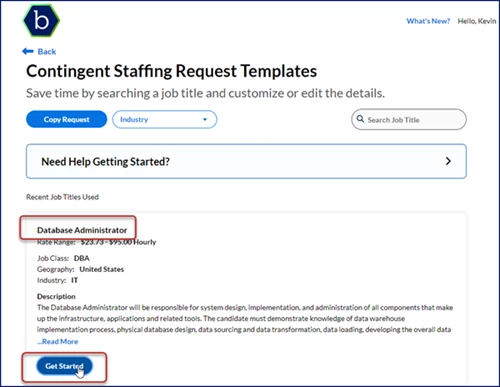
Optional: If available filter your job title search by Geography and Industry.
-
Enter criteria in the Search Job Title field.
-
Locate the job title you want, and then select Get Started.
-
-
Complete the Position Options and the Position Contacts sections, and then select Next.
-
Follow your program’s guidelines for completing the required fields in the Summary Information, the Position Information, and the Rate Details sections.
-
In the Cost Allocation section, complete these steps:
-
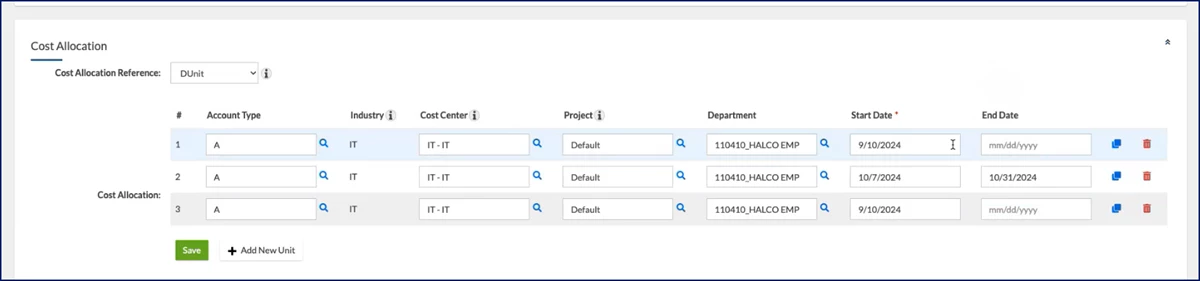
Optional: If your program uses multiple templates and the one you want isn’t selected, choose the applicable template from the Cost Allocation Reference list. You may have different templates based on various allocation types (percentage, unit or amount) available to you.
TIP: If you select a different template composed of the same segments, the defaults set up on your profile are applied. -
Enter or make selections from the cost allocation segments that display, such as Account Type, Industry, Cost Center, and more.
TIP: Segments may be required, optional or read-only fields. -
Optional: If you need to adjust the date the cost allocation string becomes effective, use the Start Date calendar to choose the date. By default, the assignment start date displays in the Start Date field.
-
Optional: Use the End Date calendar to designate the date after which the cost allocation string will no longer apply to the assignment. If you don’t specify an end date, that date defaults to the request end date.
-
Optional: Use the Add New Unit link to add another cost allocation string with different effective dates.
TIP: Throughout the duration of an assignment, at least one cost allocation string must be in effect. -
Optional: Use the Copy or Delete icons to duplicate or remove a string, respectively.
-
-
Follow your program’s guidelines for completing the required fields in the remaining sections and submitting your requisition.
Your submitted requisition follows your organization’s normal approval workflows.
Documentation release: Beeline Enterprise | Q4 2024