


Build reusable worker profiles to streamline candidate submissions
Create a resource profile to add a new worker to the Resource Pool before submitting them as a candidate. Resource profiles store worker information that can be reused across requests, helping you submit candidates more efficiently and maintain accurate worker records.
Jump to what you want
What is a resource profile?
A resource profile represents an individual worker in Beeline Enterprise. Resource profiles contain information used during candidate submission and throughout the staffing process, such as contact information, identification details, and supporting documents.
You can create a resource profile from several areas in Beeline Enterprise, including:
- Submit Candidate > Select Profiles to Submit > Add New
- Manage/Search > Resource Pool > Add New
Once created, the profile becomes available in the Resource Pool and can be selected when submitting candidates.
Why it matters
Creating resource profiles helps you:
- Maintain a centralized record for worker information.
- Reuse worker information across multiple requests.
- Reduce duplicate data entry during candidate submission.
- Improve reporting and worker history tracking.
- Support tenure management and compliance requirements.
- Attach supporting documents before submission.
Who it's for
- Suppliers who submit candidates to requests.
- Program office users who manage worker records.
Before you begin
Before creating a resource profile:
- Verify that a profile for the worker does not already exist.
- Gather the worker information required by your organization.
- Have any supporting documents ready, such as resumes or certifications.
- Confirm which supplier should be associated with the worker.
TIP: Always search for an existing resource profile before creating a new one. Reusing existing profiles helps prevent duplicate records and preserves candidate history, tenure tracking, and reporting accuracy.
Information in this article reflects a standard Enterprise configuration. Your Enterprise platform is based on your organization’s configuration. Settings and/or data visibility rules may vary slightly from what is described.
To accomplish your task, complete these steps from your Enterprise dashboard.
Create a resource profile
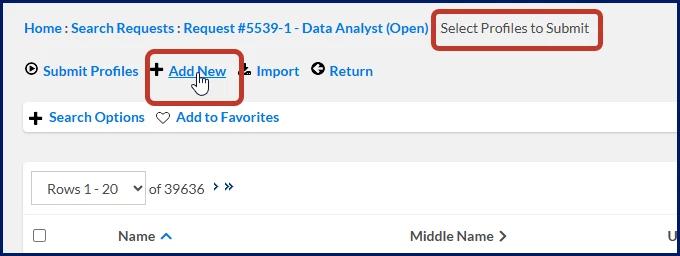
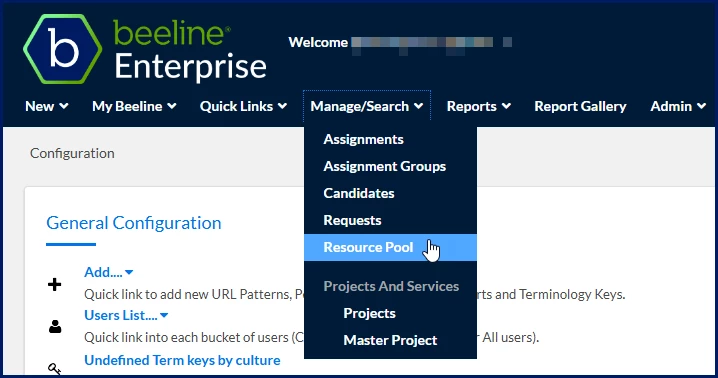
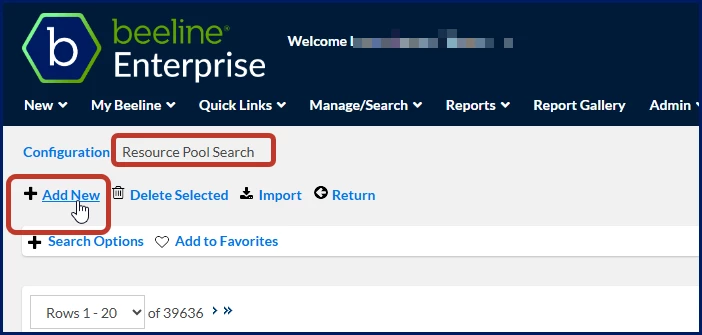
These steps explain how to create a resource profile from the Select Profiles to Submit page when a resource profile does not already exist. But you can create a resource profile from several areas of Beeline Enterprise, including:
- Submit Candidate > Select Profiles to Submit > Add New
- Manage/Search > Resource Pool > Add New
- Navigate to one of the following locations:
- Submit Candidate > Select Profiles to Submit > Add New
- Manage/Search > Resource Pool > Add New
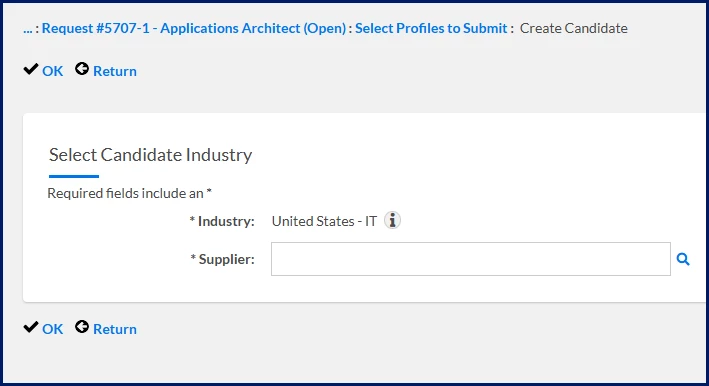
The Create Candidate dialog displays.
-
Review the selected industry.
What this does: Identifies the industry context for the resource profile.
Why this matters: Industry settings may affect available options and validation requirements.
-
Select a supplier using one of the following methods:
- Enter a supplier directly in the Supplier field.
- Select the Search icon to locate a supplier.
-
If you selected the Search icon, the Select Suppliers dialog displays: SPOT
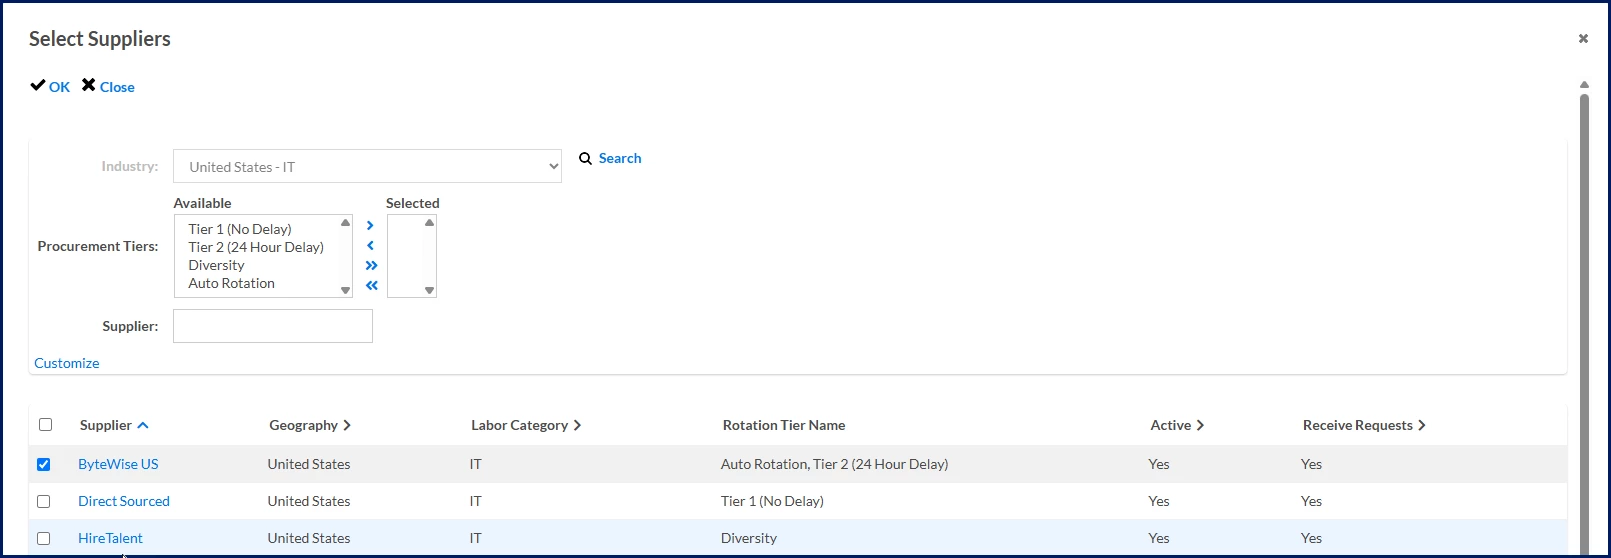
a. Search or filter available suppliers.
b. Select the appropriate supplier.
c. Select OK to close the Select Suppliers dialog and return to the Create Candidate dialog.
What this does: Associates the resource profile with a supplier.
Why this matters: A supplier association is required before you can continue creating the profile.
-
Select OK. The Add Candidate - Details page displays.
-
Complete all required candidate information.
Depending on your organization's configuration, required fields may include:
- First Name
- Last Name
- Email Address
- Date of Birth
- Personal ID Type
- Personal ID
- Resource ID
- Client-defined fields (CDFs)
- Additional organization-specific fields
What this does: Captures the core information used to identify and manage the resource.
Why this matters: Complete and accurate information helps prevent validation issues and supports downstream processes such as submission, reporting, and compliance tracking.
-
Optional. Add supporting documents such as:
- Resumes
- Certifications
- Other required attachments
What this does: Stores relevant worker documentation with the profile.
Why this matters: Adding documents during profile creation makes them available when preparing future candidate submissions.
-
Save the resource profile.
-
If a duplicate-match message displays:
a. Review the matching resource information.
b. If the record represents the same person, cancel the creation process and use the existing resource profile.
c. If the record does not represent the same person, continue creating the new profile.
What this does: Checks for existing worker records that may match the information entered.
Why this matters: Avoiding duplicate profiles helps maintain accurate worker history, tenure tracking, compliance records, and reporting data.
-
If a Do Not Re-engage (DNR) message displays, follow your organization's procedures for DNR resources.
What this does: Identifies resources that may have restrictions on future engagements.
Why this matters: Following DNR requirements helps ensure compliance with organizational policies.
Result
The new resource profile is added to the Resource Pool and is available for candidate submission, resource searches, and other staffing activities.
Import resource profiles
Use this task to import resource profiles before submitting candidates. You can access the Supplier Resource Import Template and import resources via one of these options:
- Manage/Search > Resource Pool > Resource Pool Search
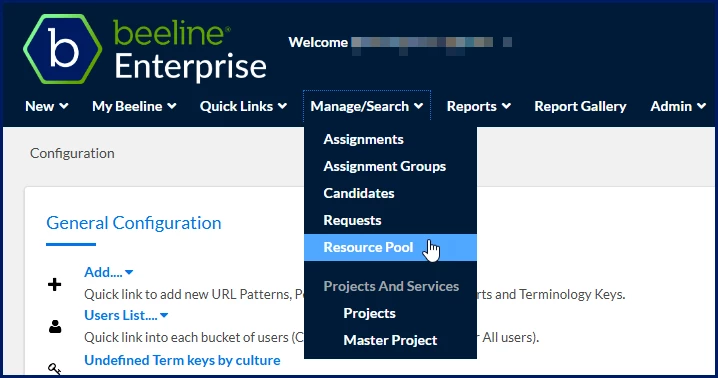
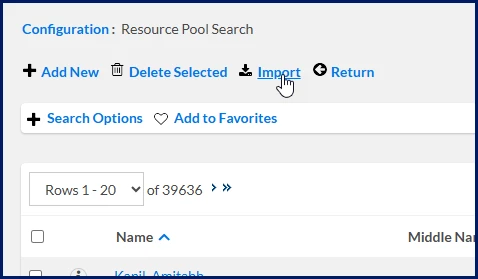
- Select Profiles to Submit page > Import
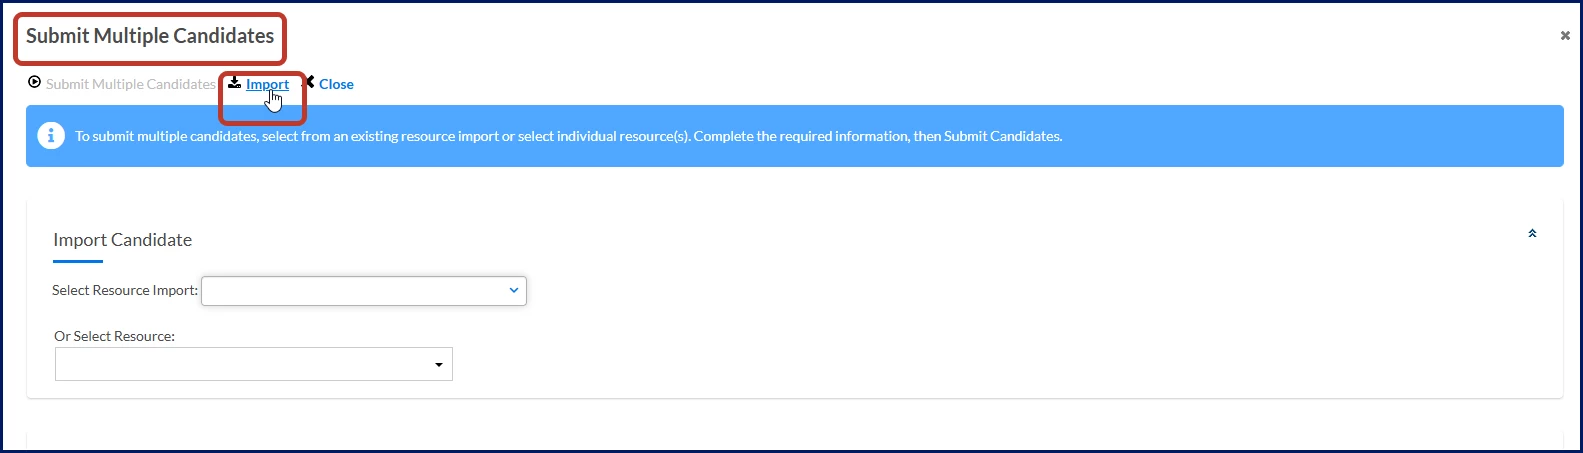
- Submit Multiple Candidates page > Import
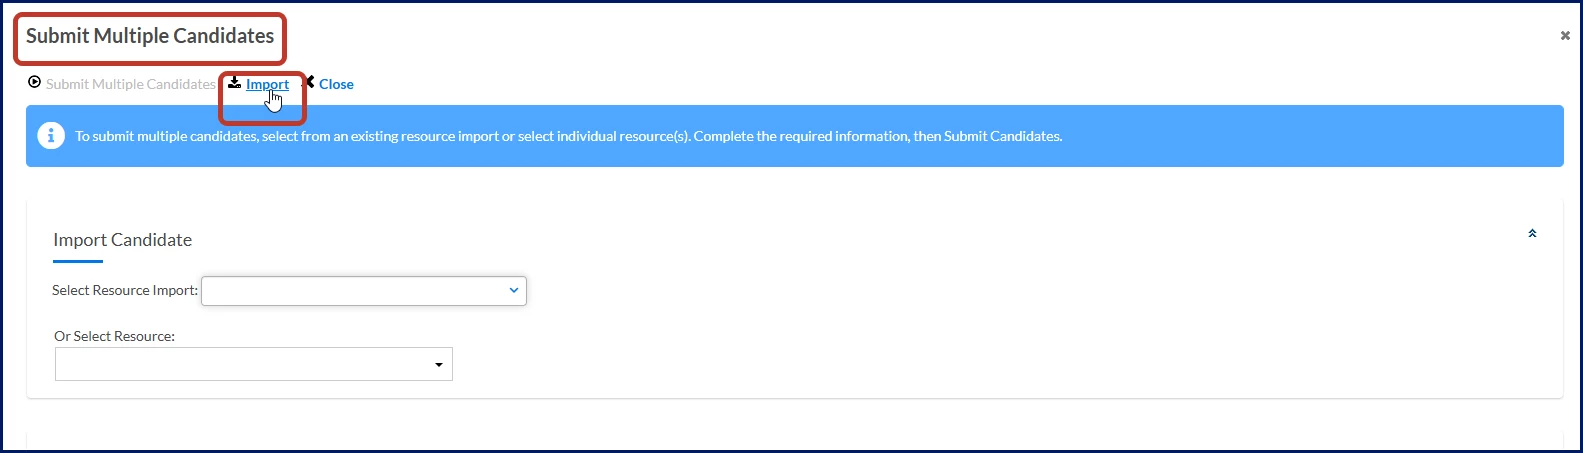
The steps for importing a resource are them same regardless of how you get to the Resource Import page.
-
Open the Resource Import page.
-
Complete the required fields:
- Import Name
- Industry
- Supplier
- Personal ID Type (such as SSN or Birthdate)
-
Select a supplier using one of the following methods:
- Enter the supplier directly in the Supplier field.
- Select the Search icon.
- If you select the Search icon, the Select Suppliers dialog displays.
- Search or filter available suppliers.
- Select the appropriate supplier.
- Select OK to close the Select Suppliers dialog and return to the Resource Import page.
- Optional. Select the Search icon next to Desired Job Titles. The Job Title Selection dialog displays.
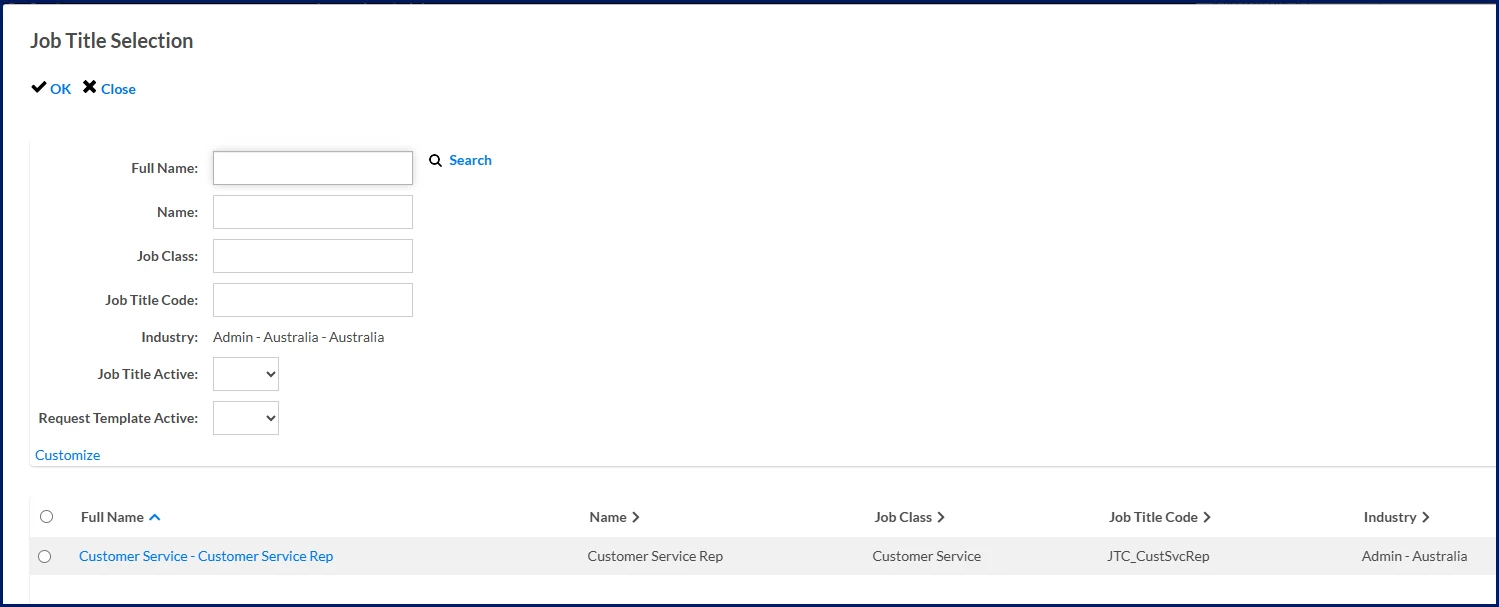
- Enter search criteria and select Search.
- Select one or more job titles from the results list.
- Select OK to close the Job Title Selection dialog and return to the Resource Import page.
What this does: Associates imported resources with one or more job titles.
Why this matters: Selecting job titles helps organize imported resources and makes them easier to locate when submitting candidates.
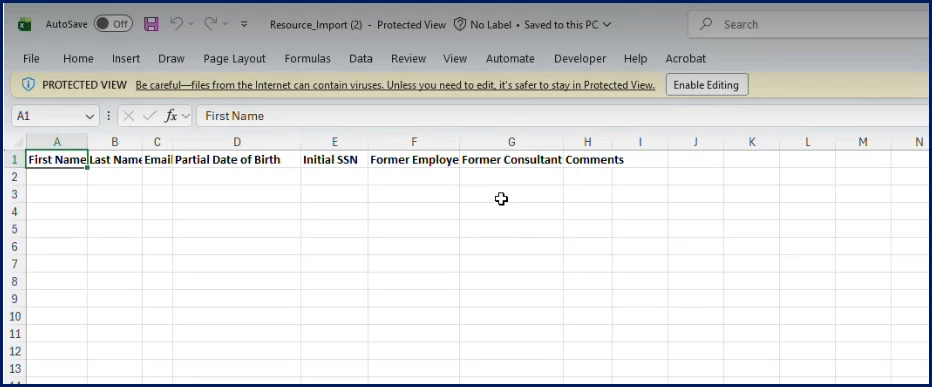
- Select Download Template. The Supplier Resource Import template .xlsx file downloads to your device.
-
Complete the template with resource information.
-
Save the completed template.
-
Upload the completed template.
-
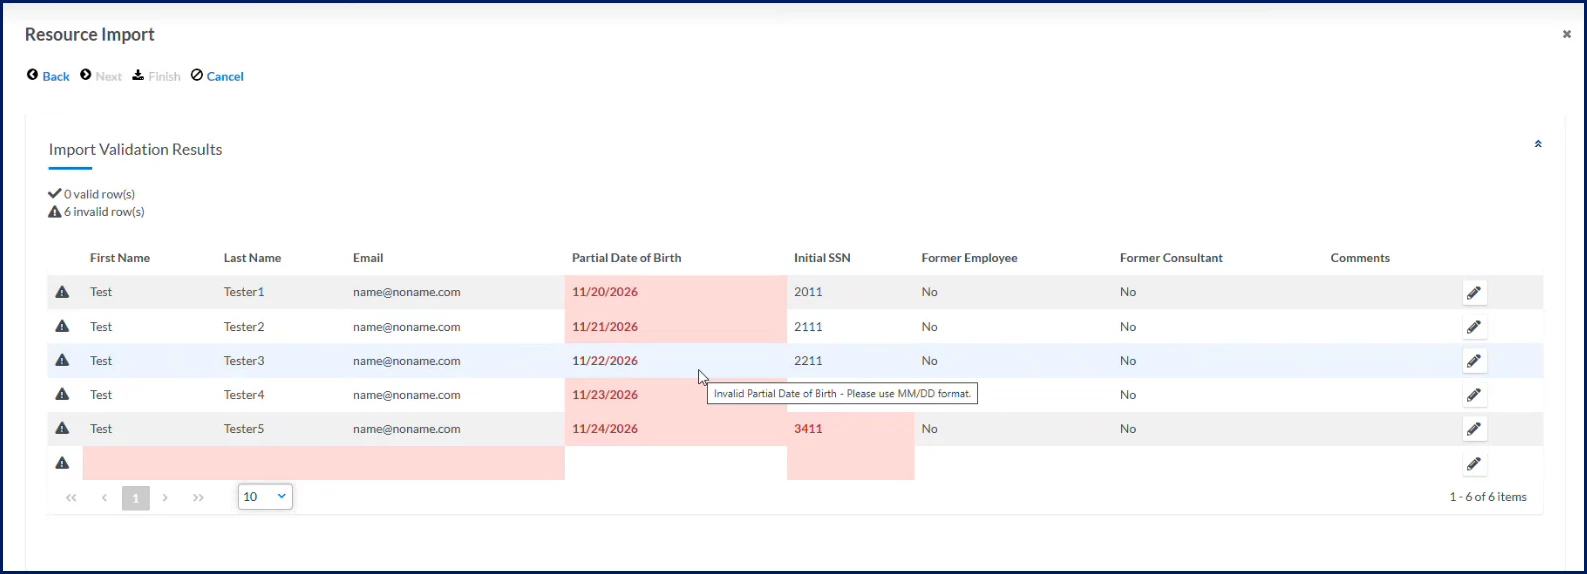
Select Next. The Import Validation Results page displays.
-
Review and correct any validation issues.
-
Select Finish.
Result
The imported resource profiles are added to the Resource Pool and can be used in both the Submit Candidate and Submit Multiple Candidates workflows.
Frequently asked questions
Why should I search before creating a resource profile?
Searching first helps prevent duplicate records. Duplicate profiles can affect reporting, worker history, tenure tracking, and candidate management activities.
What information is required when creating a resource profile?
Required fields vary by organization and configuration. Common requirements include the worker's name, email address, personal identification information, and supplier association.
Can I add documents when creating a resource profile?
Yes. Depending on your organization's configuration, you can attach resumes and other supporting documents when creating a profile.
What happens if a duplicate profile is detected?
Beeline Enterprise displays a potential match message. Review the existing profile carefully and use it instead of creating a duplicate if it represents the same individual.
What is a DNR message?
A DNR (Do Not Re-engage) message indicates that restrictions may exist for the resource. Follow your organization's policies when a DNR notification appears.
Where can I view the profile after I create it?
The profile is added to the Resource Pool and can be selected when submitting candidates or searching for resources
Learn more
Ready to submit workers to a request?
- Submit Multiple Candidates: Submit one or more resource profiles as candidates using either the standard Submit Candidate workflow or the Submit Multiple Candidates workspace.
| Persona Program office users, suppliers | Modules Contingent Staffing Services Procurement | Documentation release Beeline Enterprise | Q3 2026 | Feedback? Email us: |