


This article provides the Program Office and client users with the steps necessary to negotiate contractual and financial terms specific to a statement of work (SOW). This guide was created using Beeline Classic, non-client-specific configuration. Your specific setup is based on your company's configuration/visibility and may vary slightly from what is explained here.
Table of Contents
Negotiate Terms
After the SOW is submitted to a vendor, the vendor reviews the SOW contents. They either accept the SOW as submitted or edit the SOW content and return their edited version to the Program Office/client user for review. This is when the negotiation process begins. The negotiation process can be simple or complex depending on how many times edits go back and forth between the vendor and the Program Office/client user. “Version” controls allow both sides to view the changes each makes throughout this negotiation process. The negotiation process continues until a final version is accepted. ALL edits made to the SOW content are marked to track version changes. Marking techniques include:
- Redline – identifies changes to text; previous version displays with a redline overlay. Items in list format (e.g., financials), new sections, or deleted sections are indicated by a vertical red line adjacent to the item rather than through the text.
- Icons – used to highlight edits other than text edits
‘boxed’ A - indicates added content
‘boxed’ D - indicates deleted content
‘boxed’ M - indicates modified content
closed lock icon - identifies “locked” content; once content is locked, it cannot be edited. Content can be locked on the original template or prior to submitting the SOW to the vendor. Vendors do not have the option to lock content.
- Tags – identifies tabs and tag sections that have edited content; the number in the tag indicates the total number of edits in that tab/tab section
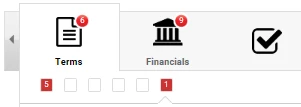
This example shows an open Terms tab indicating 6 total edits; 5 edits in the first section tab and 1 edit in the 6th. There are 9 edits in the Financials tab but the breakdown by tab section is only visible when the tab is open.
You can filter which edits you want to view by using the More Actions pull-down selection list located above the tab ribbon. (Hint: to view a SOW in tabbed view, click View Details on the SOW Profile screen.) Filter options include:
- Show Final – ability to view the SOW changes in a final state (i.e., all redlining removed) prior to acceptance
- Show Our Changes – ability to view just the changes made by the Program Office/client user
- Show Vendor Changes – ability to view only the changes made by the vendor
- Show All Changes – ability to view changes to the SOW regardless of user role
Be advised: If you use these filters during the review or edit stages, you need to click Show Final before you can proceed to the Action tab. This ensures that the “save” option on the Action tab, saves the current version of the SOW.
Use the process steps described below to review, edit, and re-submit a SOW to the vendor. These steps will be repeated throughout the negotiation process until the final version is accepted.
Please note: Content entered in Comment tags is not marked, tagged, filtered, or tracked throughout the negotiation process. This is totally separate functionality and “visible” comments are not considered part of the contractual content.
Review Vendor Edits
To review edits submitted by the vendor:
- Navigate to your Beeline Enterprise Home screen.
- In the My To Do section, click the number link located within the alert sentence, “You have # ‘You have been invited to contribute to a SOW’ tasks awaiting action”. A new window with a list of SOWs waiting for review displays.
- Click the Action drop-down arrow of the SOW to review.
- Click View Details. This opens the SOW Profile screen.
- Click View Details on the SOW Profile screen to open the SOW record in the tabbed view. Review the vendor’s edits as indicated by the various marking techniques.
A single tab can include multiple sections displayed on separate screens. The Next button option ensures that you cycle through ALL content associated to a single ribbon tab. You can scan the section topics associated with a ribbon tab by hovering over the section icons displayed directly beneath the tab icon in the ribbon.
All reviews after the initial review will identify previous edits using a variety of marking techniques. Details are provided in the Negotiate Terms section of this article. Options in the More Actions pull-down selection list let you filter these edits by type to better manage the review process.
- Use the Comments feature to make notes as you review the content. You can use these notes to identify changes you will want to make when you switch to edit mode, or you can use the check box option if you want to share any comments with the vendor. Remember to click Save to retain your comments.
- When you have completed your review of the Terms tab, click Next to continue to the Financials tab. Use the same process as outlined in Step 6 to create/save your comments.
- The Action tab is the final tab in the ribbon. If you accept the vendor’s edits as presented, then click Accept. If you choose to negotiate the content of the SOW by proposing adjustments/changes back to vendor, then click Edit and proceed to the Edit SOW section to continue.
Edit SOW
To adjust the revised SOW:
- Complete the review process as described in Review Vendor Edits up through Step 7.
- Click the check mark tab in the ribbon to go directly to the Action tab.
- On the Action tab, click Edit. Click Edit again in the dialog box to complete this action. The system returns to the SOW Profile screen.
- Click View Details to open the SOW record in edit mode with the tabbed view. Hint: The pencil icon to the left of each section number is a quick way to confirm that you are in edit mode.
- From the Welcome tab, click the Next button to navigate through the Terms content.
As previously noted, a single tab can include multiple sections displayed on separate screens. The Next button option ensures that you cycle through ALL content associated to a single ribbon tab. You can scan the section topics associated with a ribbon tab by hovering over the section icons displayed directly beneath the tab icon in the ribbon. Options in the More Actions pull-down selection list let you filter edits by type to better manage the review process.
- Modify the SOW terms as follows.
- Check any Comments created during the Review process. The number displayed within the comment icon indicates the total number of comments and is a helpful tracking feature. New comments can be created at any time. Use the check box if the comments are meant to be visible to the vendor.
- Click the Pencil icon to edit text blocks.
- Click the Open Lock icon to change a section to “locked” content. Vendors can view, but not edit, locked content. Note: The lock/unlock feature is only available to the Program Office or client users.
- Click the down arrow next to the + Add Content box to add additional text blocks to your current screen.
- Click the Plus icon displayed below the ribbon bar to add a new section at the end of the existing tab section.
Remember to click Save after each of the above modifications to retain your changes.
- Proceed to the Action tab if no adjustments are made to the SOW financials. Either use the Next button to cycle through the Financials tab or click the check mark icon in the ribbon to go directly to the Action tab. Skip to the Re-submit Edits to Vendor section to continue.
- Otherwise, modify the SOW financials as follows:
- Click Next to go to the Financials - Fixed Bid section. Displayed line items are milestones.
- Check any Comments created during the Review process. The number displayed within the comment icon indicates the total number of comments and is a helpful tracking feature. New comments can be created at any time. Use the check box if the comments are intended for the vendor.
- Click the Pencil icon to edit the milestone. An Edit Milestone dialog box opens. Required fields are indicated by an asterisk (*). Make your adjustments and click Save Milestone to exit and return to the tabbed view.
- Click the + Add Milestone link to create additional milestone line items to add to the current list. (Note: The prev | next link is used to move up and down the milestone list; the Next button takes you to the next Financials section.)
Remember to click Save after each of the above modifications to retain your changes.
- Click the Next button to navigate to the next financials section. Depending on the nature of the SOW, there will be a separate financials section for each financials type. Options include milestones, units of measure, roles, non-billable resources, and resource funds. The modification process steps for Units of Measure are similar to those described for milestones. Follow the prompts in the Edit Unit of Measure dialog box to make your adjustments or use the “plus” option to create new ones. Roles and Non-billable Resources are both role-based financials. Follow the prompts in the Edit/Add Role dialog box to modify/create these records. Required fields are indicated by an asterisk (*). And remember to click save to retain all adjustments/changes. Resource Funds is a single text box where you enter the total Resource Funds Amount. The Summary is always the final Financials tab. Review the content and check the math!
- Once you have completed your adjustments under the Financials tab, click the Next tab to proceed to the Action tab to submit your edits to the vendor.
Re-submit to Vendor
When you have completed making all your adjustments, you are ready to submit your changes back to the vendor for review.
To submit revisions to the vendor:
- Click the Action tab indicated by the check mark icon in the SOW tabbed view. (You can access the tabbed view by clicking View Details on the SOW Profile screen.)
- Click Submit for Approval. A dialogue box appears.
- Click OK to confirm the SOW submission. The system returns to the SOW Profile screen and displays an updated status, “Pending Vendor Negotiation.” The SOW record is routed to the vendor for review.
- Click Return to exit the SOW Profile and return to your Home screen.
SOW Acceptance
The vendor and the Program Office/client user must agree on all contractual and financial terms specified in the statement of work (SOW) before a final acceptance can be processed. Individual term clauses and/or financial line items may be “locked” on the original template to indicate items that are non-negotiable. Additional content can also be locked in a new SOW prior to its release to the vendor. Content can only be locked by Program Office or client users.
To lock terms and/or financials in a SOW:
- Click View Details on the SOW Profile screen to open the SOW record in a tabbed view.
- Click the Terms tab in the ribbon.
- Make any final adjustments to text that you intend to lock.
- Click the “open lock” icon next to any text block where ALL the content is non-negotiable. The icon will change to a “closed lock”. Note: You can click the “closed lock” icon to reverse this action at any time during the negotiation phase.
- Click the Next button to cycle through all the Terms tabs and continue to “lock” text as necessary.
- Click the Financials tab in the ribbon.
- Make any final adjustments to financial line items that you intend to lock.
- Click the “open lock” icon next to any line item that is non-negotiable. The icon will change to a “closed lock”. Note: You can click the “closed lock” icon to reverse this action at any time during the negotiation phase.
The ability to lock content is only an option on the Terms and Financials tabs. Sections/line items where there is no visible unlock/lock icon are pre-set as non-negotiable on the SOW template.
To accept individual terms and/or financials during the negotiations phase using the lock feature:
- Review the vendor’s submitted edits as described in the Review Vendor Edits section of this article.
- Use the Comments feature to note which individual items you plan to accept. You can refer to these notes when you switch to the edit mode. Remember to click Save to retain your comments.
- When you have completed your review of the Terms tab, click Next to continue to the Financials tab. Use the same process to create/save your comments.
- Click the check mark tab in the ribbon to go directly to the Action tab.
- On the Action tab, click Edit. Click Edit again in the dialog box to complete this action. The system returns to the SOW Profile screen.
- Click View Details to open the SOW record in edit mode with the tabbed view. Hint: The pencil icon to the left of each section number is a quick way to confirm that you are in edit mode.
- Check the Comment tags you made during the Review process to locate the sections/items you want to lock.
- Click the Open Lock icon to change a section to “locked”. This acts as a temporary approval until the final acceptance is processed.
- To ensure that the vendor is aware of your “approval”, use the Comments feature to indicate why the content is now locked and be sure to check the box to make the comment visible to the vendor. Remember to save your changes!
To accept all vendor terms and/or changes (final acceptance):
- Complete the review process as described in the Review Vendor Edits section of this article.
- If you accept the vendor’s edits without changes, then go to the Action tab (click check mark icon on the ribbon) and click the Accept box.
- If you negotiated with the vendor to adjust the SOW and now have a final version you can accept without changes, then go to the Action tab (click check mark icon on the ribbon) and click the Accept box.
- Click Accept in the dialog box to confirm your acceptance. The system returns to the SOW Profile screen and displays the new status, “Vendor Negotiation Accepted.”
- Click Return to exit the SOW Profile and return to your Home screen.
| Persona | Module | Date Posted | Feedback? Email us: |
| SOW Team | Services Procurement | Beeline Enterprise |