


Your program office can include project resource transfer data in approval emails based on an Advanced Notification Template using the Project Resource Transfer core entity type. The additional fields are automatically available in Beeline Enterprise. However, your program office must configure your Advanced Notification Templates to include them.
Adding Project Resource Transfer details to email notifications gives approvers instant access to details about the source and target projects from which talent is being transferred before they approve a change.
To add project resource transfer fields to an Advanced Notification Template, complete these steps from your Enterprise dashboard.
- Select Admin > Notifications. A Notifications Administration page displays.
- Select Advanced Notification Templates.
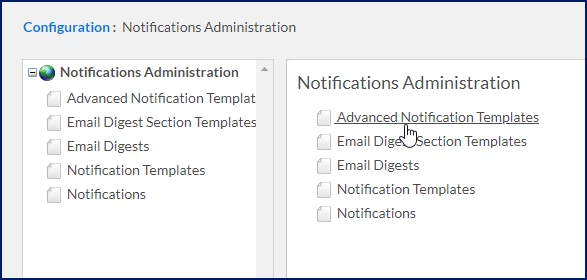
An Advanced Notification Templates page displays. - Select Add New.
- Enter a title for your template in the Name field.
- Optional. Enter an explanation for when and how your template is used in the Description field.
- From the Core Entity Type list, select Project Resource Transfer.
- In the Associated Approval Steps section, select Add Item. An Approval Step Select dialog displays.
- Select the Project Resource Transfer Approval - Initial Default - Project Manager Approval step, and then select OK.
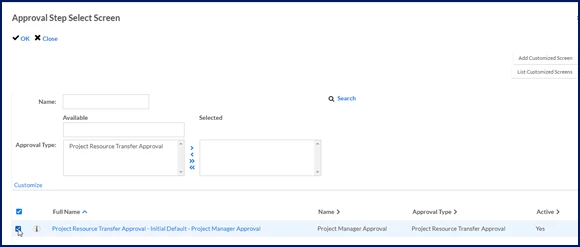
- Optional. In the Associated Approval Steps section, select the Display Approval History In Notifications checkbox to include prior approval history in your notification.
- From the Recipient list, designate who should receive the notification, such as client, PMO or supplier.
- Optional. In the Templates section, select the High Priority Email checkbox to mark the notification as urgent.
- In the Subject section, select Add Item.
- From the Subject Culture list, choose a language for your notification, and enter the corresponding text in the Subject field.
- Optional. Repeat step 13 for each culture you want to set up.
- In the Body section, select Add Item.
- From the Body Header Culture list, choose a language for your notification, and enter the corresponding text in the Body Header field.
- Optional. Repeat step 16 for each culture you want to set up.
- In the Body Template Field Visibility select the fields you want to include and choose which recipients can view them.
- In the Conclusion section, select Add Item.
- From the Conclusion Culture list, choose a language for your notification, and enter the corresponding field codes in the Conclusion field.
- In the Attachment section, navigate to and include any files you want to attach.
- In the Document Template Generation section, include any files your organization uses with verbiage specific to your program, such as contractual notifications.
- Select OK.
Your email notifications are set up and the approvers you designated automatically receive timely notifications about submitted transfers.
Related articles
Documentation release: Beeline Enterprise | September 2024