

Find the right vendors faster—without sacrificing control
Supplier Tagging lets you organize suppliers in a way that fits your program. You can create and apply customizable tags based on what matters most to you—such as service type, location, skill sets, preferred status, or any custom category you define. These tags form a centralized taxonomy you can reuse across sourcing activities, making it easier to keep supplier data organized, up to date, and ready to act on.
During bid creation, the configured taxonomy is used to surface suppliers that meet the selected criteria, improving relevance and reducing manual effort. Users can still add or override suppliers as needed, ensuring flexibility while preserving administrative control.
Why it matters
- Ensures sourcing decisions align with organizational taxonomies by applying consistent, client‑defined classifications to all project industry suppliers.
- Supports contractual and policy compliance by identifying and prioritizing preferred vendors when preferred and non‑preferred tags are used.
- Improves supplier fit and bid quality by matching vendors to required categories and validated capabilities.
- Reduces sourcing risk and inefficiency by minimizing reliance on ad‑hoc supplier selection.
Who it’s for
Clients, program office users, system administrators
Action required
Your Beeline Enterprise system administrator can set up Supplier Tagging via self-service from VMS Settings > Data Management > Supplier Tagging. You can also import Supplier Tagging data using the Supplier Tagging Import Template from the Procurement Industry Supplier Tags page or the Web Import Tool. In addition, you can report on tags using the Tags fields in the Supplier Definition report.
How it helps
Supplier Tagging delivers value across sourcing, governance and operational efficiency:
- Improves bid relevance by surfacing suppliers that match selected categories and validated capabilities.
- Supports contractual compliance by prioritizing preferred suppliers and enforcing sourcing policies.
- Allows users leverage their program’s organizational tags to quickly search and filter suppliers by during bid creation.
- Enhances governance through consistent use of client‑defined taxonomies and supplier classifications.
How it works
- Supplier tagging uses client‑defined attributes that reflect the organization’s sourcing strategy and taxonomy, which may include
-
Categories and subcategories
-
Industry verticals
-
Validated capability tags
-
Preferred or non‑preferred designations
-
- Competitive Bid creation
- When creating a competitive bid, users manually select supplier tags—such as categories and required capabilities—to filter and choose which suppliers to invite.
- Optional. Override and add vendors
- Users can override vendor suggestions and add vendors as needed.
- This preserves adaptability without compromising governance or visibility.
- Result: A smarter, faster, and more compliant sourcing process that balances structured governance with real‑world flexibility.
How to steps: Program office & system admin
Information in this article reflects a standard Enterprise configuration. Your Enterprise platform is based on your organization’s configuration. Settings and/or data visibility rules may vary slightly from what is described.
Before you begin
- Confirm you have access to VMS Settings > Data Management.
Managing your supplier tags
To accomplish your task, complete these steps from your Enterprise dashboard.
- Select VMS Settings > Data Management. A Data Management page displays.
- Select Supplier Tagging. A Procurement Industry Supplier Tags page displays.
- To add a new tag, complete these steps:
- Select Add New. An Add Supplier Tags page displays.
- From the Geography list, select the location in which you want the tag to apply.
- From the Industry list, select the line of business to which you want the tag to apply.
- From the Supplier Name list, select the vendor to which you want the tag to apply.

- Select Tags. A Search or Add tags box displays.
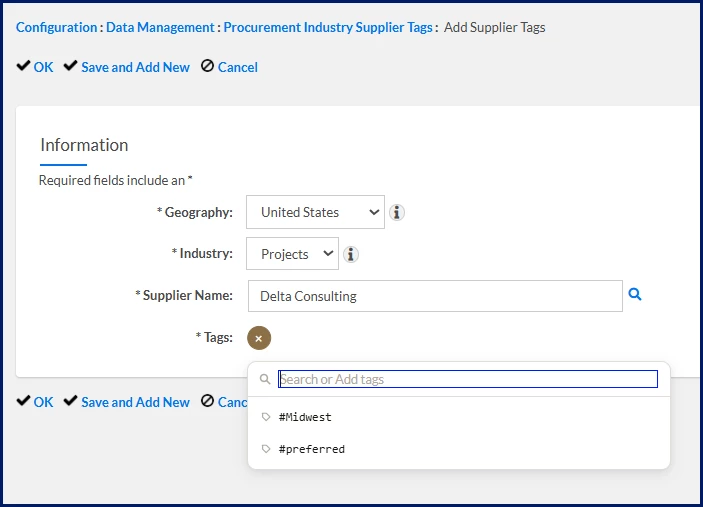
- Enter a new tag. You can enter up to 50 alphanumeric characters without spaces.
- Optional. Repeat steps 1 through 6 to add as many tags as you need.
- To use an existing tag, select Tags. A Search or Add tags box displays. Look for and select an existing tag.
- Optional. Select the X icon next to a tag to remove it.
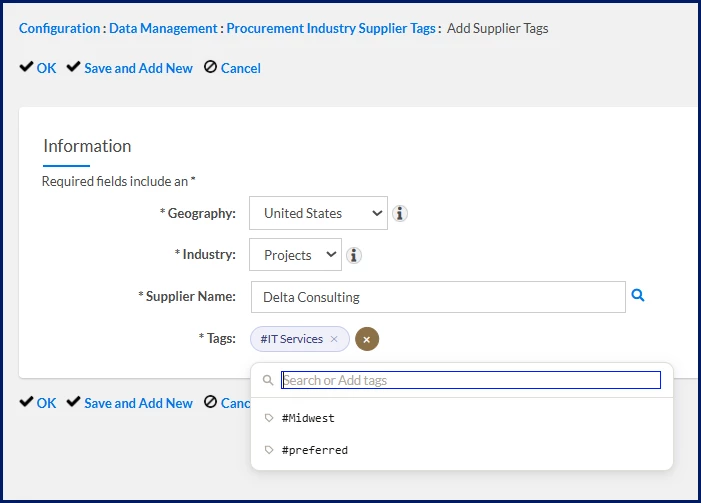
- Select OK to apply your selections.
Importing supplier tags
To accomplish your task, complete these steps from your Enterprise dashboard.
- Select VMS Settings > Data Management. A Data Management page displays.
- Select Supplier Tagging. A Procurement Industry Supplier Tags page displays.
- Select Import Records. You’re redirected to an Import—Status: Creating page.
- From the Import Type list, select Supplier Tagging.
- Select the link next to the Supplier Tagging Template to download a prototype file for your import. A Save As dialog displays.
- Select the location where you want to save a copy of the template.
- Navigate to the copy you saved, and then complete the template with the data for your organization. Next, save the file.
- In the Import page in Enterprise, enter a label for your import in the Name field.
- Choose the Select link in the Select File section. A Select Import Attachment dialog displays.
- Select Choose File, and then navigate to the file you just saved.
- From the Select Import Attachment dialog, select Upload.
- Add a label for your import in the Title field on the Select Import Attachment dialog, and then select Save.
- Optional: Define any additional file options on the Import—Status: Creating page.
- Select Validate.
- Make sure all of the entries in your import template were successfully uploaded.
- Select Save, and then select Return.
| Persona Clients, program office, system admin | Modules Services Procurement | Documentation release Beeline Enterprise | Q2 2026 | Feedback? Email us: |