


Suppliers can have the option of entering expenses on behalf of a contract worker. The expense entry process is very similar to the steps taken by the worker with the addition of some administrative information that is not visible to a contract worker.
This content reflects non-client specific Beeline Enterprise functionality which may vary from what you see when logged into Beeline Enterprise depending on any client-specific settings or adjustments.
To enter expenses on behalf of a contract worker:
- Navigate to your Beeline Enterprise Home screen.
- Click the Search drop-down arrow located in the header section and select Search Expenses from the list.
- In the Search box, enter all or a portion of the Worker’s Name or Beeline ID. As you type, the auto suggestion/type ahead feature begins suggesting search results.
- Click the matching record link when it displays. The page refreshes to show the Time and Expense, Expenses view.
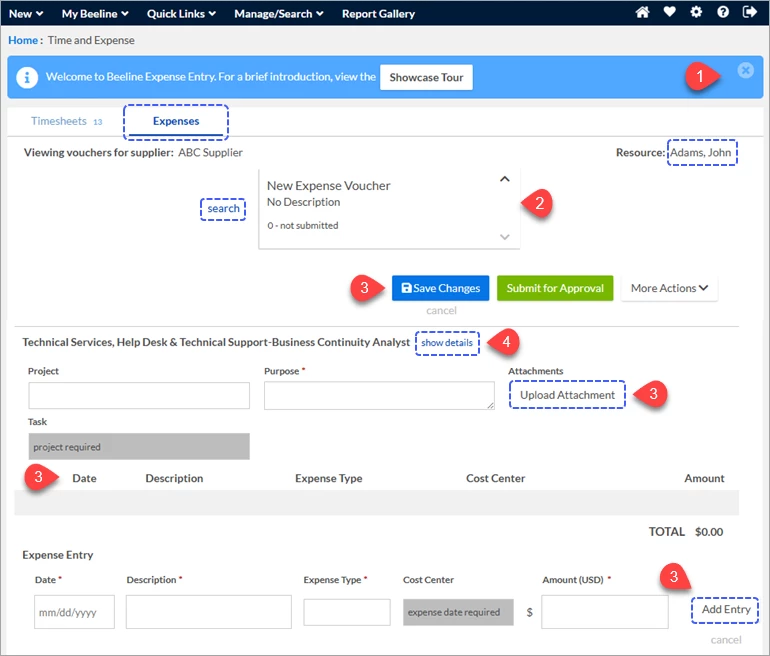
- Check the name in the Resource field (upper right section of the page) to confirm you have the correct contract worker’s expense voucher entry record.
The Beeline Time and Expense (BTE) module is designed to manage both time and expense based on client preference. Some clients only permit time entry. If you are using a client account that permits BOTH time and expense entry, be sure that the correct tab (i.e., Timesheets, Expenses) is the active tab when making entries.
- Complete the expense voucher as indicated. Features and options for filling in an expense voucher are explained in the “Expense Voucher Features” section below.
- Click Save Changes to store your entries if you plan to submit the expense voucher at a later time, OR, click Submit for Approval when the expense voucher is complete and ready to send for approval.
Expense Voucher Entry:
 | Showcase Tour |
 | Navigation |
 | Actions Use the Add Entry button to add as many line items as needed. Once you have added all the expense line items, you can edit or delete items using the “pencil” or “x” icons in the totals table. The Upload Attachment button allows you to add receipts, or other documentation, to the expense voucher directly from your computer. After the voucher is complete, choose to either Save Changes, Submit for Approval, or Cancel using the links provided. When you click Submit for Approval. The status updates in the Date Picker section and the expense voucher forwards to the timesheet approver. Save a copy of the submitted voucher by clicking the “view printable pdf” link and then use the save feature. |
 | Details |