


This article lists the steps necessary for a supplier user to respond to and manage interviews based on the enhanced interview experience. This streamlines the process steps and provides better visibility to manage all your candidate interview requests.
This content reflects non-client specific Beeline Enterprise functionality which may vary from what you see when logged into Beeline Enterprise depending on any client-specific settings or adjustments.
Access to Interview Manager:
There are multiple access points to Interview Manager within Beeline Enterprise to provide. Options include:
From your Home dashboard:
- Navigate to your Beeline Enterprise Home dashboard.
- In the My To Do quadrant, click the number link located within the alert sentence, “You have # Candidate – Interview Requested tasks awaiting action”. The Review Alerts window displays.
- Click the Action drop-down arrow for a specific Candidate Interview and select View Details.
- Click Manage Interviews on the View Job-Title – Candidates screen to go directly to the Interview Manager screen.
- Optional If you have no Requests tasks, you can access Interview Manager from the My Activity section of your dashboard. Click the number link indicating Open Requests. A dialog window opens with a list of all open Requests.
- Click the link in the ID column to open the View Position - Summary screen.
- Click the Candidates tab. The View Position – Candidates screen displays.
- Click Schedule Interviews to go directly to the Interview Manager screen.
From a Request search:
- Navigate to your Beeline Enterprise Home dashboard.
- Select Search Requests from the drop-down selection list in the Simple Search box located above the Header Menu bar.
- In the Search box, enter all or a portion of the Request number, Request name, or Request owner.
As you type, the auto suggestion/type ahead feature begins displaying search results.
- Click the Request you want to access from the list of suggestions. The View Position - Summary screen appears.
- Click Schedule Interviews on the View Position – Candidates screen to go directly to the Interview Manager screen.
From a Candidate search:
- Navigate to your Beeline Enterprise Home dashboard.
- Select Search Candidates from the drop-down selection list in the Simple Search box located above the Header Menu bar.
- In the Search box, enter all or a portion of the Request number, Candidate name, or Job Title.
As you type, the auto suggestion/type ahead feature begins displaying search results.
- Click the Candidate you want to access from the list of suggestions. The Candidate Evaluation screen appears.
- Click the 3-dot Action icon in the Actions column and select Schedule Interviews. The Interview Manager screen displays.
Interview Manager Overview
The Schedule Candidate Interviews screen is a summary screen divided into two sections, Request Information and Accept or Reject Interviews.
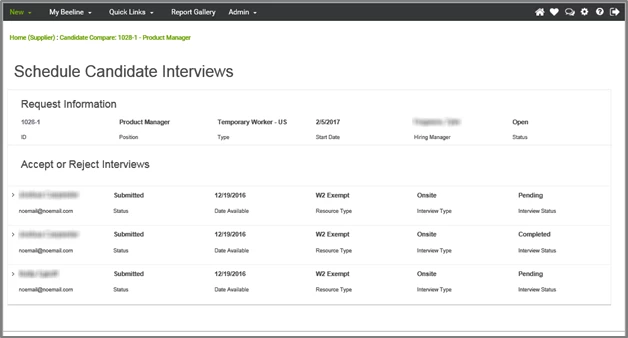
- Request Information: acts as a header and displays key details related to the Request including Request ID, Job Title, Job Type, Desired Start Date, Hiring Manager, and current Request Status. Notice that the column labels display BELOW these key details.
- Accept or Reject Interviews: is the interactive section and displays a list of candidates with interview activity. Click anywhere in the row to expand it to display the calendar view for that candidate. Click in the row again to toggle back to the condensed view. This section includes details as to Candidate Name and Email, current Candidate Status, Date Available, Resource Type, Interview Type, and current Interview Status. Candidate records can also be easily expanded or contracted by clicking the expansion arrow located to the left of the Candidate name.
Get Familiar with the Calendar View Features:
The calendar view provides easy access to key interview details.
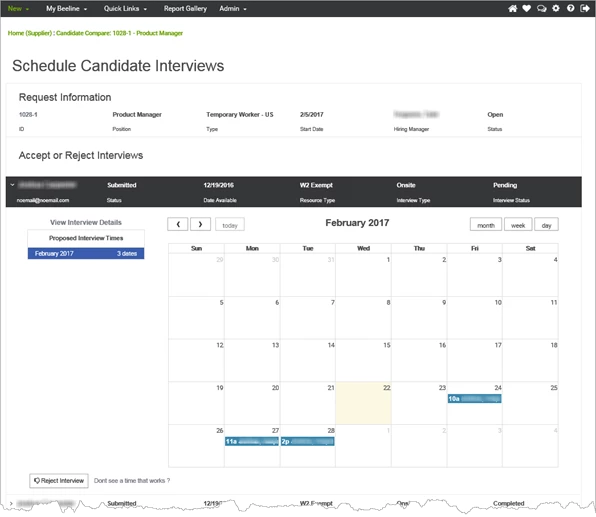
From this expanded display you can review:
- Proposed Interview Times (located in the left-hand sidebar) which shows the total number of interview dates requested, by month.
- Attachments (located in the left-hand sidebar) display links to any attached documentation related to the interview. This could be directions to the interview location or any supplemental documentation.
- Calendar where the requested interviews are displayed on the corresponding days and includes the Candidate’s name and the proposed interview start time. Notice that the Request Information section remains visible at the top of the screen in this expanded view and the Candidate information is highlighted in the horizontal color bar above the calendar layout.
- Navigation Features:
- Use the buttons located above the right side of the calendar layout to switch your display from month, week, or day format.
- Use the forward or back navigation buttons located above the left side of the calendar to move forward or back by month, week, or day depending on the active format selection. Click ‘today’ to reset the calendar display to the current date.
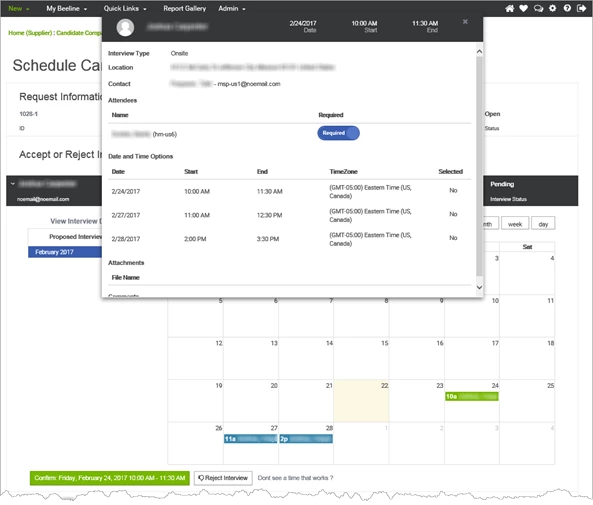
- Click either the View Interview Details link or the interview record link on the calendar to open a pop-up window with detailed interview information. Click either the “x” in the upper right-hand corner or anywhere outside the window area to close the pop-up display.
- Click the attachment file name in the Attachments section (left-hand panel) to download a listed file for viewing.
- Click the down expansion arrow to the left of the Candidate’s name or anywhere in the colored horizontal bar to exit the Calendar view.
- Click the ‘Home’ text located near the top of the screen beneath the Header Menu to exit Interview Manager and return to your Home screen (or your My To Do task list if you used that access option.)
Accept, Reject, or Propose New Time Slot for Interview Requests:
The action to accept, reject, or propose a new time slot is made from the Calendar screen. You can click View Interview Details and review all the interview details and proposed time slots in a pop-up window (as shown below) but any adjustment will need to be made from the calendar. (Note: You can check the information in the View Interview Details pop-up window throughout the interview process to verify both the current status and any adjustments to interview-related details.)
To accept an interview:
- Navigate to your Beeline Enterprise Home dashboard.
- In the My To Do quadrant, click the number link located within the alert sentence, “You have # New Request task awaiting action”. The Review Alerts window opens and displays a list of active Requests.
- Click the Action drop-down arrow for a specific Request and select View Details. The View Position – Candidates screen displays.
- Click Schedule Interviews. The Schedule Candidate Interviews (for example, Interview Manager) screen displays.
- Click the expansion arrow to the left of the Candidate name in the Accept or Reject Interviews section to display the calendar view. (You can click anywhere in the row with the candidate’s details to toggle to the calendar view.)
- Review the information posted in the Proposed Interview Times section. This indicates how many TOTAL time slots have been proposed for the interview.
- Select your preferred time slot by clicking the invitation link displayed on the respective calendar day. The link will turn green and a new bar link appears adjacent to the calendar.
- Click the bar link to confirm your acceptance. A pop-up alert bar indicates that your changes were saved and the calendar view closes. The Candidate record now indicates an interview status of “Scheduled.” A notice is generated to all designated interview attendees. No action needs to be taken for any of the other proposed interview time slots.
- Optional. Depending on the Interview Type, you may be asked to provide contact information for the interview before you can complete the confirmation.
- Enter the required information in the ‘Provide the information below to proceed’ dialog box.
- Click the Confirm bar again to finalize your acceptance.
To reject an interview:
- Navigate to your Beeline Enterprise Home dashboard.
- In the My To Do quadrant, click the number link located within the alert sentence, “You have # New Request task awaiting action”. The Review Alerts window opens and displays a list of active Requests.
- Click the Action drop-down arrow for a specific Request and select View Details. The View Position – Candidates screen displays.
- Click Schedule Interviews. The Schedule Candidate Interviews (for example, Interview Manager) screen displays.
- Click the expansion arrow to the left of the Candidate name in the Accept or Reject Interviews section to display the calendar view. (You can click anywhere in the row with the candidate’s details to toggle to the calendar view.)
- Review the information posted in the Proposed Interview Times section. This indicates how many TOTAL time slots have been proposed for the interview.
- If none of the proposed time slots are acceptable, click the Reject Interview button at the bottom of the screen. A dialog window appears.
- Enter your comments (required) and click Reject Interview to confirm. The dialog window closes and you return to the Schedule Candidate Interviews screen. Notice that the Candidate record is no longer listed in the Accept or Reject Interviews section. Although you can “accept” a single time slot, a “reject” impacts the interview invitation as a whole and removes the candidate listing from this screen. A notice is generated to all designated interview attendees and the candidate’s interview status updates to “rejected”. Note: An interview can only be cancelled by the Program Office or the designated Point of Contact.
To propose alternate interview time(s):
- Navigate to your Beeline Enterprise Home dashboard.
- In the My To Do quadrant, click the number link located within the alert sentence, “You have # New Request task awaiting action”. The Review Alerts window opens and displays a list of active Requests.
- Click the Action drop-down arrow for a specific Request and select View Details. The View Position – Candidates screen displays.
- Click Schedule Interviews. The Schedule Candidate Interviews (for example, Interview Manager) screen displays.
- Click the expansion arrow to the left of the Candidate name in the Accept or Reject Interviews section to display the calendar view. (You can click anywhere in the row with the candidate’s details to toggle to the calendar view.)
- Review the information posted in the Proposed Interview Times section. This indicates how many TOTAL time slots have been proposed for the interview.
- If you want to propose an alternative interview time, click the Don't see a time that works? link at the bottom of the screen. A dialog window opens.
- Use the data field prompts to designate the Date, Start time, End time, and Time Zone for your proposed interview time slot. Click the + Add Date and Time Option link if you want to include multiple options. Comments are optional.
- Click the Suggest New Interview Times button to confirm. The dialog window closes and a notice is sent to the interview’s designated Point of Contact. Be Aware! Take care not to click anywhere outside the dialog window BEFORE you click the ‘Suggest New Interview Times’ button or you will lose your entries and have to start over.
Provide Contact Information based on Interview Type:
The list of Interview Types has been expanded to include several Web-based options. Each interface requires contact information specific to its access portal. The Program Office or client manager has the option to require that the candidate and/or supplier provide contact information for the candidate interview based on the following criteria:
| Interview Type | Contact Information Options |
| GoToMeeting™ |
|
| Google™ Hangouts |
|
| On Site (default) |
|
| Phone |
|
| Skype™ |
|
| WebEx™ |
|
| Other |
|
Notifications
Interview Manager – Interview Requested
| Subject: | Candidate Interview Approval |
| Message: | Candidate Interview Approval |
Interview Manager – Interview Accepted
| Subject: | Candidate Interview Scheduled |
| Message: | Candidate Interview Approved |
Interview Manager – Interview Updated
| Subject: | Candidate Interview Updated |
| Message: | Candidate Interview Updated |
Interview Manager – Interview New Times Proposed
| Subject: | New Interview Times Proposed |
| Message: | New Interview Times Proposed |
Interview Manager – Interview Cancelled (Supplier Rejected)
|
|
Final Note
The process steps required to create/edit an interview using Outlook™ remain unchanged and are outside the scope of this enhanced interview experience. “How to” instructions are available from your Program Office.