BTE Project Management helps you create and maintain the projects and tasks contractors use during time and expense entry. By organizing project information in one place, you can support accurate time tracking, improve reporting, and ensure work is charged to the correct project and task.
Why it matters
Make projects and tasks available for contractor time entry.
Support accurate project, time, and cost tracking.
Manage project information through self-service.
Keep project structures up to date as business needs change.
Who it's for
Project managers.
Program managers.
Time and Expense administrators.
Authorized users responsible for managing project records.
How it helps
Allows you to create new BTE projects.
Allows you to create project-specific tasks.
Supports accurate contractor time entry.
Helps maintain consistent project and task information.
Before you begin
Have access to the Time & Expense Self-Service features.
Have permission to create or manage BTE projects.
Verify that the BTE Project Management feature is enabled in your environment.
How to steps
Information in this article reflects a standard Enterprise configuration. Your Enterprise platform is based on your organization’s configuration. Settings and/or data visibility rules may vary slightly from what is described.
To accomplish your task, complete these steps from your Enterprise dashboard.
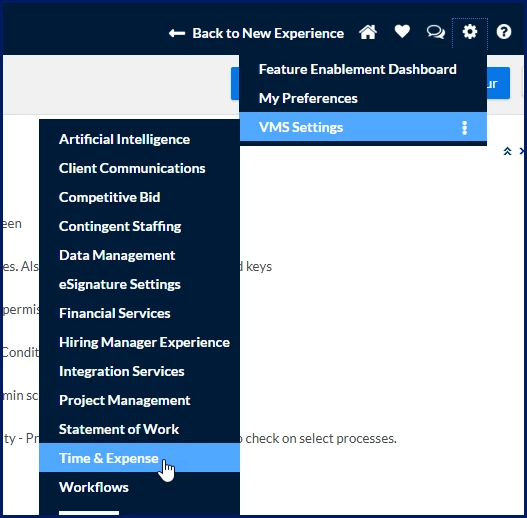
Select Preferences > VMS Settings > Time & Expense. A Time & Expense page displays.
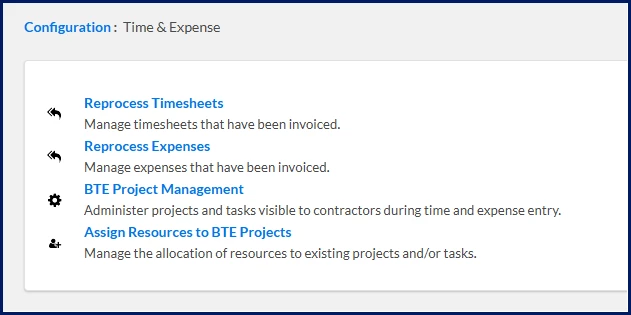
Select BTE Project Management. The BTE Project List & Management page displays.
Creating a BTE project
Create a project that contractors can select during time and expense entry.
Enter Department ⚠️
What this does: Associates the project with a department.
Why this matters: Helps organize projects and supports reporting.
TIP: Select the Lookup icon 🔍 to search for and select a department.
Enter BTE Project Name ⚠️
What this does: Identifies the project throughout BTE.
Why this matters: Helps users select the correct project during time entry and reporting.
Enter Short Name ⚠️
What this does: Describes the purpose of the project.
Why this matters: Helps users understand how the project should be used.
Optional. Enter Description
What this does: Describes the purpose of the project.
Why this matters: Helps users understand how the project should be used.
Select Status ⚠️
What this does: Controls whether users can select the project.
Why this matters: Prevents users from charging time to unavailable projects.
In simple terms: Decide whether the project is active or inactive.
Example: Set the status to Active when users should be able to charge time to the project.
Select Project Type ⚠️
What this does: Categorizes the project based on business requirements.
Why this matters: Supports project organization and reporting.
In simple terms: Choose the type of project you're creating.
Select Category ⚠️
What this does: Assigns the project to a category.
Why this matters: Helps group related projects for reporting and management purposes.
Select Project Type ⚠️
What this does: Categorizes the project based on business requirements.
Why this matters: Supports project organization and reporting.
In simple terms: Choose the type of project you're creating.
TIP: Select the Lookup icon 🔍 to search for and select a project type.
Select Project Status ⚠️
What this does: Identifies the current status of the project.
Why this matters: Helps users understand where the project is in its lifecycle.
In simple terms: Choose the status values that apply to the project.
Use the arrow controls to move statuses between the Available and Selected lists.
Example: Move Active to the Selected list when the project should be available for use.
Optional. Select Project Manager
What this does: Associates a manager with the project.
Why this matters: Helps identify project ownership and accountability.
TIP: Select the Lookup icon 🔍 to search for and select a project manager.
Optional. Select Technical Manager
What this does: Associates a technical lead with the project.
Why this matters: Helps identify the technical point of contact for the project.
TIP: Select the Lookup icon 🔍 to search for and select a technical manager.
Optional. Enter Created Date
What this does: Records the project's start or creation date.
Why this matters: Supports project tracking and reporting.
Optional. Enter Thru Date
What this does: Defines the project's end date.
Why this matters: Helps identify the period during which the project is active.
Optional. Specify Has Services Procurement Project
What this does: Indicates whether the project is associated with Services Procurement.
Why this matters: Supports proper project classification and reporting.
Select Is Enabled ⚠️
What this does: Controls whether the project is available for use.
Why this matters: Prevents users from selecting projects that should no longer be available.
In simple terms: Turn this option on to make the project available.
Review budget and financial fields
What this does: Stores project budget and financial information.
Why this matters: Supports financial calculations and reporting.
In simple terms: Update the values if needed or leave the default value of 0.
Note: Some budget and financial fields are prepopulated with 0 because they are used in financial and budget calculations and cannot be left blank.
Save the project
Option
Use when you want to...
OK
Save the project and return to the project list.
Save and Add New
Save the project and create another project.
Final result
The project becomes available in BTE Project Management.
Contractors can use the project during time entry when configured.
Project information is available for reporting and tracking.
Key takeaway
The BTE Project feature controls the projects available for contractor time entry. Creating accurate project records helps ensure time is tracked against the correct work and reported correctly.
Please complete the following fields as part of your Beeline Community registration. Unless noted as private, this information will be displayed on your user profile within the community.