Before you set up a First Advantage® account in Beeline Enterprise, make sure you obtain the following authentication credentials for the client’s First Advantage account. First Advantage will provide this information to the client or the program office.
Provider’s API URL/Provider’s Base Location URL.
Organization name; the client's First Advantage username.
Client’s company login; a unique value is used to authorize a client’s access to First Advantage and to associate suppliers with a client organization.
You need this information to permit data exchange between the Enterprise platform and First Advantage using Beeline’s application programming interface (API) calls.
As a program office user with the appropriate permissions, you can manage your First Advantage integration with Enterprise, which involves these steps.
A Make a Change ticket and discussions with your client operations manager (COM). In addition, your COM must update your Approval Workflows to support event validation. Your COM must also grant permissions to users to set up and manage Background Checks from Self-Service.
Activate First Advantage as a background check provider.
Setting up First Advantage background check packages.
Configuring your Request Templates to include the applicable background check packages.
Configuring your Request Types to include the applicable background check packages.
Persona
Program office user
About requests, request types and request templates
Underlying transactions processed through Enterprise are requisitions (also called requests or job opportunities) for the work you need done and the contingent talent to do that work. Fundamental to requests are request types that drive the information required for a requisition.
Requests store the details about the work being sourced, and track openings submitted through Enterprise by a client for work to be completed by a talent.
Request Types define the nature or category of the service being requested. They determine how the request is processed, what rules apply, and which stakeholders are involved. They store dozens of configurations related to a single procurement process. The Request Type a user selects determines which Request Template is applied.
Request Templates provide a predefined form or structure used to collect consistent information for a specific type of request. They ensure consistency, completeness, and efficiency in how requests are submitted and evaluated.
How to steps
Information in this article reflects a standard Enterprise configuration. Your Enterprise platform is based on your organization’s configuration. Settings and/or data visibility rules may vary slightly from what is described.
Activate First Advantage as a background check provider
As a program office user with the appropriate permissions, you must make First Advantage an active background check provider in Enterprise.
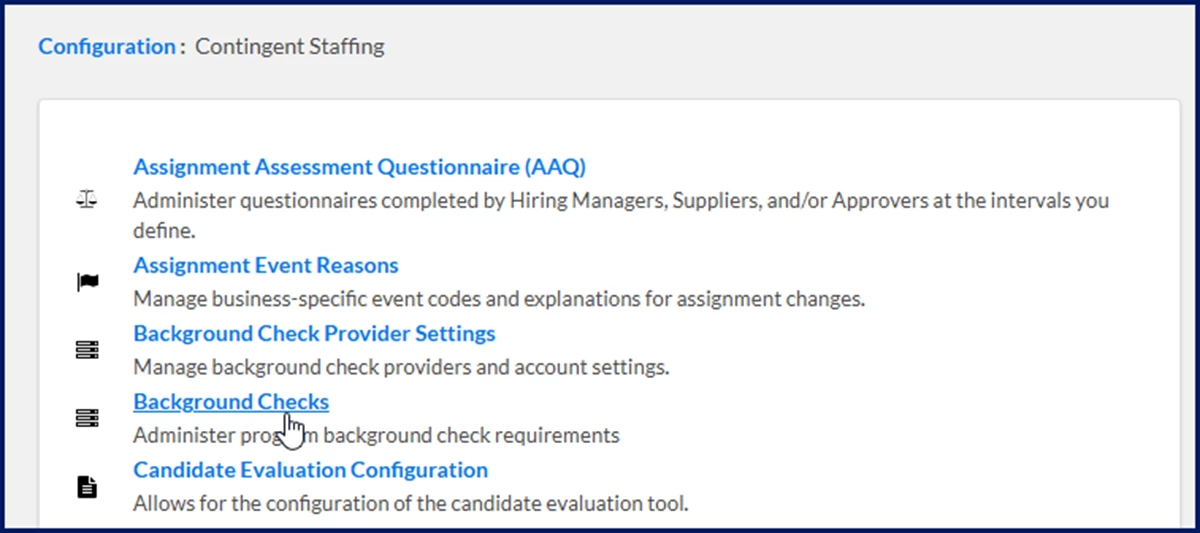
To activate First Advantage as a background check provider, complete these steps from your Enterprise dashboard.
Select Background Check Provider Settings. A Background Check Provider page displays showing any background check providers already configured in your Enterprise platform.
Select First Advantage Enterprise Provider. A View Background Check Provider page displays.
Select Edit. An Edit Background Check Provider Settings page displays.
Select the IsActive checkbox in the AddBackground Check Provider Settings section to make the account available in Enterprise.
First Advantage automatically displays as the background check provider in the Background Check Provider list in the Provider Settings section.
Optional. In the Provider Base Location URL field in the Provider Settings section, add the First Advantage application programming interface (API) URL. This URL allows API exchanges between Enterprise and First Advantage.
In the Account ID field in the Account Setup section, add the client’s First Advantage account ID.
In the User ID field in the Account Setup section, add the client’s identifier supplied by First Advantage.
In the Email field in the Account Setup section, add the email associated with the client’s First Advantage account.
Optional. In the Secret Key field in the Account Setup section, add the First Advantage
From the Available Industries list in the Associated Industries section, select the industries configured for the supplier you want to include in the First Advantage integration. Use the Arrow icons to move the industries from Available to Selected.
Select OK. A message displays indicating your changes were saved, and the First Advantage background check account is activated in Enterprise.
You’re done setting up First Advantage accounts in Enterprise. The First Advantage background check provider integration is automatically synchronized with Enterprise after 24‑hours.
Setting up background check packages
Via self-service, you can add, edit, or delete First Advantage background check packages anytime you need as your organization’s screening requirements change. Your updates are immediately applied to Enterprise and to requests in progress.
TIP: Although you can delete a background check package you’ve configured, you cannot delete a background check associated with records in Enterprise. For example, you create an IT Reference Background Check packageand a request is created using it. You cannot delete the IT Reference Background Check package.
You can configure background check packagesto match requirements based on industry, request type, and/or work location. When you create a new background check package, a separate instance is created for each industry so you can customize requirements that might vary by the work location for an assignment or by request type.
You have these options when you create a background check packages:
Associate the background check with an industry only
Associate the background check with an industry and a work location
Associate the background check with an industry and a request type
Make the background check required or make the background check optional
When you associate a background check package with only an industry and not a request type, your users are directed to a list of background check packages associated with the industry in which they’re creating a request.
When you associate a background check package with an industry and a work location, the background check packages default to those you associated with the work location.
When you associate a background check package with an industry and a request type, your users are directed to a list of background check packages associated with the type of request they’re creating. They can pick one or more background check packages based on your requirements.
When background check packages aren’t specified for a work location, the background check packages associated with the request type are used. When background check packages are set up for a work location and for the request type and the background check packages differ, the background check packages associated with the work location are applied to the request.
To set up First Advantage background check packages, complete these steps from your Enterprise dashboard.
Select Background Checks. A Background Checks page displays
Select Add New. An Add Background Check page displays.
From the Available list in the Industry section, select the business type and location to which you want to apply your background check. Use the Arrows to move your choices to the Selected list.
In the Name field, enter a label for your background check. For example, you might have a background check that applies to all administrative personnel in every location where you do business. You might label that background check International Administrative Staff.
In the Description box, enter an explanation for how the background check is used for your organization. For example, you might require reference checks from previous employers
In the Code field, add an abbreviation for the Background Check.
From the Comments list, choose whether remarks are required or optional.
From the Completed Date list, choose whether recording the date when the background check was completed is required or optional.
From the Status list, choose whether recording the standing of the background check, such as Open, Pending, Completed, is required or optional.
Select OK to save your selections, close the Add Background Check page, and return to the Background Checks page.
After you’ve outlined the basic information and background check flags, you can also define the request types to which the background check applies. To associate a Background Check with a request type, continue with step 13. Otherwise, go to step 21.
From the Background Checks page, locate and select the link for the background check you just created. A View Background Check Details page displays.
Select Edit. An Edit Background Check page displays.
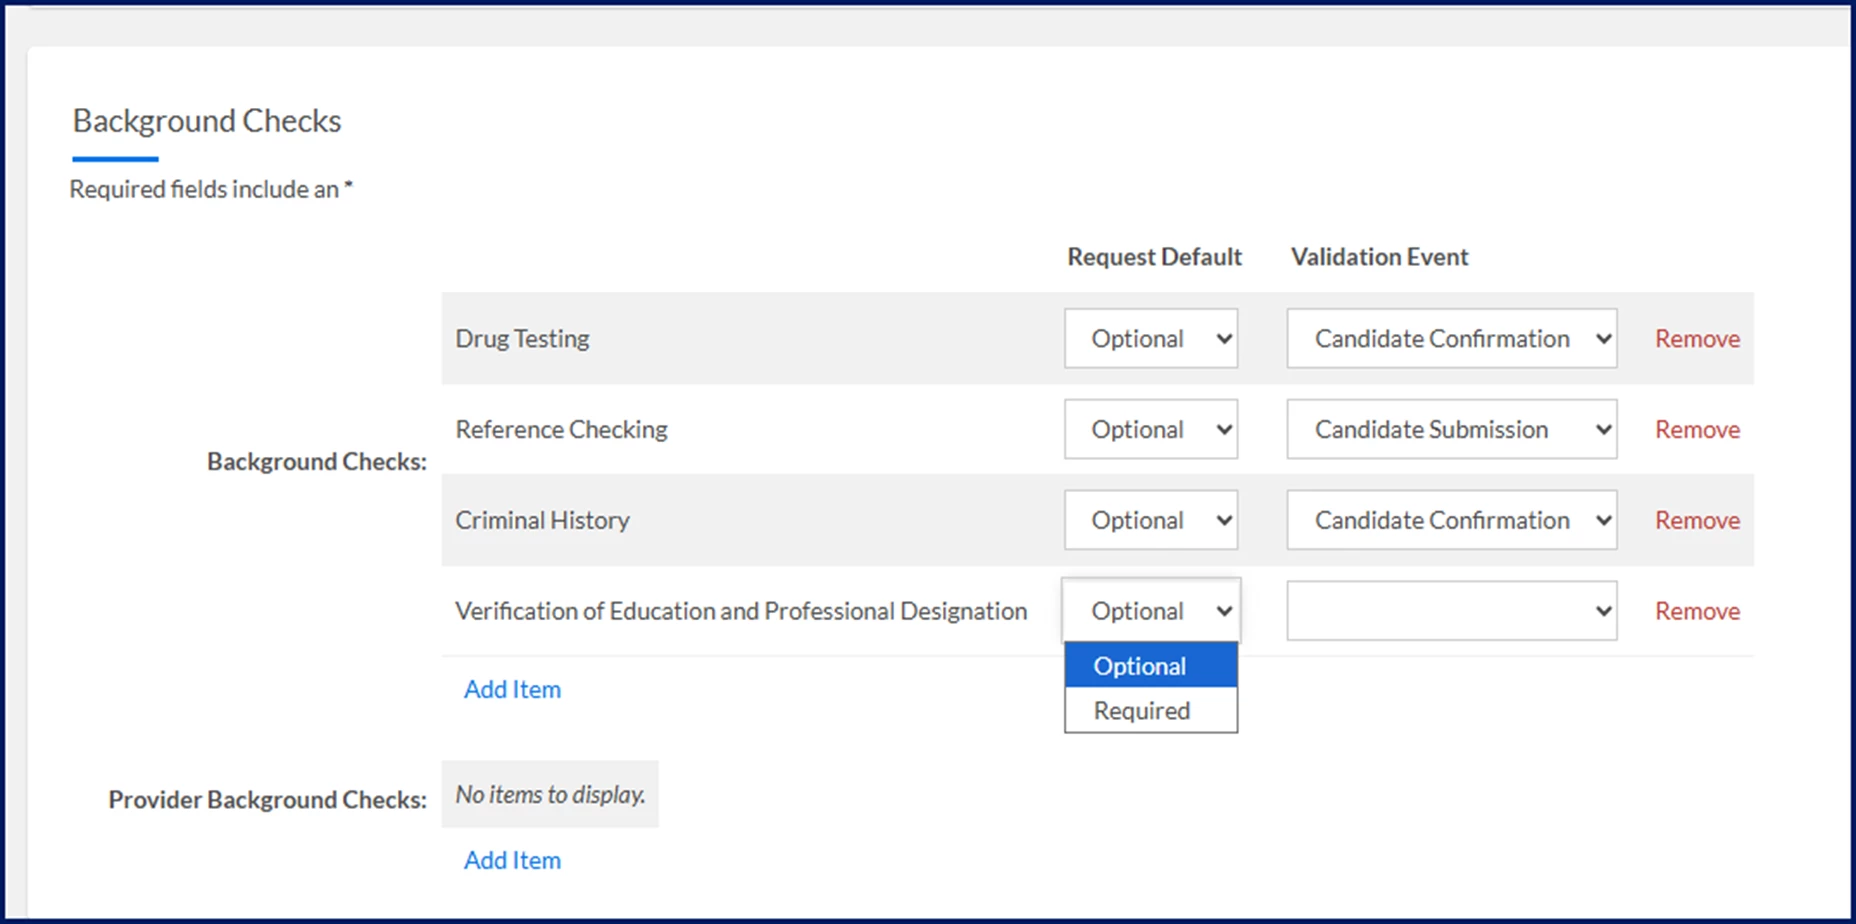
From the Request Types list, choose the kind of request to which the background check applies.
From the Request Default, select Required or Optional to specify whether the background check is mandatory for the request type you selected.
From the Validation Event list, select which step in your workflow triggers the background check. TIP: If you choose Candidate Submission or Offer Acceptance, your Approval Workflows are used to ensure background checks are confirmed at the appropriate phase.
Repeat steps 15 to 17 to associate more request types with your background check.
Select OK to save your selections, close the Edit Background Check page, and return to the Background Checks page.
Repeat steps 3 through 19 for each background check packageyou want to create.
From the Background Checks page, select Return to exit that page and return to the Contingent Staffing page.
The background check packages you created are available in Enterprise.
Adding packages to your request types
To ensure that background check data is correctly gathered when requests are created, you must associate the applicable packages to your Request Types.
To add First Advantage background check packages to your Request Types, complete these steps from your Enterprise dashboard.
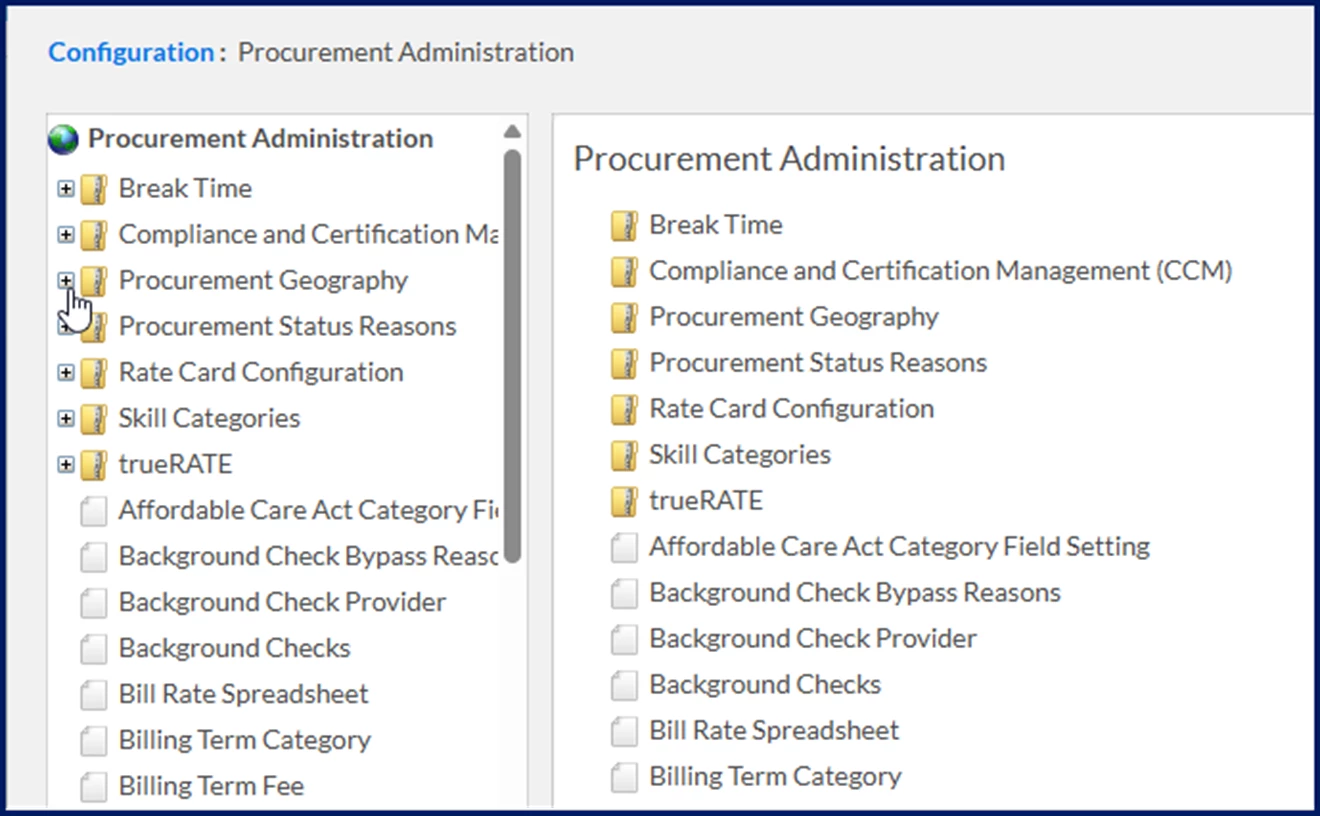
Select Admin > Procurement. A Procurement Administration page displays.
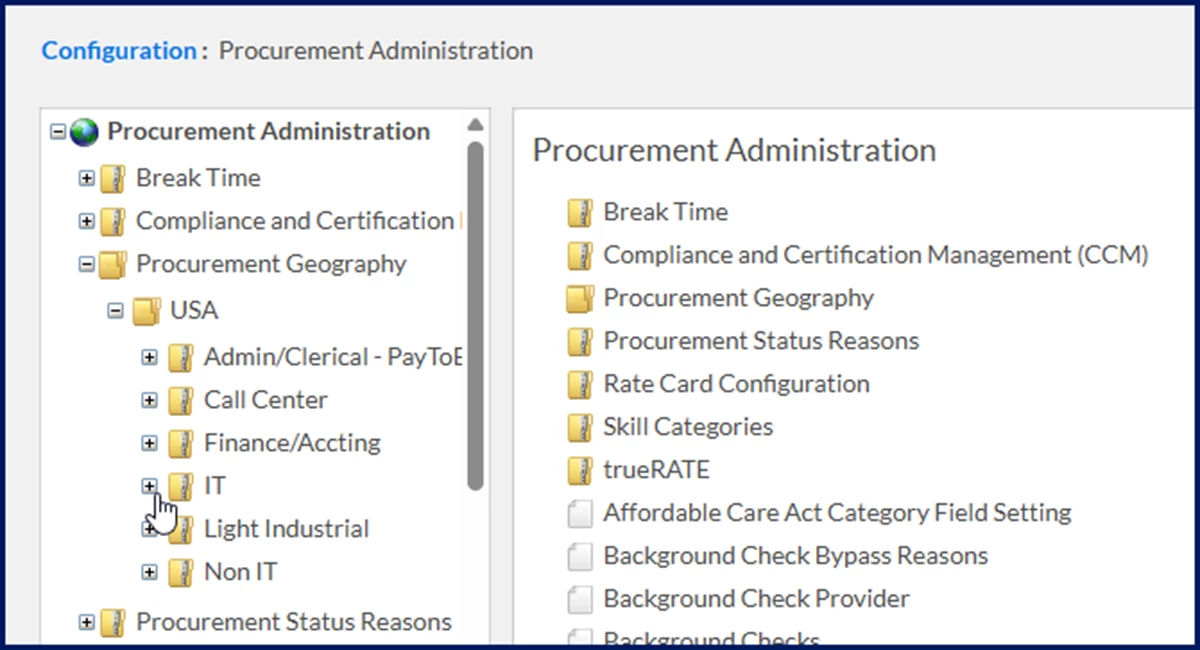
From the left navigation, expand the Procurement Geography folder.
Expand the Geography folder for the locale you want to set up.
Expand the Industry folder for the line of business you want to set up.
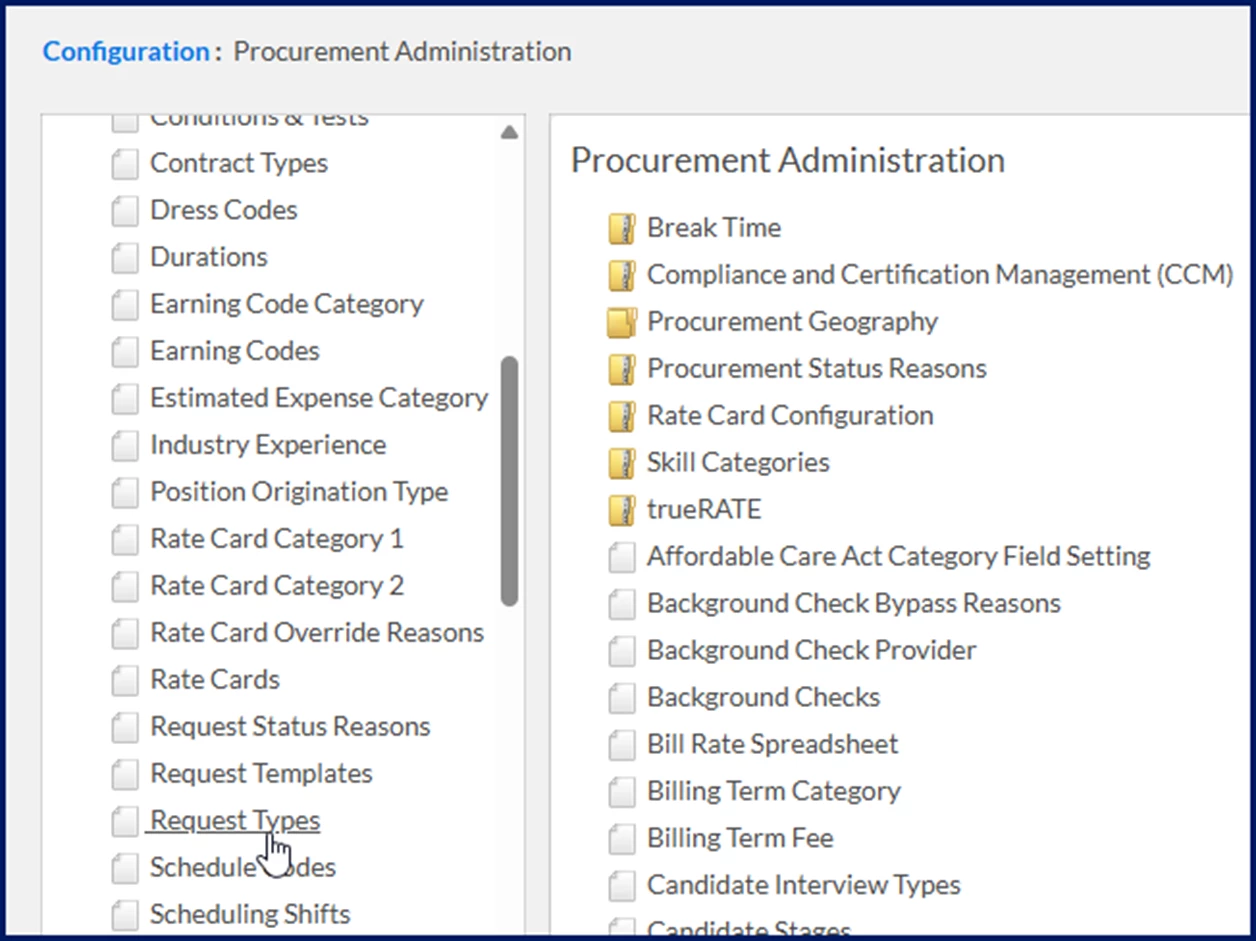
Scroll down to and select the Request Types link. A Request Types page displays.
Locate and select the request type you want to configure. You can use Search to streamline finding the one you want. A View Request Type Details page displays.
Select Edit. An Edit Request Type page is displayed.
Scroll down to the Background Checks section.
To add Enterprise background check packages to the request type for the geography and industry you selected, complete these steps in the Background Checks section.
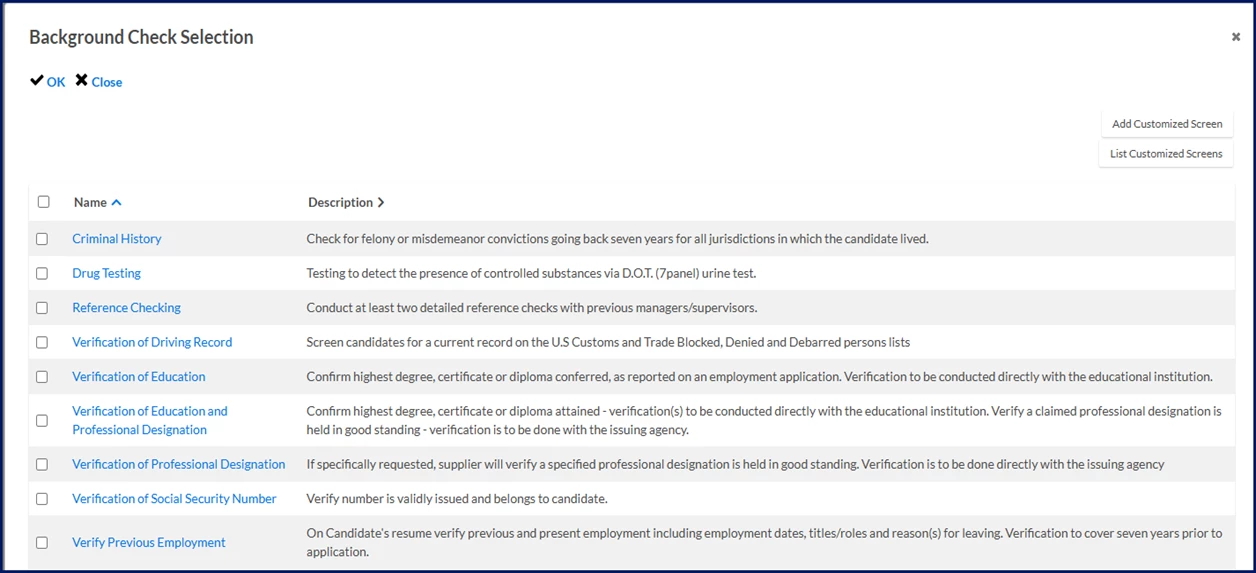
In the Background Checks section, select Add Item to open the Background Check Selection dialog.
Choose the unit you want to add from the available background check packages set up for the industry you selected and select OK. Additional fields display in the Background Checks section.
From the Request Default list, choose whether to make the background check package required or optional.
From the Validation Event list, choose the workflow action from which the user must select background check package, such as Optional, Candidate Confirmation or Candidate Submission.
Repeat a through d to designate additional background check packages.
To add First Advantage background check packages to the request type for the geography and industry you selected, complete these steps in the Background Checks section.
In the Provider Background Checks section, select Add Item to open the Background Check Selection dialog.
Choose the unit you want to add from the available background check packages set up for the industry you selected and select OK. Additional fields display in the Provider Background Checks section.
From the Request Default list, choose whether to make the background check package required or optional.
From the Validation Event list, choose the workflow action from which the user must select background check package, such as Optional, Candidate Confirmation or Candidate Submission.
Repeat a through d to designate additional background check packages.
In the Rate Card Categories section, complete the required fields and any fields applicable to your program’s workflows.
In the Fields section, complete any fields applicable to your program’s workflows.
In the Streamlined Procurement section, complete the required fields and any fields applicable to your program’s workflows.
In the Streamlined Procurement - Resource section, complete the required fields and any fields applicable to your program’s workflows.
In the Flags section, complete the required fields and any fields applicable to your program’s workflows.
In the Offer & Submission Flags section, complete the required fields and any fields applicable to your program’s workflows.
In the Fiscal Management section, complete any fields applicable to your program’s workflows.
In the User Defined Views section, complete any fields applicable to your program’s workflows.
In the Agency Worker Regulations section, complete any fields applicable to your program’s workflows.
In the Client Bill Rate section, complete the required fields.
In the Timesheets section, complete the required fields.
In the Miscellaneous section, complete the required fields and any fields applicable to your program’s workflows.
Select OK to apply your changes and close the Request Types page.
The background check packages you designated on a Request Type can now be associated with a Request Template.
Including background check packages in your request templates
To automatically display the applicable background check packages when a user creates a requisition, you must add the appropriate packages to your Request Templates.
To add First Advantage background check packages to your Request Templates, complete these steps from your Enterprise dashboard.
Select Admin > Procurement. A Procurement Administration page displays.
From the left navigation, expand the Procurement Geography folder.
Expand the Geography folder for the locale you want to set up.
Expand the Industry folder for the line of business you want to set up.
Scroll down to and select the Request Templates link. A Request Templates page displays.
Select Add New. An Add Request Template page displays.
From the Procurement Type list, select which sourcing type you want to set up, such as Contingent Staffing, Services Procurement or Resource Tracking.
From the Job Family list, select which group of job titles the template applies to.
From the Job Title list, select which job title the template applies to.
Select the Active checkbox to make the template available in Enterprise.
In the General Information section, complete any fields applicable to your program’s workflows.
From the Rate Card Class list in the Rate Card Information section, select the pricing model that defines the standardized bill rates for different job roles, skill levels, and locations in your program.
In the Labor Category Experience section, complete any fields applicable to your program’s workflows.
In the Certifications section, complete any fields applicable to your program’s workflows.
In the Conditions & Tests section, complete any fields applicable to your program’s workflows.
In the Skills section, complete any fields applicable to your program’s workflows.
The Request Type Provider Background Checks section shows background check packages associated with the Request Type. They can’t be edited from the Request Templates page.
To add Enterprise background check packages to the request template for the geography and industry you selected, complete these steps in the Background Checks section.
In the Request Template Background Checks section, select Add Item. Additional fields display.
Select the Search icon to open the Background Check Selection dialog.
Choose the unit you want to add from the available background check packages set up for the industry you selected and select OK.
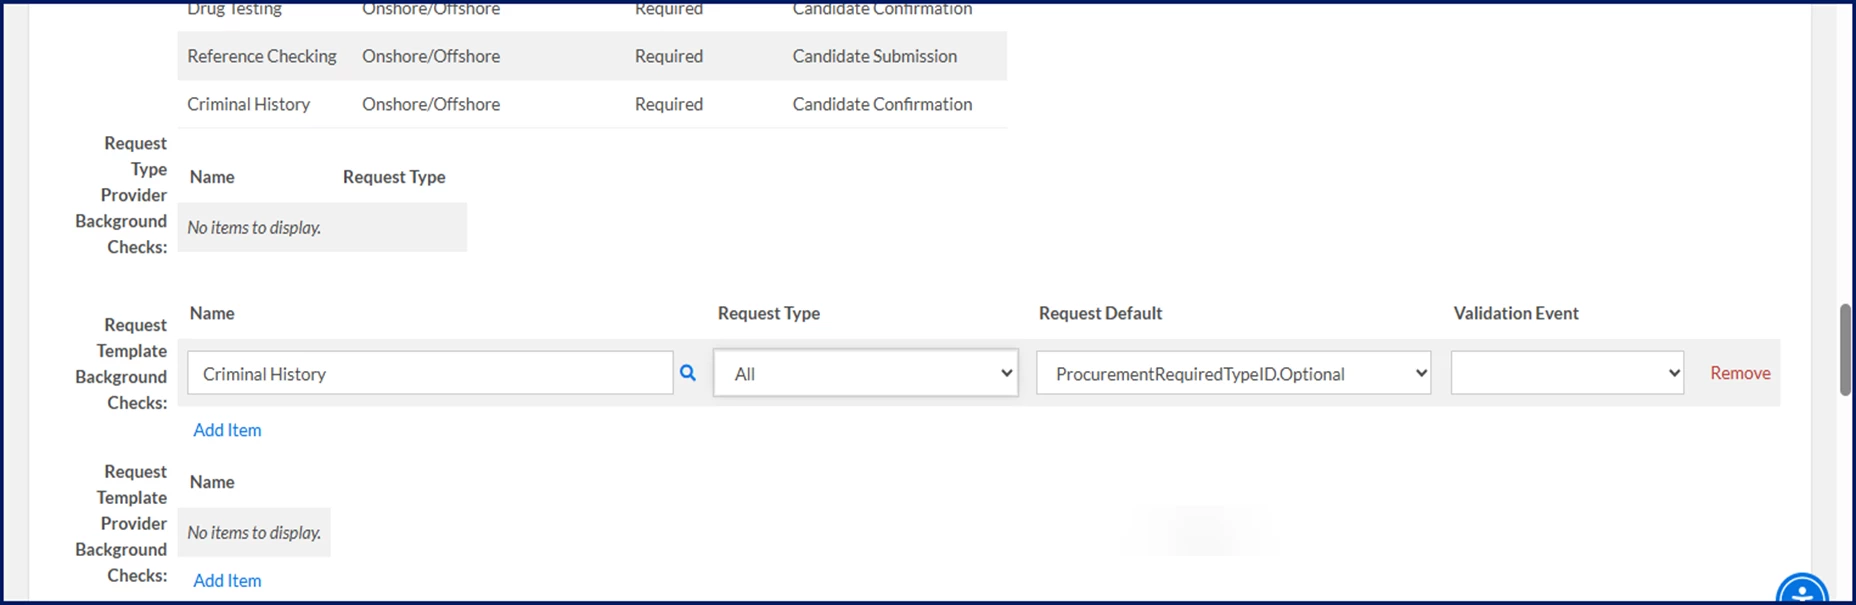
From the Request Type list, choose the kind of requisition you want the template to apply to.
From the Request Default list, choose whether to make the background check package required, optional or not applicable.
From the Validation Event list, choose the workflow action from which the user must select background check package, such as Optional, Candidate Confirmation or Candidate Submission.
Repeat a through f to designate additional background check packages.
To add First Advantage background check packages to the request template for the geography and industry you selected, complete these steps in the Background Checks section.
In the Request Template Provider Background Checks section, select Add Item. Additional fields display.
Select the Search icon to open the Background Check Selection dialog.
Choose the unit you want to add from the available background check packages set up for the industry you selected and select OK.
From the Request Type list, choose the kind of requisition you want the template to apply to.
From the Request Default list, choose whether to make the background check package required, optional or not applicable.
From the Validation Event list, choose the workflow action from which the user must select background check package, such as Optional, Candidate Confirmation or Candidate Submission.
Repeat a through f to designate additional background check packages.
In the Suppliers section, complete any fields applicable to your program’s workflows.
In the Instructions section, complete any fields applicable to your program’s workflows.
In the Attachments section, complete any fields applicable to your program’s workflows.
In the Agent Worker Regulations section, complete any fields applicable to your program’s workflows.
Optional. To apply your changes and create a new request template, select Save and Add New.
Select OK to apply your changes and close the Request Templates page.
The background check packages you designated are automatically available when a user creates a requisition based on the Request Template you configured.
Please complete the following fields as part of your Beeline Community registration. Unless noted as private, this information will be displayed on your user profile within the community.