
Table of Contents
My Data
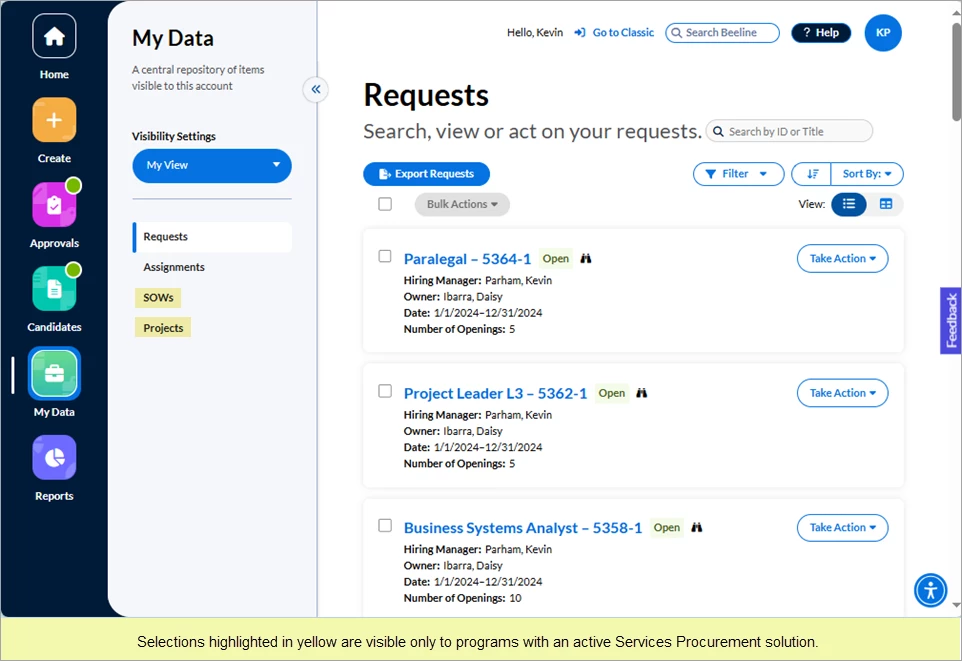
The My Data app highlights YOUR records and YOUR actions. Request, Assignment, SOW, and Project records are visible to both the Hiring Manager as well as the Hiring Manager’s manager, making these records visible and actionable by both.
Visibility Settings
Beeline Enterprise is workflow driven. You can easily check the current status of a workflow by viewing the associated visual Process Graph throughout the various workflow steps. However, it can be just as critical to know “who” is responsible for taking action in addition to “what” action needs to be taken. By hovering over the binoculars icon visible on the various card and table views throughout the My Data app you can easily determine “who” the responsible person is—and why.
Depending on the scope of your Beeline Enterprise instance, you could be a Hiring Manager, a Hiring Manager’s Manager, an SOW owner, or a Project Manager. And then there’s all those workflow-related tasks such as requestor, approver, timesheet approver, sponsor, or contributor—or just being the one responsible for system data when it isn’t even associated with an active task. Simplify all this oversight responsibility by using the filter options and the Setup delegate hyperlink located in the Visibility Settings section (left-side slide-out panel) of your My Data app to choose the data you want to view and focus on.
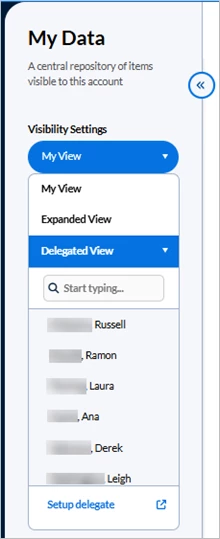
Click the My View tab to reveal the filter selection list.
Visibility Settings filter options include:
|
|
♦ My View – Select this option to retrieve and display all the Requests, Assignments, SOWs, and Projects for which you are the direct Hiring Manager, SOW Owner, or Project Manager. This is the system default view, and the data displayed in this view belongs only to you. Hover over the binoculars icon of any record, and a pop-up indicates why you have visibility to it. 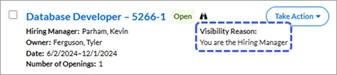 ♦ Expanded View – Select this option to retrieve and display your My View records along with all the records and data associated to the managers you manage. Hover over the binoculars icon and check the pop-up text for your visibility details as to the data where you are a requestor, an approver, a timesheet approver, a sponsor, or a contributor. 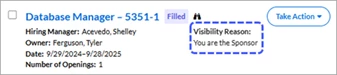 ♦ Delegated View – Select this option to retrieve and display all the Requests, Assignments, SOWs, and Projects delegated to you by another user. Hover over the binoculars icon to verify that you are the delegate. 
|
Working with Multiple Delegator Lists
Click Delegated View in the Visibility Settings panel and the panel expands to list each Delegator by name—up to a total of six names. A search box displays above the list when you have more than six Delegators. Click any name in the list and your screen refreshes to display the records delegated to you by that Delegator for the category (Requests, Assignments, SOWs, Projects) you currently have open. Or use the search box to enter a name and change your records display to a different Delegator’s records. The system retains the Delegator’s name as the active filter even when you switch from one category to another within the My Data app. Navigate away from the My Data app and the system reverts to the default view (My View) or to the “favorite” view you previously selected.
How to set a Favorite / Preferred View
As noted, the My Data view is the system default. However, when you click Expanded View, the system sets that option as your new “favorite” or preferred view. This “favorite” setting is retained even if you navigate to different apps within the Hiring Manager Experience. It is also retained when you log out, and log back in. You can change your “favorite” back to My View simply by clicking its button tab.
Please note, whenever you clear the cookies or cache on your web browser, your Visibility Settings will return to the default settings. Delegated View is a Visibility Settings option but it cannot be set as a “favorite”.
Setup Delegate
You also have easy access to assign a delegate directly from the Visibility Settings. Simply click the Setup delegate hyperlink and the system navigates you to your Manage Preferences screen. Click Delegates under Manage Preferences, then click + Add New. Follow the prompts to fill in the Delegate, Date, and Approvals sections. Additional settings can be added for Reports, Delegate Subordinate, Visibility, and Impersonation. Click OK to save your changes.
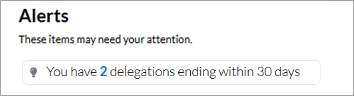
If you enter an End Date when you assign a delegate, Beeline Enterprise tracks that date and posts an Alert on your Home screen to let you know in advance when the delegation rights are about to expire. This reminder helps you keep your delegates “active” as needed.
Be aware: These Visibility Settings are only functional within the My Data app. They are not included in Classic Beeline or any other app within the Hiring Manager Experience.
Requests
♦ Card View
The Card View displays each record as a separate section (card). Cards are arranged in a scrollable list based on the default value or selected option set under the Filter and/or Sort By selection lists.
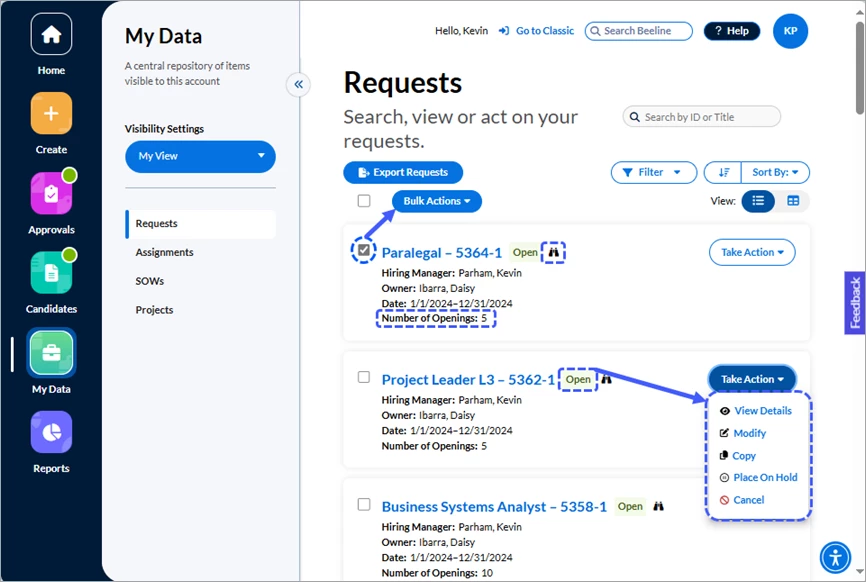
Each card displays summary information for a single Request record. Click the hyperlinked Job Title and the screen refreshes to display the Request Dashboard with access to full details including the visual Process Graph. The current status of the Request displays after the hyperlinked text. Hover over the binoculars icon to view the Visibility information.
Other card features include:
- Search by ID or Title – This search field filters your results to display records with an Open status. Use the Search Beeline field at the top of the screen to make unfiltered searches that include closed records.
- Filter – Lets you select which records to display in your card list by status. Pick any combination (or limitation) by Pending, Open, On Hold, Cancelled, Filled, Rejected, Not Submitted, or Correction Required. Multiple statuses can be selected—remember to click Apply at the bottom of the list to activate your selection(s). The default setting is Open.
- Sort By – Gives you the option to arrange your card list by Request ID, Job Title, or Status. The default setting is Request ID.
- View – Click the respective icon to easily switch from Card to Table View.
- Take Action – Click the button to reveal which action options are valid for your current setting. The Action options change depending on the current status of the record.
- Checkbox / Bulk Actions – Click the checkbox for each record you want to group together for a bulk (batch) action. The Bulk Actions button only activates when at least one checkbox is ‘checked’. Batching items into groups in order to take the same action for all the records in the group is an efficient way to save time and effort!
- Export Requests – Need to extract a list of your Requests? A single click of the Export Requests button and your requests list is exported as a download in xlsx format.
♦ Table View
The alternative display option is the Table View. This option lets you see more data by using less vertical space. Use this option to view content arranged in rows and columns like a spreadsheet, or to easily compare one record to another.
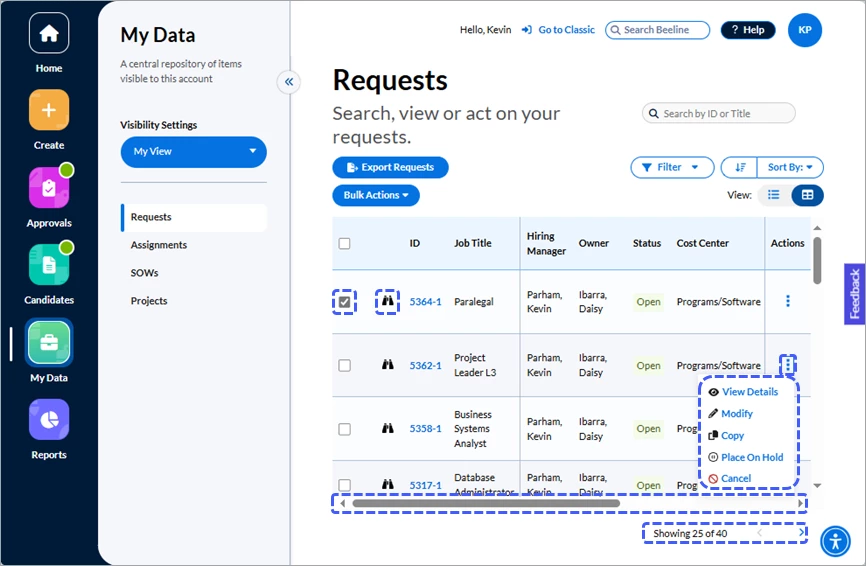
The Table View retains several of the features of the Card View. Click the hyperlinked Request ID number to navigate to the Request Dashboard with access to full details including the visual Process Graph. The current status of the Request displays as a column in the table. Hover over the binoculars icon to view the Visibility information.
Other table features include:
- Search by ID or title – This option filters your results to display records with an Open status. Use the Search Beeline field at the top of the screen to make unfiltered searches that include closed records.
- Filter – Lets you select which records to include in your table by status. Pick any combination (or limitation) by Pending, Open, On Hold, Cancelled, Filled, Rejected, Not Submitted, or Correction Required. Multiple statuses can be selected—remember to click Apply to activate your selection(s). The default setting is Open.
- Sort By – Gives you the option to arrange your table rows by Request ID, Job Title, or Status. The default value is Request ID.
- View – Click the respective icon to easily switch from Card to Table View.
- Checkbox / Bulk Actions – Click the checkbox for each record you want to group together for a bulk (batch) action. The Bulk Actions button only activates when at least one checkbox is ‘checked’. Batching items into groups in order to take the same action for all the records in the group is an efficient way to save time and effort!
- Export Requests – Need to extract a list of your Requests? A single click of the Export Requests button and your Requests list is exported as a download in xlsx format.
Additional Table View features include:
- Actions is now a locked column on the right side of the table. Click the kebab icon (⋮) to reveal which actions can be taken on any given row. The Actions options change depending on the current status of the record.
- Tally Numbers – The “Showing” text below the table layout indicates how many records are displayed out of how many total records are available.
- Horizontal scroll bar -- The scrollbar beneath the table layout gives you full access to all columns included in the table for those who have screen dimensions not able to accommodate the full width of the table. The ID, Job Title, and Actions are locked columns and will always be visible.
TIP:You can maximize your table layout space by hiding the My Data slide-out panel. Just click the double arrow slider button to hide it. Click it again at any time to restore visibility to the panel.
Assignments
It may seem curious, but the Assignment process in Beeline Enterprise starts once the Supplier has accepted the Offer. The assignment record is then created with a status of Scheduled and stays in this state of anticipation until the Assignment Start Date is reached. Once the worker is onboarded, the assignment becomes Active and stays in this status until the scheduled Assignment End Date—unless the assignment is amended. Reasons to amend an assignment might include an Assignment Extension or an Assignment Early Termination. In some instances, an Assignment Amendment may be to change the assigned Hiring Manager or Timesheet Approver. Timesheet reprocessing can also generate an assignment amendment. Throughout the duration of any amendment process, the assignment has a status of Pending Approval until the amendment is complete.
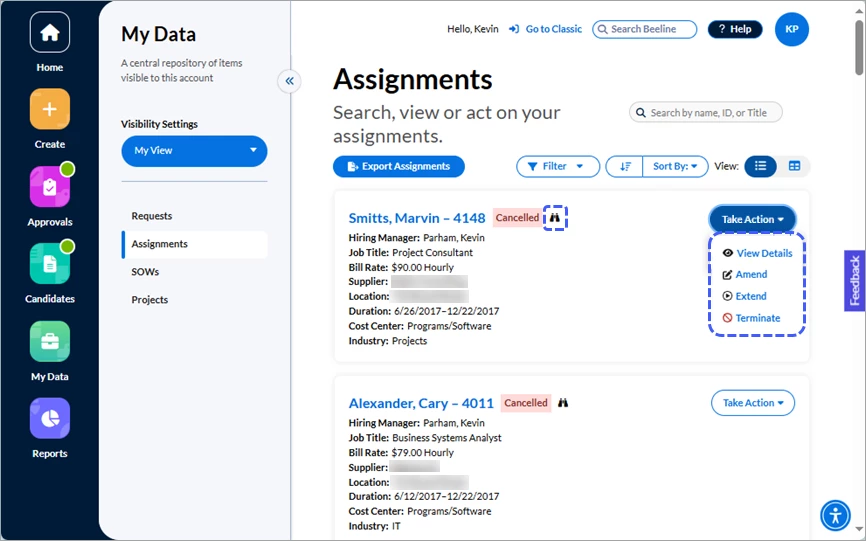
♦ Card View
The Card View displays each record as a separate section (card). Cards are arranged in a scrollable list based on the default value or selected option set under the Filter and/or Sort By selection lists.
Each card displays summary information for that assignment record. Click the worker’s hyperlinked name and the screen refreshes to display the Assignment Dashboard with access to full details.
Each card displays summary information for a single Assignment record. Click the worker’s hyperlinked name and the screen refreshes to display the Assignment Dashboard with access to full details including the visual Process Graph. The current status of the Assignment displays after the hyperlinked worker’s name. Hover over the binoculars icon to view the Visibility information
Other features include:
- Search by name, ID, or title – This search field filters your results to display active assignments only. Use the Search Beeline field at the top of the screen to make unfiltered searches that include closed records.
- Filter – Lets you select which assignment statuses to display in your card list. Pick any combination (or limitation) by Active, Scheduled, Expired, or Cancelled. Multiple statuses can be selected—remember to click Apply at the bottom of the list to activate your selection(s). The default setting is Active.
- Sort By – Gives you the option to arrange your card list by Assignment ID, End Date, Job Title, Name, Start Date, or Supplier. The default setting is Assignment ID.
- View – Click the respective icon to easily switch from Card to Table View.
- Take Action – Click the button to reveal which action options are valid for the respective assignment. The Action list will change depending on the current status of the assignment record.
- Tally Numbers – Scroll to the bottom of the screen to view the “Showing” text which indicates how many records are displayed out of how many total records are available.
- Export Assignments – Need to extract a list of your Assignments? A single click of the Export Assignments button and your assignments list is exported in xlsx format.
♦ Table View
The alternative display option is the Table View. This option lets you see more data by using less vertical space. Use this option to view content arranged in rows and columns like a spreadsheet, or to easily compare one record to another.
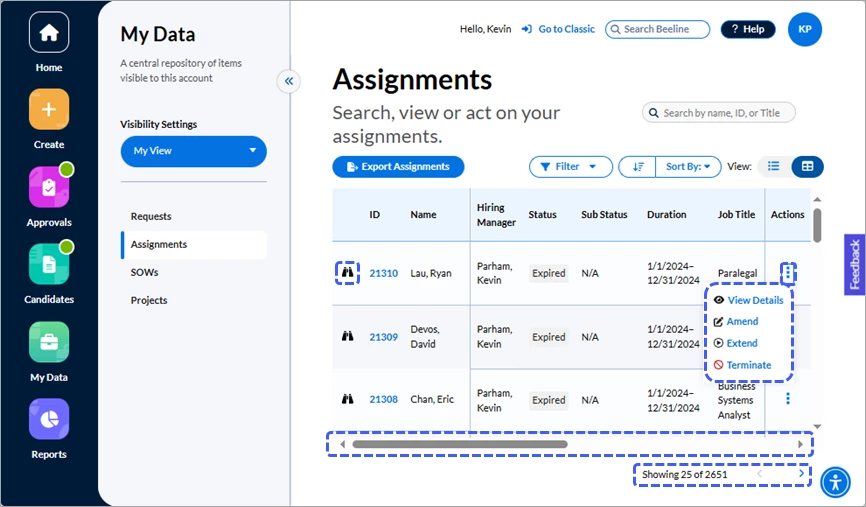
The Table View retains several of the features of the Card View. Click the hyperlinked worker’s name to navigate to the Assignment Dashboard with access to full details including the visual Process Graph. The current status of the Assignment displays as a column in the table. Hover over the binoculars icon to view the Visibility information.
Other table features include:
- Search by name, ID, or title – This column filters your results to display active assignments only. Use the Search Beeline field at the top of the screen to make unfiltered searches that include closed records.
- Filter – Lets you select which records to include in your table by status. Pick any combination (or limitation) by Active, Scheduled, Expired, or Cancelled. Multiple statuses can be selected—remember to click Apply to activate your selection(s). The default setting is Active.
- Sort By – Gives you the option to arrange your card list by Assignment ID, End Date, Job Title, Name, Start Date, or Supplier. The default value is Assignment ID.
- View – Click the respective icon to easily switch from Card to Table View.
- Export Assignments – Need to extract the table in xlsx format? Just click the Export Assignments button.
Additional Table View features include:
- Actions is now a static column locked on the right side of the table layout. Click the kebab icon (⋮) to reveal which actions can be taken on any given row. The Actions options change depending on the current status of the record.
- Tally Numbers – The “Showing” text below the table layout indicates how many records are displayed out of how many total records are available.
- Horizontal scroll bar -- The scrollbar beneath the table layout gives you full access to all columns included in the table for those who have screen displays not able to accommodate the full width of the table. The ID, Name, and Actions are locked columns and will always be visible.
TIP: You can maximize your table layout space by hiding the My Data slide-out panel. Just click the double arrow slider button to hide it. Click it again at any time to restore visibility to the panel.
Assignment Status
Some data remains constant throughout the lifecycle of the assignment while other data may change depending on the current status of the assignment. Checking the Status first is a way to remember which data may be “temporary”.
TIP: ALWAYS CHECK THE AMENDMENT HISTORY SECTION of the assignment record to verify whether there are any other “open” amendments! You can have multiple active amendments but the time durations should not overlap or one could negatively impact the other. You cannot take action on an assignment when it is in a “Pending Approval” status. Always check the status BEFORE processing an assignment amendment!
• Assignments Pending Approval
An assignment can be amended for any number of reasons. Some amendments are simple information updates while others are event/budget related such as extensions or terminations. Regardless of the reason for the amendment, once it is submitted any amendment that requires approval (financial or administrative) is placed in the Pending Approval queue.
• Scheduled Assignments
An assignment record has a status of Scheduled from the date the Supplier accepts the Offer until the Assignment Start Date when the worker is onboarded. This may be just a transitional waiting period although it is typically used to complete pre-onboarding activities (for example, background checks, badging, etc.)
• Active Assignments
An assignment is “active” from the Start Date until its End Date. Either of those dates can be adjusted using the assignment amendment process, but the time period between those two dates will always determine the “active” status.
SOWs
The SOW (Statement of Work) is a phase of the Services Procurement solution used to scope out the terms and conditions of the proposed work Project. Once the terms and conditions are agreed upon between the client and the vendor, the SOW is promoted to an active Project. The Project is used to manage the terms and conditions detailed in the SOW.
♦ Card View
The Card View displays each record as a separate section (card). Cards are arranged in a scrollable list based on the default value or selected option set under the Filter and/or Sort By selection lists.
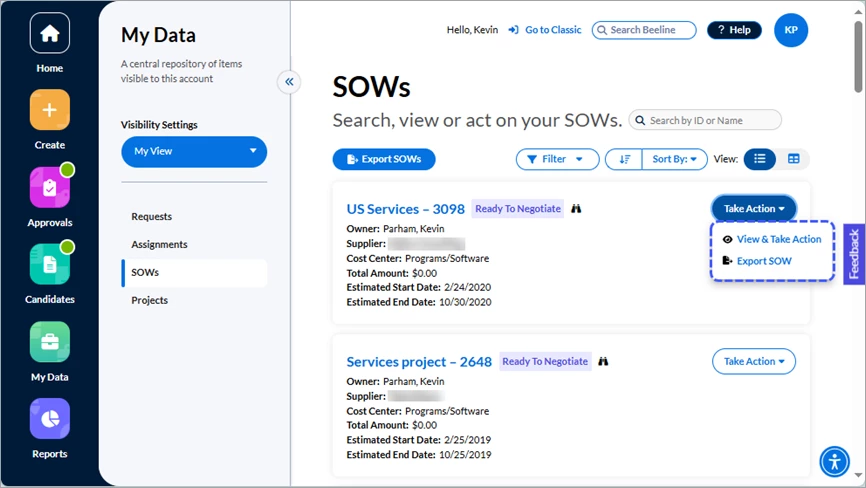
Each card displays summary information for a single SOW record. Click the hyperlinked SOW name - ID and the screen refreshes to display the SOW Dashboard with access to full details including the visual Process Graph. The current status of the SOW displays after the hyperlinked text. Hover over the binoculars icon to view the Visibility information.
Other features include:
- Search by ID or Name – Use this search field when you want to retrieve a specific SOW by its ID number or Name. The default setting for this search field limits your results to SOWs that have been active within the prior 365 days. Use the Search Beeline field at the top of the screen to make unfiltered searches that include older records.
- Filter – Lets you select which records to display in your card list by status. Pick any combination (or limitation). Multiple statuses can be selected—remember to click Apply at the bottom of the list to activate your selection(s). The Project End Date filter at the top of the list is active by default to focus on active SOWs—if you need to include historical records in your search results, just uncheck this box. Be aware that your record retrieval time could be impacted if your program has a large inventory of SOWs!
- Sort By – Gives you the option to arrange your card list by SOW ID, Status, or Supplier. The arrow on the left will switch the display order from descending to ascending, click again to switch it back.
- View – Click the respective icon to easily switch from Card to Table View.
- Take Action – Click the button to reveal which action options are valid for the respective SOW. The standard options are View & Take Action and Export SOW.
- Tally Numbers – Scroll to the bottom of the screen to view the “Showing” text which indicates how many records are displayed out of how many total records are available. The standard display is 25 cards per screen. Click the “Load next ##” button to ADD more cards to your screen display. Repeat as needed if you want to create a list of ALL records that match your filter selections. Be aware that your system response time could be impacted if you create long lists!
- Export SOWs – Need to extract a list of your SOWs? A single click of the Export SOWs button and your SOW list is exported as a download in xlsx format.
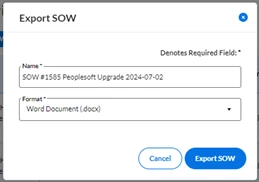
- Download SOW – Need a copy of a specific SOW document? Click the “Export Sow” option on the Take Action menu to retrieve a copy of the SOW document in either docx, doc, or pdf format.
♦ Table View
The alternative display option is the Table View. This option lets you see more data by using less vertical space. Use this option to view content arranged in rows and columns like a spreadsheet, or to easily compare one record to another.
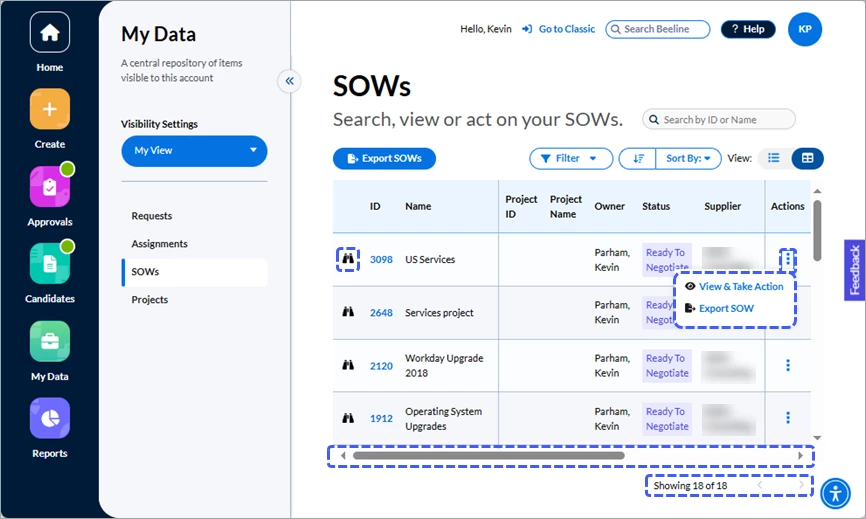
The Table View retains several of the features of the Card View. Click the hyperlinked ID number to navigate to the SOW Dashboard with access to full details including the visual Process Graph. The current status of the SOW displays as a column in the table. Hover over the binoculars icon to view the Visibility information.
Other table features include:
- Search by ID or Name – Use this search field when you want to retrieve a specific SOW by its ID number or Name. This search field limits your results to SOWs that have been active within the prior 365 days. Use the Search Beeline field at the top of the screen to make unfiltered searches that include older records.
- Filter – Lets you select which records to display in your table by status. Pick any combination (or limitation). Multiple statuses can be selected—remember to click Apply at the bottom of the list to activate your selection(s). The Project End Date filter at the top of the list is active by default to focus on active SOWs—if you need to include historical records in your search results, just uncheck this box. Be aware that your record retrieval time could be impacted if your program has a large inventory of SOWs!
- Sort By – Gives you the option to arrange your table view by SOW ID, Status, or Supplier. The arrow on the left will switch the display order from descending to ascending, click again to switch it back.
- View – Click the respective icon to easily switch from Table to Card View.
- Export SOWs – Need to extract a list of your SOWs? A single click of the Export SOWs button and your SOW list is exported as a download in xlsx format.
Additional Table View features include:
- Actions is now a locked column locked on the right side of the table layout. Click the kebab icon (⋮) to reveal which actions can be taken on any given row. Use the Export SOW option in this selection list to export an individual SOW (doc, docx, or PDF format) or use the Export SOWs button located above the table to download the list of SOWs in xlsx format.
- Tally Numbers – The “Showing” text at the bottom of the screen indicates how many records are displayed out of how many total records are available. The standard display is 25 records (rows) per screen. Click the arrow symbol to change your table display to the next 25 records. Repeat as needed to cycle through ALL the records. Unlike the card view, the table view does not expand to display more than a 25 record max limit.
- Horizontal scroll bar -- The scrollbar beneath the table layout gives you full access to all columns for those who have screen dimensions not able to accommodate the full width of the table. The ID, Name, and Actions are locked columns and will always be visible.
TIP: You can maximize your table layout space by hiding the My Data slide-out panel. Just click the double arrow slider button to hide it. Click it again at any time to restore visibility to the panel.
Projects
Once the terms and conditions are agreed upon between the client and the vendor, the SOW is promoted to an active Project. The Project is used to manage the terms and conditions agreed upon in the SOW.
♦ Card View
The Card View displays each record as a separate section (card). Cards are arranged in a scrollable list based on the default value or selected option set under the Filter and/or Sort By selection lists.
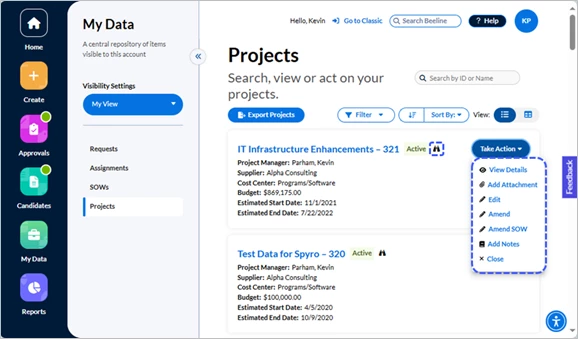
Each card displays summary information for a single Project record. Click the hyperlinked Project name - ID and the screen refreshes to display the Project Dashboard with access to full details. The current status of the Project displays after the hyperlinked text. Hover over the binoculars icon to view the Visibility information.
Other features include:
- Search by ID or Name – Use this search field when you want to retrieve a specific Project by its ID number or Name. The default setting for this search field limits your results to Projects that have been active within the prior 365 days. Use the Search Beeline field at the top of the screen to make unfiltered searches that include older records.
- Filter – Lets you select which Project statuses to display in your card list. Pick any combination (or limitation). Multiple statuses can be selected—remember to click Apply at the bottom of the list to activate your selection(s). The Project End Date filter at the top of the list is active by default to focus on active Projects—if you need to include historical records in your search results, just uncheck this box. Be aware that your record retrieval time could be impacted if your program has a large inventory of Projects!
- Sort By – Gives you the option to arrange your card list by Project ID, Project Name, Status, or Supplier. The arrow on the left will switch the display order from descending to ascending, click again to switch it back.
- View – Click the respective icon to easily switch from Card to Table View.
- Take Action – Click the button to reveal which action options are valid for that Project. The standard options are View Details, Add Attachment, Edit, Amend, Amend SOW, Add Notes, and Close.
- Tally Numbers – The “Showing” text visible when you scroll to the bottom of your screen indicates how many “cards” are displayed out of how many total records are available. The standard display is 25 cards per screen. Click the “Load next ##” button to ADD more cards to your screen display. Repeat as needed if you want to create a list of ALL records that match your filter selections. Be aware that your system response time could be impacted if you create long lists!
- Export Projects – Need to extract a list of your Projects? A single click of the Export Projects button and your Project list is exported as a download in xlsx format.
♦ Table View
The alternative display option is the Table View. This option lets you see more data by using less vertical space. Use this option to view content arranged in rows and columns like a spreadsheet, or to easily compare one record to another.
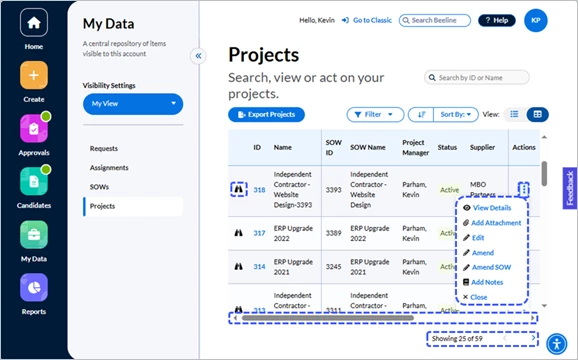
The Table View retains several of the features of the Card View. Click the hyperlinked ID number to navigate to the Project Dashboard with access to full details. The current status of the Project displays as a column in the table. Hover over the binoculars icon to view the Visibility information:
- Search by ID or Name – Use this search field when you want to retrieve a specific Project by its ID number or Name. The default setting for this search field limits your results to Projects that have been active within the prior 365 days. Use the Search Beeline field at the top of the screen to make unfiltered searches that include older records.
- Filter – Lets you select which Project statuses to display in your card list. Pick any combination (or limitation). Multiple statuses can be selected—remember to click Apply at the bottom of the list to activate your selection(s). The Project End Date filter at the top of the list is active by default to focus on active Projects—if you need to include historical records in your search results, just uncheck this box. Be aware that your record retrieval time could be impacted if your program has a large inventory of Projects!
- Sort By – Gives you the option to arrange your card list by Project ID, Project Name, Status, or Supplier. The arrow on the left will switch the display order from descending to ascending, click again to switch it back.
- View – Click the respective icon to easily switch from Table to Card View.
- Export Projects – Need to extract a list of your Projects? A single click of the Export Projects button and your Project list is exported as a download in xlsx format.
Additional Table View features include:
- Actions is now a locked column on the right side of the table layout. Click the kebab icon (⋮) to reveal which actions can be taken on any given row. The Actions options change depending on the current status of the Project.
- Tally Numbers – Scroll to the bottom of the screen to see how many records are displayed out of how many total records are available. The standard display is 25 records (rows) per screen. Click the arrow next to the “Showing…” text to change your table display to the next (or previous) 25 records. Repeat as needed to cycle through ALL the records. Unlike the card view, the table view does not expand to display more than a 25 records max limit.
- Horizontal scroll bar -- The scrollbar beneath the table layout gives you full access to all columns if your screen dimensions are not able to accommodate the full width of the table. The ID, Name, and Actions are locked columns and will always be visible.
TIP: You can maximize your table layout space by hiding the My Data slide-out panel. Just click the double arrow slider button to hide it. Click it again at any time to restore visibility to the panel.
| Persona | Module | Date Updated | Feedback? Email us: |
| Hiring | HMX | Beeline Enterprise |