
Topics on this page
Your entire invoicing process—organized and simplified
Invoices aren’t just paperwork—they’re the key to financial accuracy, smooth operations, and compliance for your contingent workforce program. As a Beeline Enterprise administrator, you deserve a smart, fast way to manage them.
The Master Invoice Schedule feature gives you a single, centralized view of all scheduled invoices across projects and suppliers—making invoice management simpler, faster, and more reliable.
Why it matters
When invoices are scattered, it’s easy to miss deadlines, lose visibility into spend, or face compliance risks. The Master Invoice Schedule centralizes billing, giving you clear visibility, efficiency, and control.
Persona
Client and program office administrators
Before you begin
-
Confirm whether you’re in a TEST or PROD site. Actions in PROD affect live financial data.
-
Understand that processing an invoice may trigger automatic file distribution to clients that may cause billing issues.
-
Avoid gaps or overlaps in billing periods. Gaps between billing periods or overlapping billing schedules aren’t permitted in final invoices. You must ensure the last final invoice billing end date and the next final invoice billing start date are consecutive.
How to steps
The Master Invoice Schedule isn’t just a tool—it’s your command center for invoice management. From the Master Invoice Schedule page, you can:
- Locate and manage individual invoices.
- Check the status of scheduled invoices.
- Download logs and feeds and review invoice batch details or potential errors.
- Investigate exceptions and validations.
- Delete duplicate or incorrect invoices.
- Approve, reject, cancel, or rerun invoices.
- Make one-time changes to invoice schedules.
- Add new invoice schedules manually.
Pro Tip: Use the Invoice Schedule Generator for recurring schedules. The Master Invoice Schedule is best for one-time changes and troubleshooting.
Information in this article reflects a standard Enterprise configuration. Your Enterprise platform is based on your organization’s configuration. Settings and/or data visibility rules may vary slightly from what is described.
To accomplish your task, complete these steps from your Enterprise dashboard.
Getting started—accessing the Master Invoice Schedule and locating a specific invoice
- Select Preferences > VMS Settings > Financial Services. A Financial Services page displays.
- Select the Master Invoice Schedule link. The Master Invoice Schedule page displays showing scheduled invoices across all projects and suppliers.
- Expand the Search Options. Additional fields display.
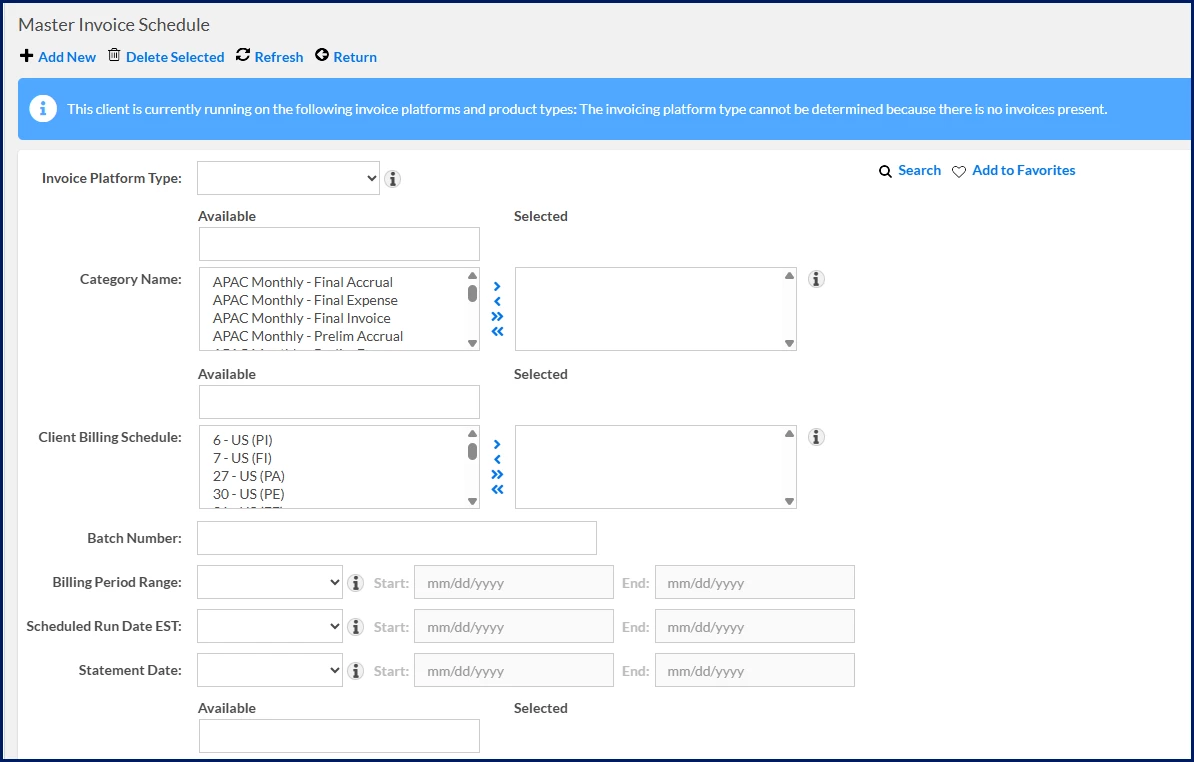
- Choose the search criteria you want. Select any of the following options to filter your search results.
- Category Name
- Client Billing Schedule
- Batch Number
- Billing Period Range
- Scheduled Run Date EST
- Statement Date
- Invoice Status
- Feed Status
- Failed Exceptions
- Failed Validations
-
Select the Search icon. Matching invoices display in the Invoices section.
- Based on your task, continue with one or more of the following steps.
Downloading logs or feeds
- Select the invoice.
- Hover over the Help icon, and then select Yes in the Has Attachments field. An Invoice Attachment dialog displays showing you an invoice summary and any attachments.
- Navigate to the section you want, such as Invoice Log, Feed Logs, or Feeds.
- Select the attachment you want. The file is downloaded to your device.
Viewing exceptions and validations
- From the Actions menu, select View Exceptions or View Validations.
- Review the reports and then take corrective actions.
- See this article to learn more about resolving pre-invoice and recurring data validations.
Deleting invoices
- Select one or more invoices in a Not Started status.
- From the Actions menu, choose Delete Invoice or Delete Selected.
Approving or rejecting rerun invoices
- Select the invoice.
- From the Actions menu, choose Approve Invoice or Reject Invoice.
Running or rerunning an invoice
- Select the invoice.
- From the Actions menu, choose Run Invoice or Rerun Invoice if you’ve fixed data in the invoice.
Canceling a pending invoice
- Immediately after running the invoice, select Cancel Pending from the Actions menu.
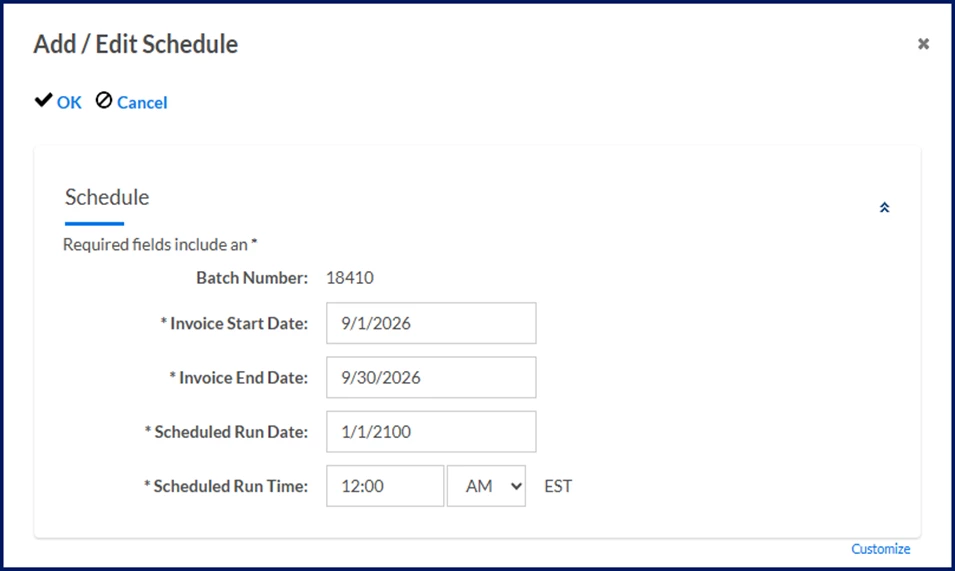
Editing an invoice schedule
- Select the invoice.
- Expand the Actions menu and select Edit Invoice. The Add/Edit Schedule dialog displays.

- These required fields are automatically prepopulated; adjust any as needed: Invoice Start Date, Invoice End Date, Scheduled Run Date, and Scheduled Run Time.
- Select OK to close the Add/Edit Schedule dialog and apply your changes.
Adding a new invoice schedule
- From the Navigation bar, select Add New. The Add/Edit Schedule dialog displays.
- From the Invoice Platform Type list, select the invoicing solution used in the client’s site. Choose the same platform that’s listed in the Information header ribbon.
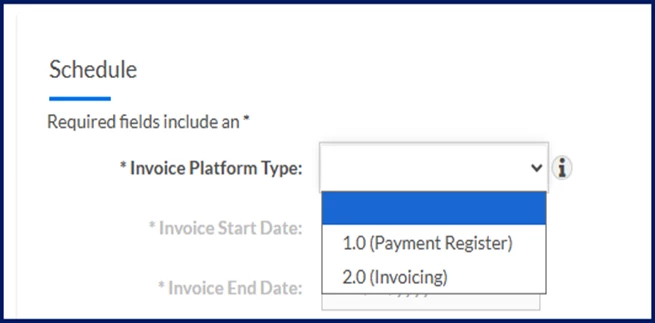
- Based on the Invoice Platform Type you selected, take one of these steps.
- If you chose 1.0 (Payment Register) as the platform, select the invoice category you want from the Client Billing Schedule list.
- If you chose 2.0 (Invoicing) as the platform, select the kind of recurring invoice you want to schedule from the Category Name list.
- Use the Invoice Start Date calendar to select the beginning of the billing period in the invoice; the date listed on the invoice when services began to be provided.
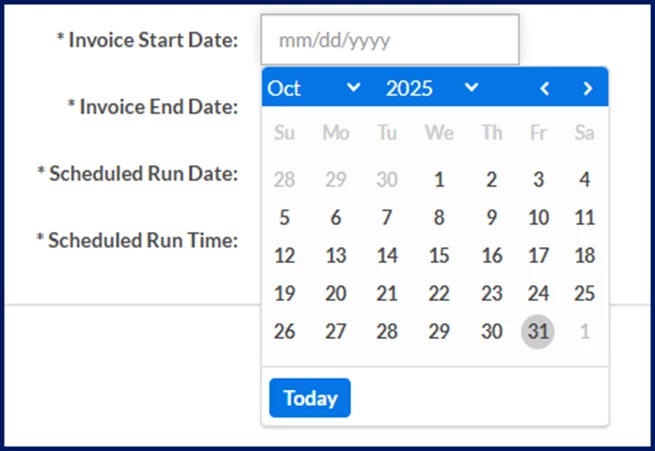
- Use the Invoice End Date calendar to select the closing date of the billing period in the invoice; the date listed on the invoice when services stopped being provided.
- Use the Scheduled Run Date calendar to select the date you want the invoice to be processed.
- In the Scheduled Run Time field, enter the time you want the invoice to be processed.
- From the Scheduled Run Time list, choose either AM or PM.
Caution: Remember, the runtime uses a 24-hour clock based on Eastern Standard Time (EST). - Select OK to save your entries and schedule an invoice for processing.
References
The Master Invoice Schedule page is robust and presents a lot of information. Browse through these topics to learn more about the page and about invoice statuses.
Understanding the Master Invoice Schedule page
The Master Invoice Schedule page is a consolidated view of your scheduled invoices. You can instantly view these details about your scheduled invoices.
| Field | Description | ||||||||||
|---|---|---|---|---|---|---|---|---|---|---|---|
| Actions toolbar | Displays high-level actions you can take on the page, such as Add New, Delete Selected, Refresh, and Return. | ||||||||||
| Information header ribbon | Instantly informs you about the invoice platform (1.0 or 2.0) the client is using and the product types (category of services) for which the client invoices. Invoices for these product types can be processed through Enterprise.
| ||||||||||
| Search Options | Exposes additional fields on the page so you can quickly locate a specific scheduled invoice. You can choose from these criteria:
| ||||||||||
| Action menu | Select one of these options to act on an invoice. Not all actions are available on all invoices. The invoice status determines which actions are available on an individual invoice.
| ||||||||||
| Help icon | 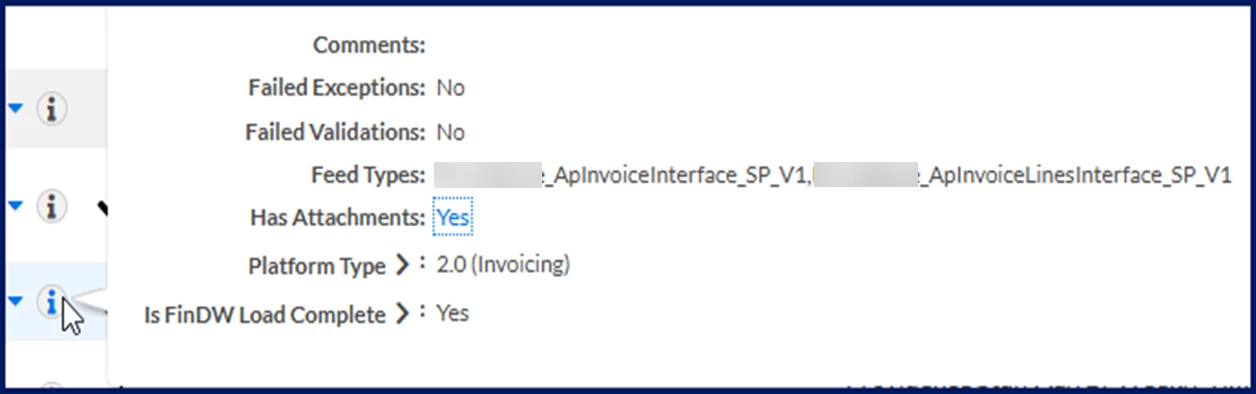 Instant access to these additional details about a scheduled invoice.
| ||||||||||
| Batch Number | The unique identifier assigned to a group of invoices simultaneously processed together. Helps you organize, track, and manage multiple invoices efficiently. | ||||||||||
| Invoice Status | Current state of an invoice within the billing or payment process. The status provides visibility, supports forecasting and helps you reduce payment delays. | ||||||||||
| Category Name | Name of the schedule associated with an invoice. | ||||||||||
| Billing Period Start Date | First date in the specific span of time during which goods or services are tracked for invoicing. Use the Billing Period Start Date to prevent overlapping billing schedules. | ||||||||||
| Billing Period End Date | Last date in the specific span of time during which goods or services are tracked for invoicing. The Billing Period End Date you define determines which approved transactions (timesheets, expenses, miscellaneous fees, or milestones) are included in an invoice. Approved transactions with a date less than or equal to the Billing Period End Date you define are included. | ||||||||||
| Scheduled Run Date EST | Date and time the invoice is planned to be processed, where the time is defined using a 24-hour clock based on Eastern Standard Time (EST). | ||||||||||
| Statement Date | Date on which a financial statement was issued. It marks the finalization of the billing period and the point when all charges, payments, and adjustments are summarized. | ||||||||||
| Frequency | How often a scheduled invoice issued for goods or services is processed, such as Daily, Weekly, Biweekly, Monthly, Custom, and much more. See this Invoice Schedule Generator article to learn more. | ||||||||||
| Feed Status | Current state of an invoice within the billing or payment process, such as Failed, Not Sent, Pending, Processing, Scheduled, or Sent. |
Understanding invoice statuses
The status of your invoices is determined by the step the invoice is currently in. Understanding these statuses provides valuable insights into your scheduled invoices and into invoice reports. Here’s what each status means.
| Status | Definition |
|---|---|
| Not Started | The invoice has been created but hasn’t been processed or sent to clients. |
| Pending | The invoice hasn’t been finalized or processed for payment. |
| In Process | The invoice has been created and is actively moving through the workflow, but it hasn’t been finalized or approved for payment. |
| Successful | The invoice has completed all processing steps without errors. It has passed validation checks, approvals, and any required integrations and is ready for payment. |
| Rejected | The invoice was declined during the approval or validation process and will not proceed to payment. The invoice remains in Enterprise for audit and record-keeping, but it's excluded from further processing unless corrected and resubmitted. |
| Void | The invoice is canceled and no longer valid. All associated values are typically set to zero, ensuring they’re excluded from financial reports or payment workflows.
|
| Rolled Back | Occasionally you might encounter an invoice in a Rolled Back status. Under rare conditions, an invoice that was previously processed or moved forward in the workflow might need to be reverted to an earlier state. An invoice can be rolled back for any of these reasons:
After a rollback, the invoice may require correction and reprocessing before it can be processed. |
Documentation release: Beeline Enterprise | Q1 2026