Beeline Enterprise Single Sign‑On (SSO) provides a centralized, standards‑based authentication model that allows organizations to integrate one or more identity providers (IdPs) with the Enterprise platform. By supporting multiple SSO connections, customers can manage authentication across different organizations, user populations, or business units—while maintaining consistent security controls and authorization within the Enterprise VMS.
Enterprise pairs platform‑managed authorization with Auth0® authentication, using SAML 2.0 to deliver secure, scalable access without compromising control or visibility.
Why it matters
Enterprise Single Sign‑On matters because it establishes authentication as a core, platform‑level capability. The SSO solution:
Provides a single, supported SSO framework for the Enterprise platform.
Standardizes support for multiple SSO connections as a built‑in capability.
Defines clear boundaries between external identity management and platform access control.
Creates a consistent authentication contract across customers and organizations.
Enables scalable evolution of authentication without custom or embedded solutions.
Who it’s for
Enterprise SSO is designed for Enterprise environments where different user groups may require different sign‑in methods, enforcement rules, or identity providers.
This article is for:
System administrators configuring and maintaining one or more SSO connections
IT and security teams responsible for identity and access management
Program offices or client administrators coordinating authentication across multiple organizations or IdPs
How it helps
Enterprise Single Sign‑On enables customers to securely manage access across complex environments by:
Delivering simple, familiar sign‑in through corporate identity providers.
Supporting multiple SSO connections, so different organizations or partners can use their own IdPs.
Enforcing strong, consistent security without shared or local credentials.
Centralizing authorization in Enterprise, regardless of how users authenticate.
Scaling easily as new organizations or identity providers are added.
Reducing access disruptions caused by configuration or certificate drift.
This lets customers meet diverse identity requirements while keeping access secure, consistent, and easy to manage.
How it works
Enterprise Single Sign‑On operates as a centralized, platform‑managed authentication capability by:
Using a service‑provider‑initiated (SP‑initiated) SAML 2.0 model to control where authentication begins
Integrating with external identity providers for user authentication through standards‑based assertions
Brokering authentication exchanges through Auth0 to support secure, consistent SAML communication
Validating identity responses within Enterprise before access is granted
Applying authorization rules within the platform, independent of identity provider configuration
Managing each SSO connection independently, enabling support for multiple identity providers within the same Enterprise environment
This model ensures authentication is flexible and extensible, while access control remains consistent across the platform. Administrators can choose the appropriate model per connection based on security and usage requirements.
How‑to steps: Quick start
Information in this article reflects a standard Enterprise configuration. Your Enterprise platform is based on your organization’s configuration. Settings and/or data visibility rules may vary slightly from what is described.
As an Enterprise Administrator, you must set up an enterprise-level SAML connection before a client’s users can access the Enterprise VMS using SSO. This topic gives you quick start steps to bring an SP‑Initiated SSO connection live using the recommended configuration.
Prerequisites
Make sure you have:
Access to your Enterprise site with admin credentials.
IdP metadata: SingleSignOnService URL, SingleLogoutService URL (if using FederatedLogout), and an X.509 signing certificate (PEM or CER).
An X.509 signing certificate (PEM or CER)
These steps explain only required settings to bring an SP‑Initiated SSO connection live using the recommended configuration.
Prepare the IdP certificate and back up any existing certificate.
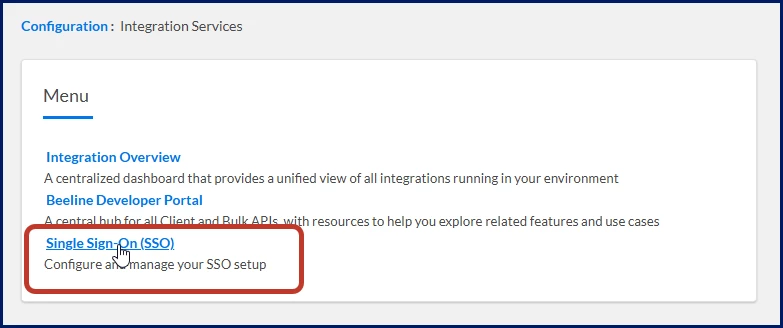
Navigate to VMS Settings > Integration Services > Single Sign‑On (SSO).
Select Add New to create an SSO connection.
In the Display Name field, enter the display name, which displays as the label for the SSO Login button on the Enterprise Login page.
In the Sign In field, enter your sign‑in URL from IdP metadata. TIP: You typically copy this value from your IdP metadata. Open the metadata file and find the SingleSignOnService parameter and use the Location attribute value. For example, <SingleSignOnService Binding="urn:oasis:names:tc:SAML:2.0:bindings:HTTP-POST" Location=”https://someclient.com./sign-in”/>
Upload the X.509 signing certificate.
Save the SSO connection.
Repeat steps 3 through 6 to add more connections.
Download the Enterprise Metadata XML, which contains the information necessary for configuring your identity provider.
Test SP‑initiated login in a private browser session.
How to steps: Step-by-step
As an Enterprise Administrator, you must set up an enterprise-level SAML connection before a client’s users can access the Enterprise VMS using SSO.
Prerequisites
Make sure you have:
Access to your Enterprise site with admin credentials.
IdP metadata: SingleSignOnService URL, SingleLogoutService URL (if using FederatedLogout), and an X.509 signing certificate (PEM or CER).
An X.509 signing certificate (PEM or CER)
Information in this article reflects a standard Enterprise configuration. Your Enterprise platform is based on your organization’s configuration. Settings and/or data visibility rules may vary slightly from what is described.
Creating an SSO connection
Before you create an SSO connection, gather your IdP metadata so you can set up a working connection right away.
Defining General Information
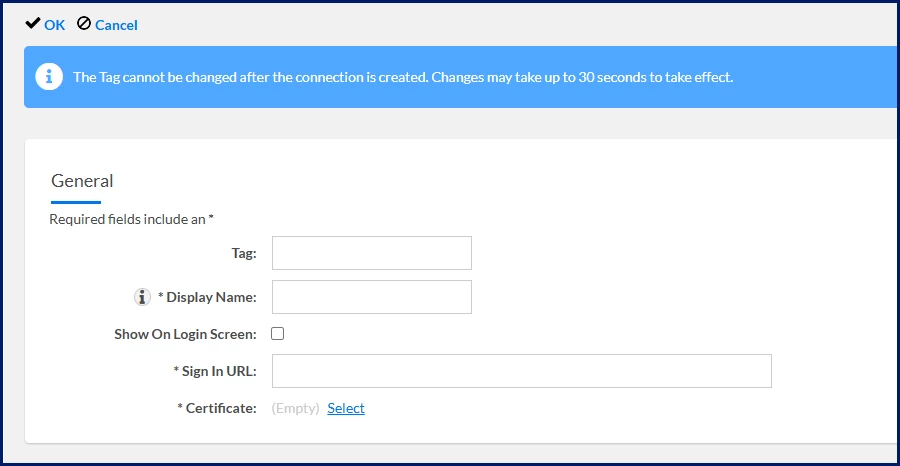
Part of setting up an SSO connection includes specifying general information, such as these settings.
Setting
Description
Tags
Since a site may have multiple connections, specifying a Tag ensures each SSO connection has a unique URL. Only one connection can have a blank tag, and you cannot change it after the connection is created.
Display Name
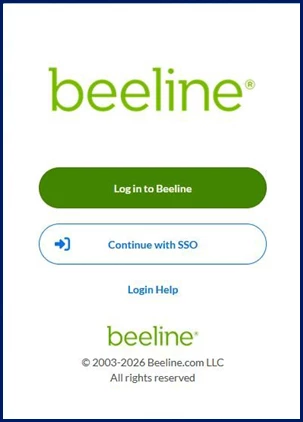
Defines the term that displays as the SSO Login button label on the Enterprise Login page. Most clients use SSO, which displays as Continue with SSO as shown in this example.
Show on Login Screen
Determines whether to show or hide the Continue with SSO button on the Welcome page.
Sign In URL
Identifies where to send users to log in.
It’s the login page of your Identity Provider (IdP).
When a user selects Continue with SSO, Enterprise redirects them to this URL so the IdP can authenticate them.
You typically copy this value from your IdP metadata as the SingleSignOnService Location.
If the Sign In URL is wrong or missing, users can’t be redirected to the IdP, and SSO won’t work.
Certificate
Establishes trust between Beeline Enterprise and your identity provider by allowing Enterprise to verify that SAML authentication responses are authentic, untampered, and issued by the configured IdP. If the certificate is missing, expired, or does not match the IdP configuration, SSO authentication will fail and users may be unable to sign in. Enterprise supports PEM or CER for X.509 signing certificates.
Select Single Sign-On (SSO). An SSO Connections page displays.
Select Add New. An Edit SSO Connection page displays.
Optional. In the Tag field in the General section, enter up to 50 lower‑case alphanumeric characters as an identifier.
In the Display Name field in the General section, enter the text that displays as the label for the SSO Login button on the Enterprise Login page.
Optional. Select the Show on Login screen checkbox in the General section, to show or hide the Continue with SSO button on the Welcome page.
In the Sign In field in the General section, enter the URL for you IdP SAML sign‑in endpoint. If IdP metadata is available, use the SingleSignOnService Location value.
Add your X.509 certificate:
Choose the Select link next to Certificate. A Select Certificate dialog displays.
Select Choose File, then use Explorer to locate and select the client’s certificate in PEM (.pem) or CER (.cer) format.
Optional. If the cert is only in metadata or another format, export to PEM/CER first.
Select Upload to import the file, close the Select Certificate dialog and return to the SSO Connections page.
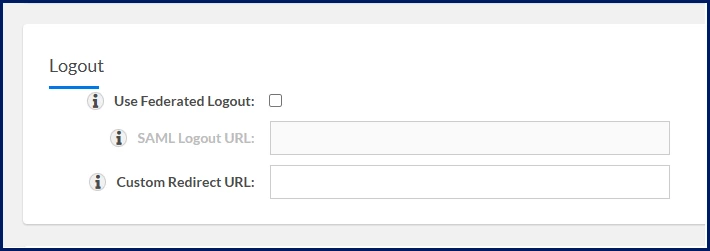
Use the Logout settings to give users a clear, confident sign‑out experience. You choose whether signing out of Beeline also ends the user’s session with their identity provider for stronger security (federated logout) or keeps that session active for faster, more convenient re‑entry (non‑federated logout).
You can also guide users to a custom or vanity URL after logout—such as a branded landing page or internal site. These options let you balance security, user expectations, and ease of re‑entry—so logout works the way your users and organization need it to.
For Federated logout, select the Use Federated Logout checkbox and then enter data in the SAML Logout URL field. If IdP metadata is available, use the (SingleLogoutService Location.
For non-Federated logout, leave the Use Federated Logout checkbox unchecked to keep users signed in to the Identity Provider.
Add data in the Custom Redirect URL field; otherwise, users land on the Enterprise Welcome page.
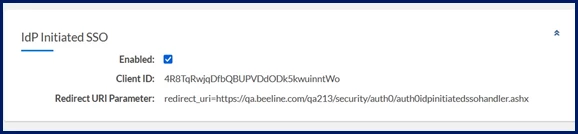
Use the IdP‑Initiated SSO settings to protect how authentication begins. For the strongest security posture, you can ensure all users start sign‑in from the Beeline login page using SP‑initiated SSO, which creates a one‑time, controlled authentication request and reduces the risk of misuse or replay. If necessary, you can allow IdP‑initiated access—such as links from internal portals or dashboard tiles—but this option is best reserved for specific, well‑understood use cases. These settings help you minimize risk while maintaining flexibility where business needs require it.
Enterprise uses SP‑initiated SSO by default and recommends it for vanity URLs or internal links. If your security policy prefers SP‑initiated only, leave the Enabled checkbox in the IdP Initiated SSO section unchecked; the remaining values populate automatically.
Use Home Realm Discovery (HRD) to automatically guide users to the right sign‑in experience—and enforce secure login paths. When you use HRD, Enterprise automatically uses a user’s email domain to determine how they should sign in.
Automatically redirects SSO‑required users to the identity provider.
Removes unnecessary login choices for a faster, clearer sign‑in.
Enforces how users authenticate (SSO vs non‑SSO) for configured domains.
Preserves the standard login flow for users outside HRD domains.
Does not control which Enterprise links users can access.
Does not interrupt email notification links, which continue to authenticate based on HRD rules.
Caution: When you add email domains to Home Realm Discovery, users with those domains must sign in using SSO. They will no longer be able to log in with non‑SSO credentials, so be sure this aligns with your security and access policies before enabling it.
Optional. Some clients require users with specific email domains to sign in to Enterprise using SSO. To automatically route users to SSO and skip the Continue with SSO step, enter those email domains in the Domains field in the Home Realm Discovery section. Users with a matching email domain are redirected to the client’s IdP login page. Go to Requiring SSO for certain users to learn more.
You’re almost done configuring SSO. Review these final settings to confirm your authentication flow, security controls, and user experience work together as intended. Once saved, your SSO connection is ready for testing and use.
To accomplish your task, complete these steps from the Edit SSO Connection page.
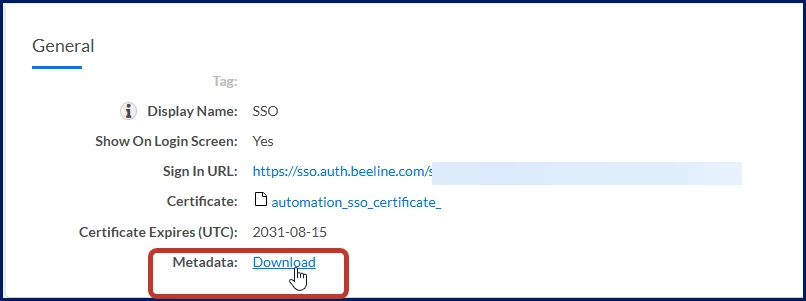
Download the Metadata XML to complete the handshake between Enterprise and your identity provider. This file contains the technical details your IdP needs—such as where to send authentication responses and how to securely communicate with Enterprise. By sharing this XML with your IdP team, you enable them to finish configuring SSO so users can authenticate successfully and securely.
Log in to the client’s site.
Navigate to VMS Settings > Integration Services.
Select Single Sign‑On (SSO). An SSO Connections page displays.
Select the SSO connection link to open it. A View SSO Connection page displays.
In the General section, select the Download Metadata link.
Requiring SSO for certain users
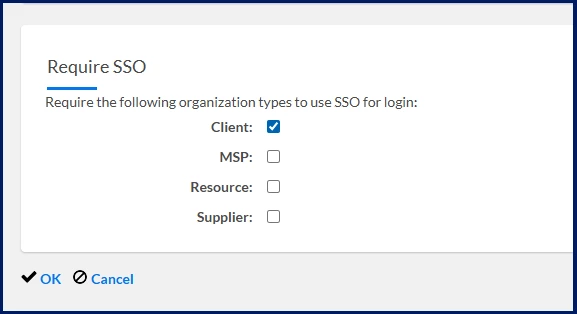
Some clients require users with specific email domains to sign in to Enterprise using SSO. You can define which user types must sign in via SSO using the Advanced Settings option on the SSO Connections page.
Log in to the client’s site.
Navigate to VMS Settings > Integration Services.
Select Single Sign‑On (SSO). An SSO Connections page displays.
Select Advanced Settings. An Advanced Settings page displays.
Select Edit.
In the Require SSO section, select or clear the checkboxes for the user types that must sign in using SSO.
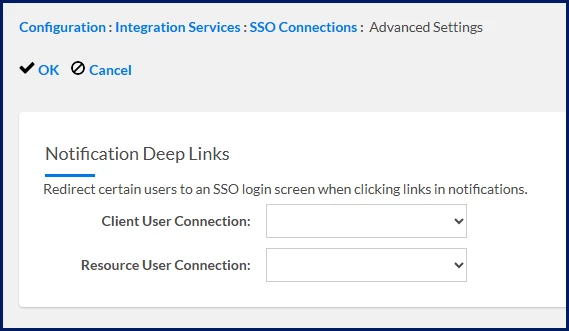
Configure SSO redirection for email notification links
You can set up your site so that users are redirected to the SSO page when they select a link in an email notification sent from the Enterprise VMS. You can set up this option to redirect users with the Organization Type of Client or Resource only. You cannot configure this option for managed service providers or suppliers.
Keep in mind: This setting does not enforce SSO for users. You can enforce SSO at the organization type level only. Go to Requiring SSO for certain users to learn how.
Log in to the client’s site.
Navigate to VMS Settings > Integration Services.
Select Single Sign‑On (SSO). An SSO Connections page displays.
Select Advanced Settings. Ab Advanced Settings page displays.
Select Edit.
In the Notification Deep Links section, select the SSO connection option you want:
Client User Connection: select which SSO login page client users are sent to when they click a link in an email notification.
Resource User Connection: select which SSO login page resource users are sent to when they click a link in an email notification.
Select OK.
Setting up Enterprise for SP-initiated link access
Some clients want to give their users a simple, branded way to access the Enterprise VMS—for example, a custom URL or a button on an internal dashboard. In those scenarios, users start sign on by selecting a link that launches an SP‑initiated SSO.
Provide branded access: Give users a simple way to access Beeline by using a vanity URL, dashboard link, or button that launches SP‑initiated SSO.
Redirect vanity URLs: Set up vanity URLs (for example, https://yourcompany.com/beeline) to redirect to an SP‑initiated SSO URL.
Enable dashboard access: Add the Enterprise VMS as a tile or button on your internal dashboard or intranet. You can configure the tile name to match their internal conventions.
Initiate sign‑in securely: Use SP‑initiated SSO when users select a link or button. SP‑initiated SSO requires no additional configuration after the SAML connection is created and is the recommended and more secure sign‑in method.
Use existing configuration: SP‑initiated SSO enabled by default if you have an existing SAML connection.
Platform‑managed security and advanced configuration
This section describes security‑critical and advanced SSO settings managed by Beeline to protect the integrity, trust, and reliability of authentication across the Enterprise platform.
Protecting the trust between systems
The Request Signing section defines how Beeline secures outbound SSO requests sent to the identity provider. These settings ensure authentication requests are cryptographically signed, allowing the IdP to verify that requests are authentic, untampered, and truly coming from Beeline. This helps prevent spoofing and strengthens the overall security posture of the SSO connection.
These fields are typically managed by Beeline and are read‑only for admins to preserve platform‑level security.
Supporting advanced or platform‑managed behavior
The Custom section contains system‑defined configuration used to support specialized or platform‑managed SSO behavior. These settings are not required for standard SSO setup and are maintained by Beeline to ensure consistent and reliable authentication flows across environments.
Verification checklist
Confirm that:
Continue with SSO displays on the Welcome page.
Authentication redirects to the IdP and returns successfully.
The user lands in Enterprise with correct access.
The signing certificate is valid and unexpired.
Operational reminders
Back up certificates before every change
Rotate certificates proactively
Certificate lifecycle (typ. 1–3 years): When rotating, upload the new X.509 in SSO > Edit > Upload
Test all changes immediately and in isolation
Troubleshooting
Fast answers
The following error will be displayed:
RelayState/ACS mismatch or login loop → Ensure IdP posts to the ACS Location from Enterprise metadata; confirm lowercase SP handler path.
Username/password still shown → Enable Display SSO link, consider HRD for primary domains, and enforce org‑type Required if policy demands.
Logout doesn’t end IdP session → Switch to Federated Logout and verify SingleLogoutService URL.
Certificate error / sudden failures → Check Certificate Expiration and rotate X.509 with the IdP.
Error
Symptom
Likely cause
Fix
Login loop or “RelayState/ACS mismatch”
User is bounced between IdP and Enterprise or sees an ACS/RelayState error.
IdP posting to wrong ACS or SP handler not all lowercase.
Download Enterprise Metadata XML and verify IdP uses that ACS Location; fix handler URL casing.
Users still see Enterprise username/password
SSO button not visible; users land on native login.
SSO link disabled; no HRD; org‑type enforcement disabled.
Turn on Display SSO link; optionally add HRD domains; set Client/MSP/Resource/Supplier Required as policy dictates; add per‑user exceptions only if needed.
Logout doesn’t end IdP session
User signs out of Enterprise but remains logged into IdP.
Non‑federated logout selected or missing/incorrect SingleLogoutService URL.
Enable Federated Logout and paste IdP SingleLogoutService; retest in private window.
Sudden SSO failures/certificate error
Auth fails or users see certificate warnings.
IdP signing cert expired/rotated without updating Enterprise.
Check Certificate Expiration; upload new X.509 (PEM/CER) and coordinate rotation on IdP.
Too many failed codes. Wait for some minutes before retrying.
Ten failed multi-factor authentication (MFA) attempts.
The user attempted to sign ten times on using MFA with incorrect information.
The user must wait for an hour before trying to sign in again.
Persona
Modules
Documentation release
Feedback? Email us:
Clients, program office users, system administrators
Please complete the following fields as part of your Beeline Community registration. Unless noted as private, this information will be displayed on your user profile within the community.