
This document provides supplier users with the steps necessary to use the Simple Search feature located above the Header Menu bar in Beeline Enterprise.
This content reflects non-client specific Beeline Enterprise functionality which may vary from what you see when logged into Beeline Enterprise depending on any client-specific settings or adjustments.
Simple Search can be used to find a specific record or to search for a group of records. To use this feature, select a category from the Simple Search pull-down selection list menu then type your search term(s) in the text box. Results will start to display as you type.
- To go directly to a record, click on the record link as soon as it displays in your results.
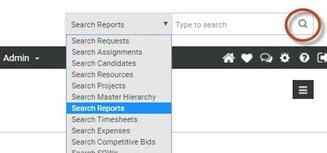
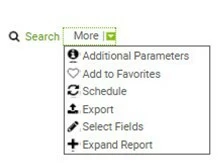
- To search for a list of records, click the advanced search icon (the magnifying glass) next to the text entry box. A search screen opens. Use the filter options at the top of the screen to define your search. Click Search and the results display in a list at the bottom of the screen. If you need more options, expand the More drop-down selection list.
Advanced Search Options
The More drop-down selection list gives you additional options to enhance your search results.
Additional Parameters
Select this option to add more areas to filter data. This option may not be available for all Simple Search categories, and the Additional Parameters list will be specific to the category you select.
Step 1. From the More drop-down list, click Additional Parameters. A dialog box opens.
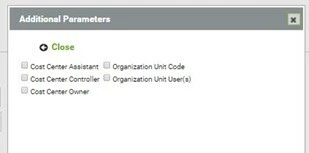
Step 2. Click the check box for each parameter you want to include, then, click Close.
Step 3. Click Search to update the results list screen.
Add to Favorites
Use this option to convert your search results into a saved favorite report. As a “favorite”, it retains the criteria, functions, conditions, and sort parameters of your original search. Instead of needing to repeat your original search, you can now generate this report on-demand, which provides ease of access, saves time, and provides consistent reporting across time.
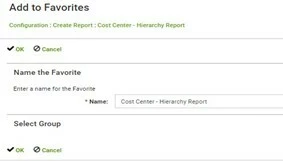
When you click the Add to Favorites link, you’ll be prompted to enter a name for your report. Use a title that is easy to recognize. Click OK to save.

To retrieve your report, expand the My Beeline menu in the Header Menu bar and check under the My Favorites section.
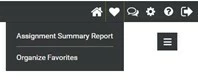
Optional: Click the favorites “heart” icon located in the Header Menu bar.
Be sure to complete all format changes to your results list before you select “Add to Favorites”.
Export
The Export option lets you export your results list into an Excel® spreadsheet.
Step 1. From the More drop-down list, click Export. An alert message displays advising you to wait while the data downloads.
Step 2. Click on your download file link to open the spreadsheet.
Be sure to complete all format changes to your results list before you select “Add to Favorites”.
Schedule Report
The Schedule Reports feature allows the report creator to designate when and to whom a report will be delivered. This feature is only available to client accounts that have active ad hoc 2.0 functionality. This feature is integrated into Report Builder but also available in Simple Search/Advance Search. The ability to set report delivery to match your schedule needs lets you stay organized and in control of your data. Multiple format options are available along with the ability to compress larger files sent as email attachments. Scheduled reports can also be viewed within the application, but data visibility will reflect your assigned user role(s). Follow the prompts carefully when setting up the schedule options and reach out to the client’s program office if you need assistance.
Be sure to complete all format changes to your FINAL results before you select this option.
Step 1. From the More drop-down list, click Schedule. A Schedule Report dialog window opens.
Step 2. Use the General section to enter a report title and description.
Step 3. Verify that Destination is set to “Email”.
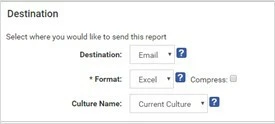
Step 4. Use the Format drop-down arrow to select the format of your choice. NOTE: Choices may be limited based on report type.
Step 5. Enter the email address of the user to whom you wish to send this report. If you plan to send it to multiple users, separate the email addresses with a semicolon (;).
Report results are based on the data visibility settings of the person who schedules the report. Reports sent to users with higher visibility rights will only see data that reflects the sender—not the recipient.
Step 6. Enter an email title in the Subject field.
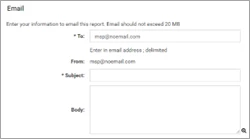
Step 7. Enter an email message in the Body field.
Step 8. Use the Schedule Type drop-down arrow to select how frequently the report will be sent.
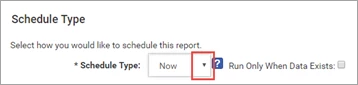
Step 9. Check “Run Only When Data Exists” to ensure that a report is sent only when there is data.
Step 10. Review all fields and adjust as needed.
Step 11. Click Schedule Report. The dialog window closes.
To view, edit, copy, or cancel scheduled reports, click the My Beeline drop-down arrow in the Header Menu bar, scroll down and select Scheduled Reports.
Select Fields
The Select Fields in the More drop-down list refers to the columns in our displayed results list. You can customize these columns, both by topic and arrangement.
Step 1. From the More drop-down list, click Select Fields.
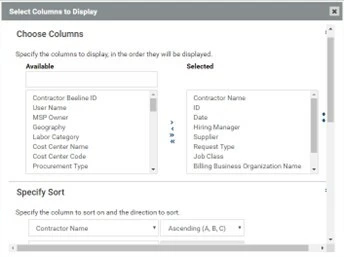
Step 2. Use the shuffle boxes to add or remove column headers for your report. Double-click on the topic to move it from one box to the other or use the arrow icons to move single or multiple headers.
Step 3. Use the up and down arrows to the right of the Selected list to set the display order of the columns in your report.
Step 4. Use the pull-down selection list in the Specify Sort section to determine the order in which the report data display. If you select multiple sort settings, they prioritize in the order in which they are listed.
Step 5. Click OK to save your changes. The screen refreshes to display your data based on the revised settings.
Expand Report
Need even more adjustments? Click Expand Report and your results list will be pulled into Report Builder with access to its full-range of features. From Simple Search to a full-feature report engine in just a few clicks. What could be simpler!
Expand Report lets you transform a simple results list into a full-feature ad hoc report. This gives you access to a broader range of data fields, filters, functions, and conditions to create a report to meet your specific needs.
Step 1. From the More drop-down list, click Expand Fields.
Step 2. Customize the report as needed. See Building a Base (Ad Hoc) Report for additional information.