


Standard Reports
Beeline Enterprise provides a broad range of Standard Reports based on preset criteria. These Standard Reports were developed in collaboration with our clients. Suppliers are provided with similar, client-approved reports. These reports are designated as SV or Supplier View and only include data specific to each supplier’s business organization. Contingent Staffing reports are arranged by type: Sourcing, Management, Administrative, and Financial. Standard reports may be used as base reports to create custom reports. Users can schedule reports to run once, daily, weekly, or monthly to designated email distribution lists and can designate to send a report only when data is generated.
This content reflects non-client specific Beeline Enterprise functionality which may vary from what you see when logged into Beeline Enterprise depending on any client-specific settings or adjustments.
To view standard reports:
- Navigate to your Beeline Enterprise Home screen.
- Expand the Reports drop-down selection list in the Header Menu bar.
- Click to open the report of your choice.
- Optional: Adjust settings in the Parameters section to modify report.
- Optional: Click Create Report update report to match new parameters.
- Optional: Click Add to Favorites to save revised report for future use.
- Optional: Click Schedule Reports to set distribution rules and report schedules.
Schedule Report
The Schedule Reports feature allows the report creator to designate when and to whom a report will be delivered. This feature is only available to client accounts that have active ad hoc 2.0 functionality. Follow the prompts carefully when setting up the schedule options and reach out to the client’s Program Office if you need assistance.
Be sure to complete all format changes to your report before you select this option.
Step 1. Click Schedule Report. A Schedule Report dialog window opens.
Step 2. Use the General section to enter a report title and description.
Step 3. Use the Destination to set delivery method.
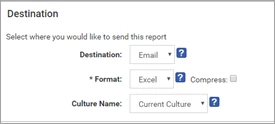
Step 4. Use the Format drop-down arrow to select the format of your choice. NOTE: Choices may be limited based on report type.
Step 5. Enter the email address of the user to whom you wish to send this report. If you plan to send it to multiple users, separate the email addresses with a semicolon (;).
Report results are based on the data visibility settings of the person who schedules the report. Reports sent to users with higher visibility rights will only see data that reflects the sender—not the recipient.
Step 6. Enter an email title in the Subject field.
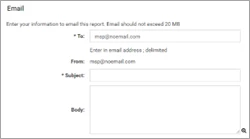
Step 7. Enter an email message in the Body field.
Step 7. Use the Schedule Type drop-down arrow to select how frequently the report will be sent.
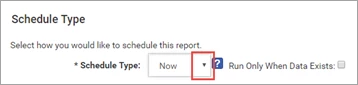
Step 8. Check “Run Only When Data Exists” to ensure that a report is sent only when there is data.
Step 9. Review all fields and adjust as needed.
Step 10. Click Schedule Report. The dialog window closes.
To view, edit, copy, or cancel scheduled reports, click the My Beeline drop-down arrow in the Header Menu bar, scroll down and select Scheduled Reports.
Up to 10 reports are saved at any given time. When you save the 11th report, the first report drops from your list.
Ad hoc Reports
To access ad hoc reports:
- Navigate to your Beeline Enterprise Home screen.
- Expand the Reports drop-down selection list in the Header Menu bar.
- Scroll to the Ad hoc section and click the report title to open the selection of your choice. Your selection opens in Report Builder.
- Use the Report Builder features to adjust as needed. View the showcase tour for an overview of this feature. A link to the showcase tour is located near the top of the screen.