


This article provides Services Procurement Vendors with the steps necessary to negotiate contractual and financial terms specific to a statement of work (SOW). Users need access to Microsoft® Word to negotiate the SOW terms and conditions. The exchange of the terms document is managed within Beeline Enterprise. The SOW financials are managed entirely within Beeline Enterprise.
This content reflects standard Beeline Enterprise functionality which may vary from what you see when logged into Beeline Enterprise depending on any client-specific settings or adjustments.
Table of Contents
Negotiation Process Overview
After the SOW is submitted to a vendor, the vendor reviews the SOW contents. They either accept the SOW as submitted or revise the SOW content and return their revised version to the Program Office/client user for review. This is when the negotiation process begins. The negotiation process can be simple or complex depending on how many times revised versions go back and forth between the vendor and the Program Office/client user. The negotiation process continues until a final version is accepted by both parties.
All revisions made to the SOW are tracked throughout this negotiation process. Changes made to terms are managed using Track Changes within Microsoft Word and then tracked by version control numbers within Beeline Enterprise. Changes made to financials are tracked entirely within Beeline Enterprise using marking techniques.
Version Control (Terms)
The initial version of the SOW is based on a SOW template. Each subsequent “check out” (i.e., download) and “check in” (i.e., upload) of the terms is then tracked by version control number. Vendors must download the terms in order to make revisions offline and then upload their revised version for review/approval. When the terms are downloaded, they are converted into a Microsoft® Word document (docx format only). Revisions are then made using standard Track Changes functionality. The revised document is uploaded back into Beeline Enterprise, and a version control number is assigned to indicate the placement of this version in the overall tracking of check-outs/check-ins.
As a best practice, vendors should adjust the Word .docx filename to reflect the new version number when they upload a document since the system cannot revise filenames automatically during the check-in process. Tracking documents throughout an extended negotiation process is easier if the version number in the Word document filename is consistent with the version number assigned within Beeline Enterprise. Beeline Enterprise version numbers are assigned as a single progression regardless of negotiating party. Filename numbers can reflect this single progression across both parties or each side can use a separate progression count (e.g., c.1, c.2, c.3 for client with v.1, v.2 for vendor) as long as the filename numbers are consistent. Consistency is much better than confusion!
Vendors can check the progress of the terms documentation process by clicking the Terms icon on the SOW ribbon and reviewing the displayed version control history. A system message indicates if the current version is available for check out, or, if it is currently checked out, which user has it checked out. No other user will be able to upload a document while the current version is checked out. The Contributor column includes name, date, and timestamp for efficient tracking of all check-outs/check-ins. Once the negotiation process ends, the complete version control tracking can be retained for historical purposes or clients may choose to retain only the final version.
When using version control, be aware that:
- Only a single document may be tracked using version control at any given time. Should a user attempt to upload a document other than a revised version of the previous document, a warning message displays.
Users should take care not to override this warning message. If a document is uploaded that is not the revised version of the previous document, then the Track Changes history will be lost.
- Only one user may have the version control document checked out at any given time. All other users will be blocked from access until the document is checked in.
- Only Microsoft® Word .docx format is supported under version control.
- Internal versions are only visible to the negotiation side that created them. Version control uses a single numeric sequence for all versions, but any version designated as “internal” will not be visible to the other negotiation side. Users can check the visibility status of any version by hovering over the Version number in the Terms tab on the SOW ribbon.
- Available options to upload a document include a “drag and drop” window located below the Version Control section or click in the “drag and drop” window and follow the prompts to browse and locate the file to import.
Marking Techniques (Financials)
The initial version, and all subsequent revisions, of Financials content must be made within Beeline Enterprise to ensure that this information is captured for financial tracking and invoicing once the SOW is promoted to a Project. A variety of marking techniques within Beeline Enterprise ensure that any revisions are highlighted throughout the negotiation process. These marking techniques include:
- Redline – identifies changes to text; previous version displays with a redline overlay. Items in list format, new sections, or deleted sections are indicated by a vertical red line adjacent to the item rather than through the text.
- Icons – used to highlight edits other than text edits
‘boxed’ A - indicates added content
‘boxed’ D - indicates deleted content
‘boxed’ M - indicates modified content
closed lock icon - identifies “locked” content; once content is locked, it cannot be edited. Content can be locked on the original template or prior to submitting the SOW to the vendor. Vendors do not have the option to lock content.
- Tags – identifies financials that have edited content; the number in the tag indicates the total number of edits across all Financials sections.
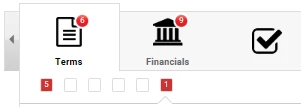
This example shows an open Financials tab with a total of 6 “marked” changes.
The boxes indicate the specific section, 5 changes in the 1st and 1 change in the 6th.
You can filter which Financials edits you want to view by using the More Actions pull-down selection list located above the tab ribbon. (Hint: to view a SOW in tabbed view, click View Details on the SOW Profile screen.) Filter options include:
- Show Final – ability to view the SOW changes in a final state (i.e., all redlining removed) prior to acceptance
- Show Our Changes – ability to view just the changes made by the vendor
- Show All Changes – ability to view changes to the SOW regardless of user role
- Save and Export to Word – ability to download the final SOW
Be advised: If you use these filters during the review or edit stages, you need to click Show Final before you can proceed to the Action tab. This ensures that the “save” option on the Action tab, saves the current version of the SOW.
Use the process steps described below to review, edit, and re-submit the SOW to the Program Office/client user. These steps will be repeated throughout the negotiation process until the final version is accepted.
Please note: Content entered in Comment tags is not marked, tagged, filtered, or tracked throughout the negotiation process. This is separate functionality and “visible” comments are not considered part of the contractual content even if you select to make comments visible to the Program Office/client user.
Step 1: Review SOW
To review the contractual and financial terms on a pending SOW:
- Navigate to the Beeline Enterprise Home screen.
- In the My To Do section, click the number link located within the alert sentence, “You have # ‘You have been invited to contribute to a SOW’ tasks awaiting action”. A new window with a list of SOWs available for review opens.
- Click the Action drop-down arrow of the specific SOW to be reviewed.
- Select the View Details option. This opens the SOW Profile screen.
Vendors have the option to select either “accept” or “edit” rather than “view details”, for the initial review. Best practice is to review the complete SOW by selecting the “view details” option.
- From the SOW Profile screen, click either View Details or the SOW name hyperlink located on the Summary tab to open the SOW record in the tabbed view.
- Starting at the Welcome tab, use the Next button to navigate to the Terms tab. The Version Control list displays.
- Click the Checkout button to download the current version for review. The download format is Word .docx. Remember to turn on the “Track Changes” feature before making any revisions.
- Click Next to advance to the Financials tab.
The Financials tab can include multiple sections displayed on separate screens. Use the Next button in the bottom right-hand corner of the screen to ensure you cycle through ALL Financials content.
Explanations for the various marking techniques are provided in the Negotiate Terms section of this document.
Options in the More Actions pull-down selection list let you filter these edits by type for better management throughout the review process.
If you accept the Terms and Financials as presented:
- Click the check mark icon on the ribbon and go to the Action tab. Click the Accept button.
- Click Accept again in the dialog box to confirm your acceptance. The system returns to the SOW Profile screen and displays the new status, “Vendor Negotiation Accepted.”
- Click Return to exit the SOW Profile and return to your Home screen.
If you plan to negotiate modifications to the Terms and Financials:
- Click the check mark icon on the ribbon and go to the Action tab. Click the Edit button.
- Click Edit again in the dialog box to confirm your intention to make revisions. The system returns to the SOW Profile screen.
- Proceed to Step 2: Edit SOW in the section below to continue.
Step 2: Edit SOW
To modify the SOW submitted by the Program Office/client:
- From the SOW Profile screen, click View Details to open the SOW record in edit mode with the ribbon visible (tabbed view.) Hint: The pencil icon to the left of each section number is a quick way to confirm that you are in edit mode.
- From the Welcome tab, click the Next button to navigate to the Terms tab.
- Review the Version Control (Terms) content in the Negotiation Process Overview of this document.
- Click Checkout to download the most current version. The download format will be Word .docx.
- Turn Track Changes on in Word.
- Make all revisions in Word and save the document.
Remember to revise the filename of your saved document to match the version number of the upload!
- Drag the revised Word document into the “drag and drop” box located below the version control list or click in the “drag and drop” box and use the prompts to browse and upload your file.
- Proceed to the Action tab if no revisions are needed to the Financials. Either use the Next button to cycle through the Financials tab or click the check box icon in the ribbon to go directly to the Action tab. Skip to Step 3 in the Submit Edits section below to continue.
- Otherwise, revise the SOW financials as follows:
- Click Next to go to the Financials - Fixed Bid section. The line items are proposed milestones.
- Check any Comments created during the Review process. The number displayed within the comment icon indicates the total number of comments and is a helpful tracking feature. New comments can be created at any time. Use the check box if the comments are intended for the Program Office/client user audience.
- Click the Pencil icon to edit the milestone. An Edit Milestone dialog box opens. Required fields are indicated by an asterisk (*). Make your adjustments and click Save Milestone to exit and return to the tabbed view.
- Click the + Add Milestone link to create additional milestone line items. (Note: The prev | next link is used to move up and down the milestone list; the Next button takes you to the next Financials section.)
Remember to click Save after each of the above modifications to retain your changes!
- Click the Next button to navigate to the next financials section. Depending on the nature of the SOW, there will be a separate financials section for each financials type. Options include milestones, units of measure, roles, non-billable resources, and resource funds. The modification process steps for Units of Measure are similar to those described for milestones. Follow the prompts in the Edit Unit of Measure dialog box to make your adjustments or use the “plus” option to create new ones. Roles and Non-billable Resources are both role-based financials. Follow the prompts in the Edit/Add Role dialog box to modify/create these entries. Required fields are indicated by an asterisk (*). Remember to click save to retain all adjustments/changes. Resource Funds is a single text box where you enter the total Resource Funds Amount. The Summary is always the final Financials tab. Review the content and check the math!
- Once you have completed your revisions under the Financials tab, click the Next tab to proceed to the Action tab to submit the revised SOW to the Program Office/client user.
Step 3: Submit Edits
When you have completed making all your revisions to the SOW, you are ready to submit your changes back to the Program Office/client user for their review.
To submit revisions for review/approval:
- Click the Action tab indicated by the check mark icon in the SOW tabbed view. (You can access the tabbed view by clicking View Details on the SOW Profile screen.)
- Click Submit for Approval. A dialog box appears.
- Click OK to confirm your intent to submit to the Program Office/client user. The system returns to the SOW Profile screen and displays an updated status, “Pending Client Approval.” The SOW record is routed to the Program Office/client user for review.
Final Step: Accept SOW
To accept the SOW:
- Complete the review process as described in the Step 1: Review SOW section of this document.
- If you accept the initial SOW contents without changes, then go to the Action tab (click check mark icon on the ribbon) and click the Accept box.
- If you negotiated with the Program Office/client user to revise the SOW and now have a final version to accept without changes, then go to the Action tab and click the Accept box.
- Click Accept in the dialog box to confirm your acceptance. The system returns to the SOW Profile screen and displays the new status, “Vendor Negotiation Accepted.”
- Click Return to exit the SOW Profile and return to your Home screen.
| Persona | Module | Date Posted | Feedback? Email us: |
| Vendor | Services Procurement | Beeline Enterprise |