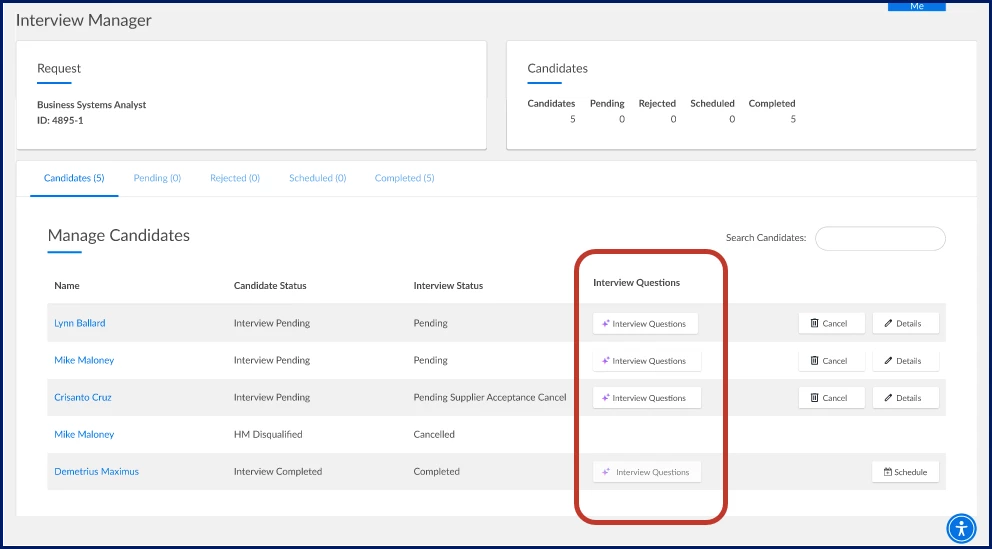
Interview Manager lets you view and manage all interview activity for a requisition in one place. You can quickly see candidate details, interview status, and complete common tasks such as scheduling, reviewing, and updating interviews.
Interview options
Interview Manager is rich with choices for scheduling interviews. Browse this section to learn more about them.
Supported Interview Types
When scheduling an interview, select one of the supported interview platforms:
Custom interview types used in the past are no longer supported. To ask about mapping a custom interview type, contact your Client Operations Manager.
Candidate or supplier-provided information
When scheduling an interview, you can choose whether the candidate or the supplier provides interview details. This flexibility allows you to adapt the process to your organization’s workflow.
Multiple interview rounds
Depending on your Enterprise configuration, you may be able to schedule multiple interview rounds for the same candidate without waiting for a previous interview to finish. You can schedule additional interviews on the same day, later in the week, or at any future date.
If a candidate is disqualified during an interview, any remaining scheduled interviews for that candidate are automatically canceled. When multiple rounds are available, interview statuses appear as Interview activity.
Google Calendar Integration
Interview Manager integrates with Google Calendar®. As an interview coordinator, you can view suggested interview times based on attendee availability, making scheduling faster and easier.
Outlook Integration
Interview Manager integrates with Microsoft Outlook 365®. As an interview coordinator, you can view suggested interview times based on attendee availability, making scheduling faster and easier.
Information in this article reflects a standard Enterprise configuration. Your Enterprise platform is based on your organization’s configuration. Settings and/or data visibility rules may vary slightly from what is described.
Supplier names are shown in graphics in this article. If your system is configured to mask supplier names, they won’t display in any of the Interview Manager pages.
Navigation
Accessing Interview Manager from Beeline Classic
You can get to Interview Manager with just a few clicks.
To access Interview Manager, complete these steps from your Enterprise dashboard.
From the Request page, take one of these actions.
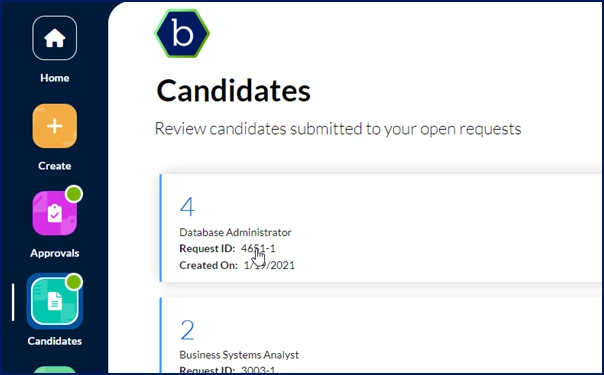
Select the ScheduleInterviews link from the RequestMenu. Interview Manager displays. OR
Select Schedule Interview from the Action list available from the Candidates pane. Interview Manager displays showing you only the candidate you selected. To see all of the candidates submitted to a request, select ShowAll Candidates in the upper right corner.
Accessing Interview Manager from the Hiring Manager Experience
To access Interview Manager, complete these steps from the Hiring Manager Experience Home page.
Select the Candidates app, and then select the open request you want to view.
Locate the candidate you’re interested in, and then select Manage Interviews from the Take Action list. Interview Manager displays showing you only the candidate you selected. To see all of the candidates submitted to a request, select ShowAll Candidates in the upper right corner.
Interview coordinator tasks
As your program’s interview coordinator, you’re the primary user of the Interview Manager. You might be a hiring manager, a managed service providers or a program office user. You can find step-by-step instructions for managing interviews in this section.
Scheduling an interview
Using Interview Manager reduces the time it takes you to do your job, potentially improving your organization’s time-to-fill. Just select Schedule to get started.
To schedule an interview, complete these steps from Interview Manager.
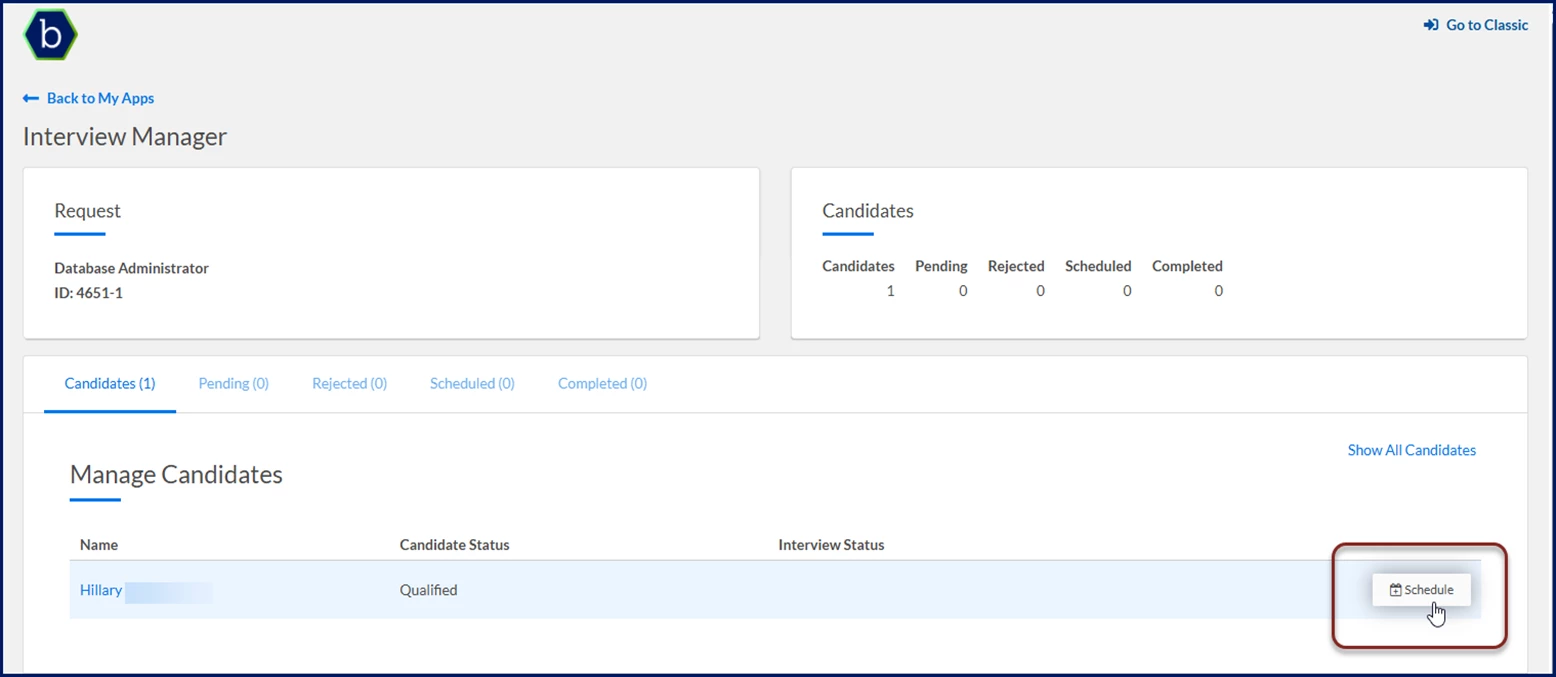
From the Manage Candidates section on the Candidates tab, navigate to the candidate for whom you want to schedule an interview. TIP: Use the Search Candidates field to quickly find your candidate. You can use any one of these criteria: candidate name, candidate status, interview status, or supplier.
Select Schedule. A Schedule Interview dialog displays.
From the Interview Type list, select the kind of interview you want to schedule. For example, you can choose BlueJeans, Go To Meeting, On Site, and much more.
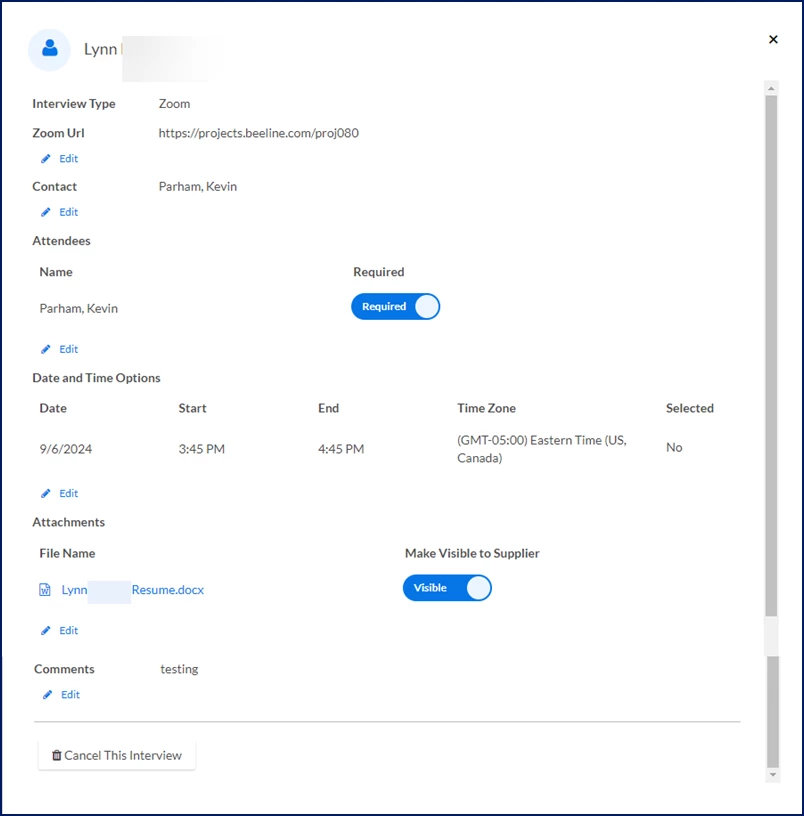
The next field updates automatically based on the Interview Type you select. Choose the matching option—for example, select a Location for on‑site interviews or enter a URL for online meetings like Teams or Zoom.
Optional. You can choose whether the candidate or the supplier provides the details. When you do, what you need to enter to complete scheduling will vary.
Make sure the correct primary contact is selected in the Contact field; your name is automatically added. Click in the Contact field to search for and select a different user. You can select only from users configured in your system.
Optional. Your name is automatically added to the Attendees section. If you don’t need to attend, select Remove.
Under the Attendees section, select the Add Attendee link. Additional fields automatically display in the Attendees section. TIP: Depending on your Enterprise configuration, you may see an attendee’s username and name while you’re scheduling.
Select the Attendee field, and then select the person you want to invite. Only users configured in your system display.
Indicate whether the attendee is required or optional. By default, the Required option is selected. If the attendee you’ve added isn’t required for the interview, set the Required toggle to make that person’s attendance optional.
Repeat steps 8 through 10 to add more attendees.
Optional. If you’ve inadvertently added an attendee, select Remove.
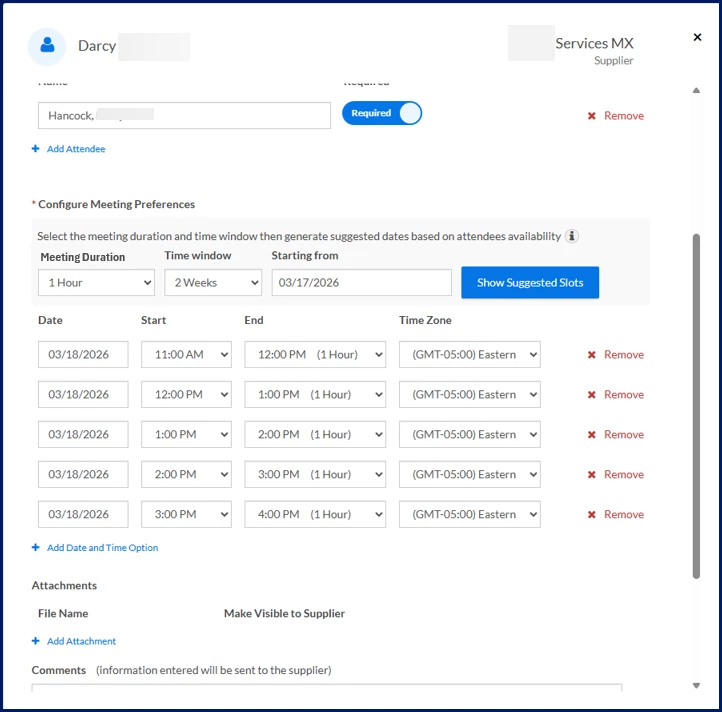
Optional. If your program is using Beeline’s Microsoft Outlook integration and you want to get schedule recommendations, take these steps.
Select Add Date and Time Option. Additional fields automatically display in the Date and Time Options frame.
Select an interview duration from the Meeting Duration list.
From the Time Window list, select 2, 3, or 4 weeks.
In the Starting From field, enter the date you want to begin looking for recommended time slots.
Select Show Suggested Slots. Available timeslots that fit your attendees’ schedules display. TIP: Time zones are automatically considered when recommendations are generated. When you’re scheduling an interview, the time zones for your location display. Invitations sent to users match their local time zone.
Optional. Select Remove to delete any recommended timeslots you don’t want to use.
Optional. Manually add timeslots by completing these steps:
Select Add Date and Time Option. Additional fields automatically display in the Date and Time Options frame.
Use the Date Calendar to select the date for the interview.
Select the time you want the interview to begin from the Start list.
Select an interview duration from the End list. The end time is automatically calculated for you.
Select the local time for the region or country where the interview is taking place from the Time Zone list.
Optional. Repeat steps 14 and 15 to immediately schedule another interview for later in the same day, week or any time you like. TIP: This option may or may not be available based on your Enterprise configuration.
Optional: If you want to include a résumé, curriculum vitae, or other files for the interviewers to review, complete these steps:
Select Add Attachment.
Navigate to the file you want to attach and then select Upload.
Add a label for the attachment in the Title field.
Select Save. By default, the attachment is hidden from the supplier.
Optional: Toggle the Make Visible to Supplier button to make the attachment available to the supplier.
Optional. In the Comments fields, add any remarks you want to send to the supplier.
Optional. You can select Save for Later if you need to confirm any details before scheduling an interview. Later, you can use the Edit Draft button to open and schedule the interview. Or use the Delete Draft button to remove the interview.
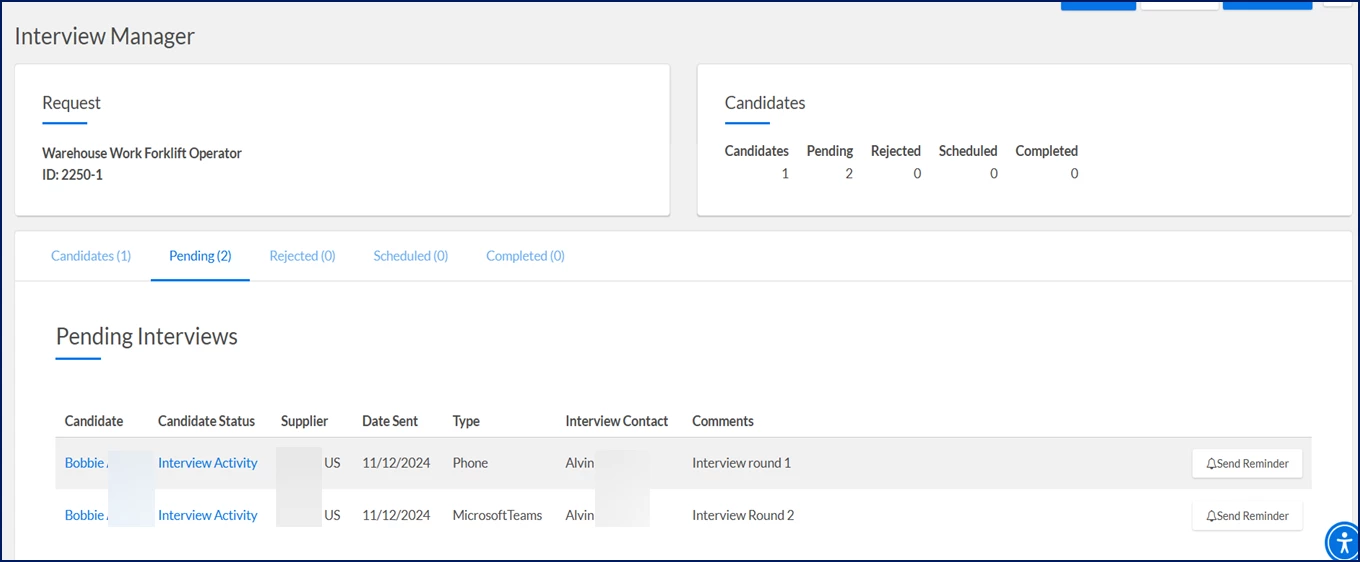
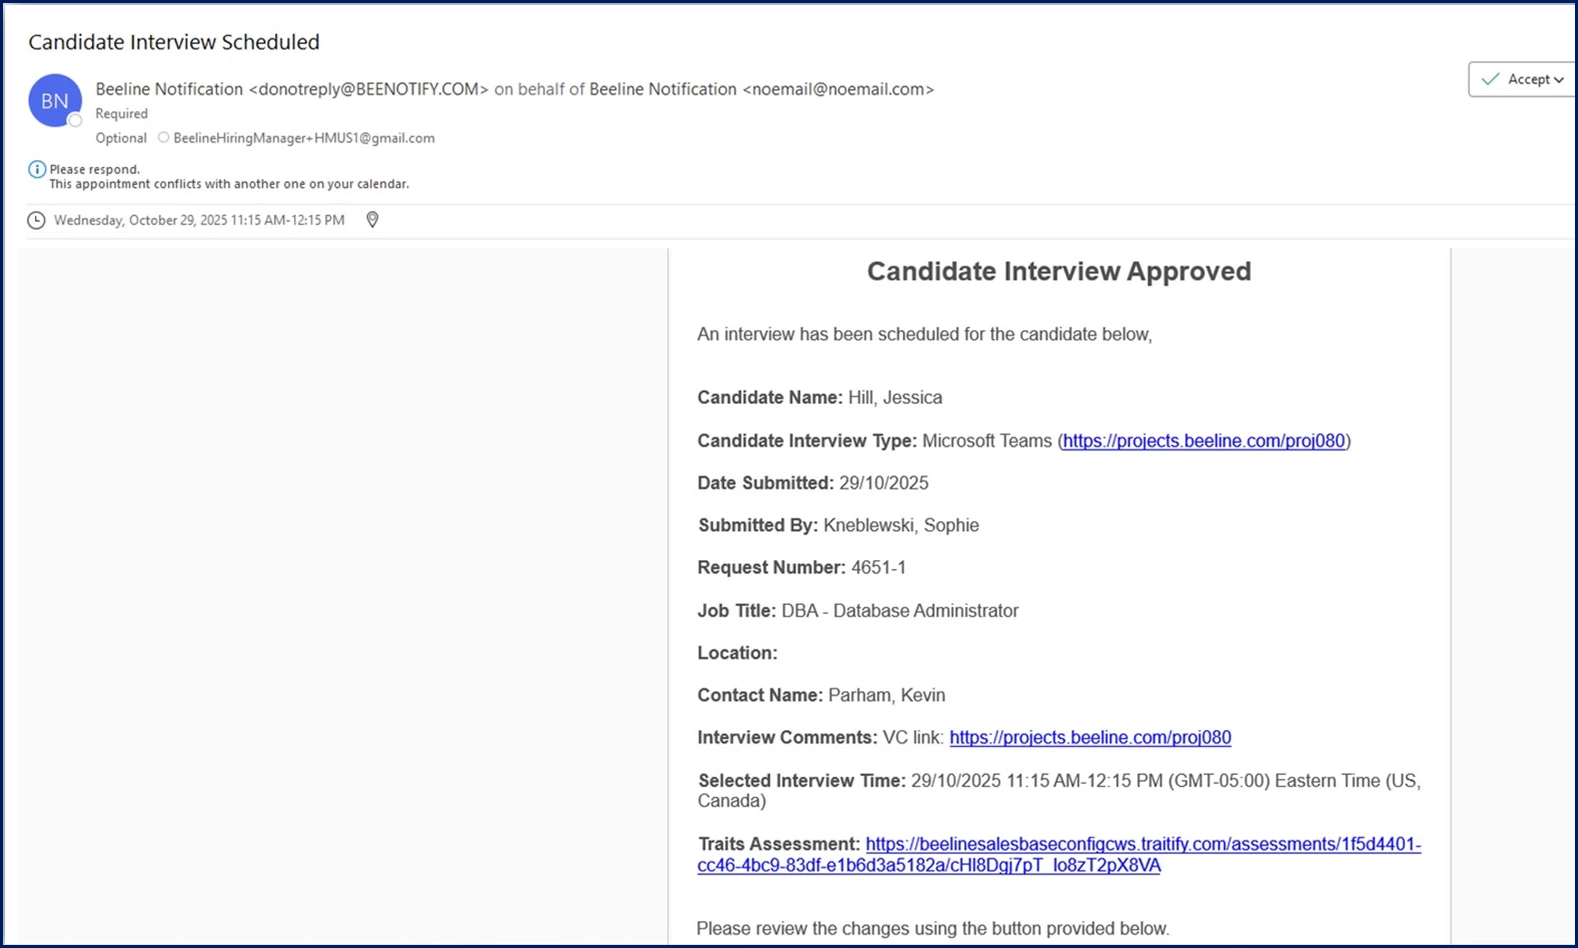
Select Send Invite. You can view the interview on the Pending tab.
After you send an invite, an interview request is sent to the supplier. After the supplier confirms the interview, notifications are sent to the attendees with an .ics file attachment they can add to their calendar application. The notification also informs the attendee whether their attendance is required or optional.
Note: An .ics file is a calendar file saved in a universal calendar format used by several email and calendar programs, including Microsoft® Outlook®, Google Calendar™, and Apple Calendar.
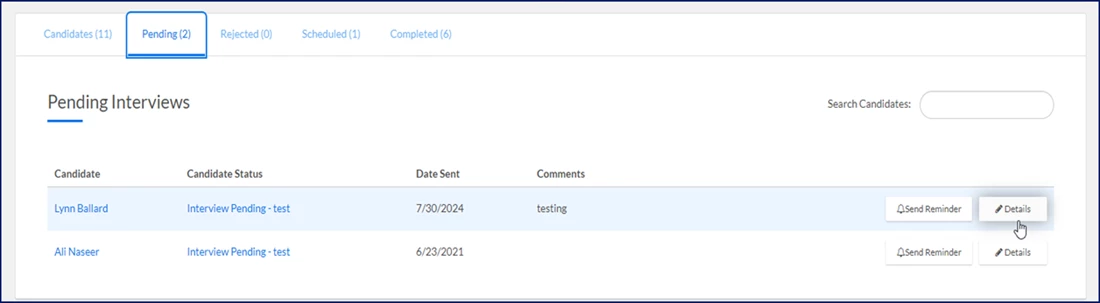
Viewing interview details
Quickly view specifics about an interview in an Interview activity, Pending or Scheduled status any time you need. Simply take one of these actions.
To view interview details, complete these steps from Interview Manager.
Select the Pending tab, and then select the Details button. OR
Select the Scheduled tab, and then select the Interview link.
The Interview Details dialog displays details about the interview you selected.
Modifying an interview
You can modify an interview in an Interview activity, Pending or Scheduled status at any time.
To change details for an interview, complete these steps from Interview Manager.
Navigate to the InterviewDetails dialog by taking one of these actions:
Select the Pending tab, and then select the Details button. OR
Select the Scheduled tab, and then select the Interview link.
Select the Edit link for any information you want to modify.
Change the information, and then select Save.
Select the X in the Interview Details dialog to close it and return to Interview Manager.
Canceling an interview
You can quickly and easily cancel an interview that’s in an Interview activity, Scheduled or Pending status. When you cancel a scheduled interview, notifications are sent to the hiring manager, the program office, the supplier, and all attendees. When you cancel a pending interview, notifications are sent to the hiring manager, the program office and the supplier.
To revoke an interview, complete these steps from Interview Manager.
Navigate to the InterviewDetails dialog by taking one of these actions:
Select the Pending tab, and then select the Details button. OR
Select the Scheduled tab, and then select the Interview link.
Select Cancel this Interview. A CancelInterview dialog box displays.
Enter remarks explaining why you’re canceling the interview in the Comments field.
Select OK.
Reviewing proposed times
If the dates and times you proposed for an interview don’t work for your supplier, they can reply with alternate dates and times. When that occurs, an email notification is sent to you and the interview displays on the Pending tab.
To review proposed interview times, complete these steps from Interview Manager.
Select the Pending tab.
Navigate to the interview you want to review.
Select Review And Accept Time Slot. Additional fields display showing the proposed dates and times.
Select the date and time you want, and then select Accept Time Slot.
Optional. If the proposed time slots aren’t acceptable, select Cancel, and then edit the interview.
An interview request is sent to the supplier. After the supplier confirms the interview, notifications are sent to the attendees with an .ics file attachment they can add to their calendar application. The notification also informs the attendee whether their attendance is required or optional.
Hiring manager, manager, program office user and supplier tasks
After an interview is scheduled, you’ll receive an interview request. You can accept a timeslot, propose a new timeslot or reject an interview request. Here are instructions for responding to interview requests.
Accessing Interview Manager
To access Interview Manager, complete these steps.
Beeline Classic
From your MyToDo List quadrant, select the Interview Alert link. A ReviewAlerts page displays.
Locate the candidate interview you want to review.
From the Action list, select ViewDetails. Interview Manager displays. TIP: The ManageCandidates tab displays by default showing only the interview request you selected. Select the Show All Candidates link in the upper-right corner to view all candidates submitted by your organization for a specific request.
Hiring Manager Experience
Select the Candidates app, and then select the open request you want to view.
Locate the candidate you’re interested in, and then select Manage Interviews from the Take Action list. Interview Manager displays showing you only the candidate you selected. To see all of the candidates submitted to a request, select ShowAll Candidates in the upper right corner.
Accepting a timeslot
After an interview coordinator schedules interviews, an interview request is sent to the supplier. As the supplier, you can quickly review and accept a proposed timeslot from Interview Manager.
To accept a timeslot, complete these steps from Interview Manager.
Select a proposed date and time slot.
Optional. In the StatusComments field, enter any remarks you’d like to send to your client.
Select Accept Time Slot.
A notification is sent to your client with your response and any comments you included. In addition, these actions occur.
With Outlook Calendar Invite Notification set up
Invitations are automatically sent to attendees, the supplier and/or the program office based on your Enterprise configuration.
Without Outlook Calendar Invite Notification set up
Your organization can choose to automatically add interviews to users’ calendars after a supplier accepts a timeslot for an interview. That option is set up via self-service.
Notifications are sent to the attendees with an .ics file attachment that they can add to their calendar application. Attendees must manually save and add the .ics file to their calendar application.
The notification also informs the attendee whether their attendance is required or optional.
TIP: You cannot add the .ics file to your MyCalendar feature on your Enterprise dashboard.
Proposing a new timeslot
Sometimes suggested interview times just don’t fit your schedule. You can quickly suggest new timeslots from Interview Manager.
To propose new timeslots, complete these steps from Interview Manager.
Select Don’t see a time that works. A New Times For dialog box displays.
Select Date, and then select the date when you want the interview to occur from the Calendar control.
Select Start, and then select the time you want the interview to begin.
From the End list, select an interview duration and the end time is automatically calculated for you.
Select TimeZone, and then select the local time for the region or country where the interview is taking place.
Repeat steps 5 through 8 to add multiple time slots.
Select SuggestNewInterviewTimes.
A notification is sent to your client. After your client reviews and accepts a new timeslot, the interview is scheduled, and you receive a notification.
Rejecting an interview
Occasionally, you may need to decline an interview. You can do so from Interview Manager.
To turn down an interview, complete these steps from Interview Manager.
In the StatusComments field, enter any remarks you’d like to send to your client.
Select RejectInterview. A RejectInterview dialog displays.
In the Comments field, enter an explanation for declining the interview.
Select Reject Interview.
Preparing for an interview
Hiring managers and program office users can generate interview questions using the Interview Question Generator in Interview Manager. Go to Take Action > Manage Interviews, select Interview Questions. You’ll be taken to the Interview Questions tab on the Candidate Evaluation page.
To learn more about the Interview Question Generator, read this article. The Interview Question Generator feature is a premium AI feature.
Attending an interview
As an interview attendee, you’ll receive an email notification when your interview time is confirmed. When your email includes an Interview Type field and the Interview Type is a Video Conference (such as Teams or Webex), your email includes a clickable link. Simply select the Interview Type link in your email or calendar invite to join your video interview.
Please complete the following fields as part of your Beeline Community registration. Unless noted as private, this information will be displayed on your user profile within the community.