To make it easier for you to amend common changes, quick links are available at the top of the Select Assignments to Amend page. Use the links to update basic aspects on multiple assignments quickly and easily.
Caution: If you submit and process multiple amendments with the same effective dates, the last amendment submitted and processed takes precedence and overwrites previous amendments.
For example, your first amendment changes the hiring manager on the assignments from Username 1 to Username 2 and is effective 01/01/18 to 01/30/18. Your second amendment changes the cost center on the assignments and is effective 01/01/18 to 01/30/18. When your second amendment is processed, the hiring manager reverts to Username 1.
Locating assignments
Steps for navigating to Mass Amendments and locating the assignments you want to update are the same regardless of the change you want to make. This topic explains how to navigate to Mass Amendments, filter and sort, and then locate assignments.
To navigate to Mass Amendments and find the assignments you want to change, complete these steps from your Enterprise dashboard.
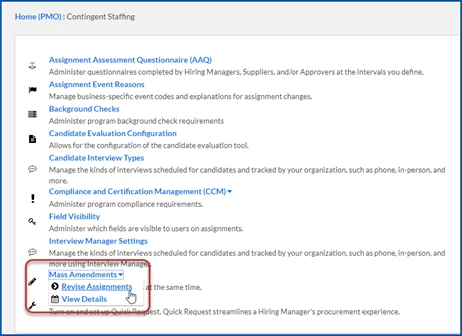
Select the Preferences gear, and then select VMS Settings > Contingent Staffing.
Expand the Mass Amendments list, and then select ReviseAssignments.
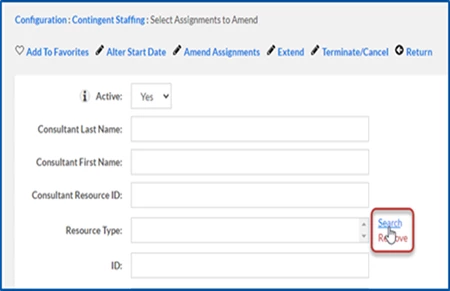
A Select Assignments to Amend page displays fields for filtering assignments and a list of assignments you can select.
Select the Search link next to a field to open a dialog box, and then choose criteria to filter the list of assignments. For example, you might filter assignments by ResourceType.
Repeat step 3 to add other filters.
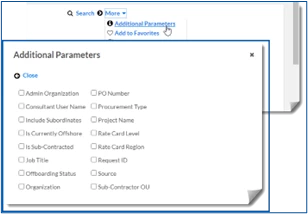
Optional: To select additional filters, select the More list, and then select Additional Parameters. Next, choose the criteria you want, and then select Close.
Optional: Use the column headers above the Assignments list near the bottom of the Select Assignments to Amend page to sort the list.
From the Assignments list near the bottom of the Select Assignments to Amend page, select the assignments you want to amend.
Continue with the type of amendment you want to complete.
Use the Alter Start Date quick link to easily update the date when multiple assignments will begin.
To alter the start date on multiple assignments, complete these steps.
Navigate to Mass Amendments > Revise Assignments, and then filter and sort assignments as needed.
From the Assignments list near the bottom of the Select Assignments to Amend page, select the assignments you want to amend.
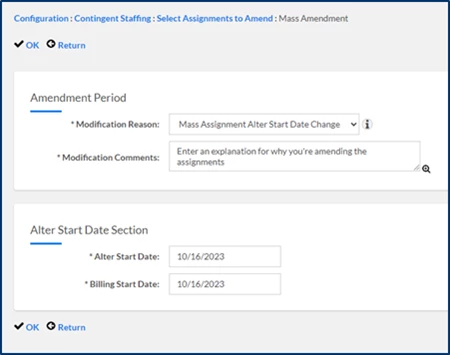
Select Alter Start Date from the top or the bottom of the Select Assignments to Amend page. A Mass Amendment page displays.
From the ModificationReason list, select the basis for your change. TIP: The ModificationReasons list includes global event explanations for amending assignments, such as Do Not Rehire, Accepted another Offer, and much more.
In the ModificationComments field, enter an explanation for why you’re amending the assignments.
In the Alter Start Date field, enter the new date you want the assignments to begin.
In the Billing Start Date field, enter the new date you want billing for the assignments to begin.
Click OK to save your changes to all the assignments you selected. The start date is changed for the assignments you selected. TIP: Force flags, such as Cost Centers on projects, are maintained when you update assignments. Warnings display for any changes you attempt that aren’t permitted, and an error message displays for any changes you attempt that cannot be validated.
Amend Assignments to change key components on multiple assignments
Use the Amend Assignments quick link to easily manage numerous aspects for multiple assignments. With the Amend Assignments action, you can update these basic aspects on multiple assignments quickly and easily. You can also manage some rate-related aspects ( * ) on multiple assignments.
Add Assignment Bill Rates*
Add Assignment Pay Rates*
Administrative Cost Center
Align Organizational Data to Match Hiring Manager
Assignment Type
BTE Projects
Client-Defined Fields (CDFs)
Cost Center
Exclude from tenure rate adjustments
Exempt from tenure
Functional Partition
Hiring Manager
Physical Work Location
PO Number
Project
Requestor
Sponsor
Sync Rate Cards*
Timesheet Approver
Update Assignment Bill Rates*
Update Assignment Pay Rates*
Work Location
To amend basic aspects on multiple assignments, complete these steps.
TIP: Fields available in the Amendment section vary based on your organization’s needs and your permissions.
Navigate to Mass Amendments > Revise Assignments, and then filter and sort assignments as needed.
From the Assignments list near the bottom of the Select Assignments to Amend page, select the assignments you want to amend.
Select Amend Assignments from the top or the bottom of the Select Assignments to Amend page. A Mass Amendment page displays.
In the Amendment Start Date field, enter the date you want your changes to be applied.
Optional: In the Amendment End Date field, enter the new date you want the assignments to finish.
From the ModificationReason list, select the basis for your changes. TIP: The ModificationReasons list includes global event explanations for amending assignments, such as Do Not Rehire, Accepted another Offer, and much more.
In the ModificationComments field, enter an explanation for why you’re amending the assignments.
To assign a different hiring manager, select their name from the Hiring Manager list or use the Search icon to quickly locate a specific hiring manager. The assigned hiring manager is the person primarily responsible for managing the assignments.
To assign a separate user as the timesheet approver, select their name from the Timesheet Approver list or use the Search icon to quickly locate a specific approver. In some scenarios, a different user other than the assigned hiring manager is responsible for ratifying timesheets.
Use the Requestor list to associate another user to the assignments who will have similar access and visibility as the hiring manager. Select the user’s name from the Requestor list or use the Search icon to quickly locate a specific user. TIP: Some programs track who submitted request for Talent, which may a different user other than the hiring manager.
Use the Sponsor list to associate another user to the assignments who will have similar access and visibility as the hiring manager. Select the user’s name from the Sponsor list or use the Search icon to quickly locate a specific user. TIP: In some scenarios, a different user other than the assigned hiring manager is responsible for allocating Candidates to assignments. In addition, another user (such as an Administrative Assistant, a Job Coordinator, a Site Coordinator, or a Sourcing Liaison) needs visibility and may help manage and oversee assigned requests, candidates, and assignments.
Use the Admin Cost Center list to assign the business unit or responsibility center used to track overhead and/or operating costs not clearly linked to any tangible or measurable output. Select the cost center from the Admin Cost Center list or use the Search icon to quickly locate a unit.
Use the Cost Center list to assign the business unit or responsibility center used to track direct spend. Select the cost center from the Cost Center list or use the Search icon to locate a specific unit quickly. TIP: Cost centers are the most granular values against which companies can associate spend. Your organization might use two sets of cost centers. One to track spend internally in different divisions of the business for better planning. And another for external statutory spend reporting, such as allocating costs to different tax entities.
Use the Physical Work Location list to identify the locale where the contingent talent is located. Select the name from the Physical Work Location list or use the Search icon to quickly find a specific locale.
Use the Work Location list to assign the locale used to calculate pay and taxes. Select the name from the Work Location list or use the Search icon to find a specific locale quickly. TIP: Work Locations are used for tax calculations and to track site locations where the work occurs. For example, pay and taxes might be calculated using US dollars, but the Talent is located outside of the United States.
Use the Project list to identify the larger group of work an assignment is associated with. Select the name from the Project list or use the Search icon to find a specific project quickly. TIP: Projects can be used to track a group of related tasks completed within a particular financial budget restrain and a limited period. Talent can be allocated to multiple projects or change during the duration of an assignment.
Use the Functional Partition list to identify the operational unit with which the assignments are associated. Select the name from the Functional Partition list or use the Search icon to quickly find a specific partition. TIP: Data in your Beeline platform can be stored and arranged into Business Areas and Functional Partitions giving you visibility into horizontal, independent business units, shared services and departments. Business Areas represent business units, projects or shared services in your organization. Functional Partitions are linked to a single Business Area and represent subdivisions, subfunctions, subprojects, lines of business, or supervisory organizations in your business.
Use the PO Number list to associate the purchase order to which the assignments are allocated. Select the name from the PO Number list or use the Search icon to quickly find a specific purchase order. TIP: Purchase orders are created by the buyer (client) authorize procurement transactions. They specify payment terms, delivery dates and all other obligations and conditions.
From the Assignment Type list, select the kind of assignment you want to apply, such as standard, onsite rotation, multi-location, or other types set up in Beeline. TIP: Some organizations use values in their assignment type as drivers that control Supplier rates on a request and on an assignment. Occasionally a Supplier’s status changes, and you need to update the assignment type for all assignments from that Supplier.
To add Beeline Time & Expense (BTE) projects data, select AddItem from the BTE Projects frame. Next, use the Search field in to locate the WBS element you want to add or remove. Then select Add or Remove from the Action list. TIP: Some organizations use work-breakdown structure (WBS) elements on requests and assignments to bucket and manage project activities. Using WBS elements can simplify project execution and provide accurate readable project organization. Talent can be allocated to multiple projects or change during the duration of an assignment. TIP: You can also import assignment types and BTE Project data via Self-Service. Select the Preferences gear, and then select VMS Settings>Data Management. Next, select Web Import from the Data Management page. Then follow your organization’s business processes for importing data to amend assignments. Use Assignment Mass Amendment for the Import type. From the BudgetAdjustment list, select how you want your changes to affect the budget.
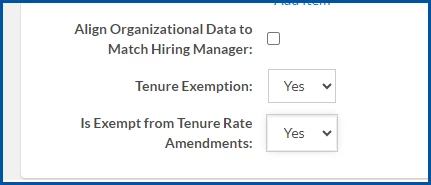
Select the Align Organizational Data to Match Hiring Manager checkbox to match any organization information with the designated hiring manager.
Select Yes from the Tenure Exemption list to exclude the assignment from tenure calculations.
Select Yes from the Is Exempt from Tenure Rate Amendments list to exclude the assignment from any mass amendment tenure rate transactions.
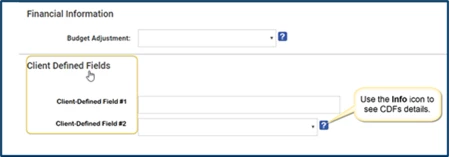
Select any CDFs you want to change. CDFs display below the FinancialInformation section.
Select OK to save your changes to all your selected assignments. A warning displays alerting you to the number of assignments you’re amending.
Select OK. The changes you made are applied to your selected assignments, including data from any CDFs you selected. TIP: Force flags like Cost Centers on projects are maintained when you amend assignments. Warnings display for changes you attempted to make that aren’t permitted, and an error message displays any changes you tried to make that couldn’t be validated.
Use the Extend quick link to easily lengthen the duration of multiple assignments.
To extend the duration of multiple assignments, complete these steps.
Navigate to Mass Amendments > Revise Assignments, and then filter and sort assignments as needed.
From the Assignments list near the bottom of the Select Assignments to Amend page, select the assignments you want to amend.
Select Extend from the top or the bottom of the Select Assignments to Amend page. A Mass Amendment page displays.
From the ModificationReason list, select the basis for your changes. TIP: The ModificationReasons list includes global event explanations for amending assignments, such as Do Not Rehire, Accepted another Offer, and much more.
In the ModificationComments field, enter an explanation for why you’re amending the assignments.
In the Extension Date field, enter the date to which you’re lengthening the assignments.
From the BudgetAdjustment list, select how you want your changes to affect the budget.
Select OK to save your changes to all your selected assignments. A warning displays alerting you to the number of assignments you’re amending.
Select OK. The assignments you selected are extended to the date you chose. TIP: Force flags like Cost Centers on projects are maintained when you amend assignments. Warnings display for changes you attempted to make that aren’t permitted, and an error message displays any changes you tried to make that couldn’t be validated.
Use the Terminate/Cancel quick link to easily end multiple assignments across industries, geographies, and request types.
To terminate or cancel multiple assignments, complete these steps.
Navigate to Mass Amendments > Revise Assignments, and then filter and sort assignments as needed.
From the Assignments list near the bottom of the Select Assignments to Amend page, select the assignments you want to amend.
Select Extend from the top or the bottom of the Select Assignments to Amend page. A Mass Amendment page displays.
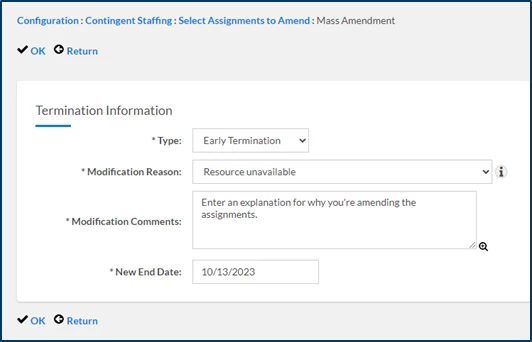
Select Terminate/Cancel from the top or the bottom of the Select Assignments to Amend page. A Mass Amendment page displays.
The Type list prepopulates with EarlyTermination. You can select one of these types: Early Termination, Cancellation, No Show, Alter End Date, or Terminate on Time.
The ModificationReason list prepopulates with EarlyTermination. TIP: The ModificationReasons list includes global event explanations for amending assignments, such as Do Not Rehire, Accepted another Offer, and much more.
In the ModificationComments field, enter an explanation for why you’re amending the assignments.
In the New End Date field, enter the date the assignments finish.
Select OK to save your changes to all your selected assignments. A warning displays alerting you to the number of assignments you’re amending.
Select OK. The assignments you selected are terminated. TIP: Force flags like Cost Centers on projects are maintained when you amend assignments. Warnings display for changes you attempted to make that aren’t permitted, and an error message displays any changes you tried to make that couldn’t be validated. For example, you might have an assignment with actions in a PendingApproval status.
Please complete the following fields as part of your Beeline Community registration. Unless noted as private, this information will be displayed on your user profile within the community.