
Web Import Tool – Introduction
Table of Contents:
The Web Import Tool feature reduces the amount of time it takes for client data to be imported into Beeline Enterprise by granting authorized users access rights to manage client production site data. These Web Import Tool usage rights are assigned based on the following criteria:
- Validate Only – grants users the ability to download an import template file, populate data into it, and then validate the completed file prior to import.
- Validate with Import Rights – grants users the same rights as Validate Only plus the right to import validated files into the client’s production or project sites.
Please note: The Web Import Tool only validates and imports data that is populated into one of Beeline Enterprise’s standard import template files.
♦ Primary benefits:
- Gives authorized users the ability to self-manage data imports.
- Reduces turnaround time for importing data into a client production site.
♦ Secondary benefits:
- Enhances skills and knowledge level regarding Beeline Enterprise data formats and data system requirements.
- Enhances overall knowledge of Beeline Enterprise functionality and differences based on system user roles.
If you are given Web Import Tool access rights:
Use caution when importing data into any Beeline Enterprise site; with great power comes great responsibility! You will be responsible for ALL data you import into ANY client Beeline Enterprise site. This means that YOU are responsible for correcting any issues resulting from, or caused by, “bad data” you import into a Beeline Enterprise production site.
Import / Export Rights
Data in Beeline Enterprise is stored in a series of data tables arranged in a hierarchy structure to support system functionality and workflows. To ensure that data is populated into the relevant data table, data can only be imported using a Beeline import template. The process starts by downloading the relevant import template. Templates are revised as needed to ensure that Beeline supports current market practices therefore users should ALWAYS download a new template prior to EVERY import to ensure that the template in use is the most current version.
Once the new/revised data is populated into the template file, the next step is to validate the data by running the file through the validation process. In a perfect world, all files always validate with no errors with the first validation “run”. In the real world, there are several factors that can cause the validation to require multiple “runs”, requiring multiple error adjustments, before a file successfully validates. Templates that include data fields that are replicated throughout Beeline data hierarchies or templates that include multiple “conditional” fields will be the biggest challenge. Every data field has a single “home” location. However, a data field may be replicated in multiple data tables. Each instance of that field must remain in sync with the value of the “home” location. Some data fields are required due to Beeline data rather than client data, but this data needs to be entered as indicated. The validation process is not only to check data in the import file, but also to verify that it is consistent with the data already populated in the system. Patience is a key factor! The Import Tool is ALWAYS right. Items in the error list must ALWAYS be resolved—and resolved to the Import Tool’s satisfaction. The Errors List is not the enemy. It is the guardian at the gate to ensure that all is well before the import portal will be opened.
A “View Details” option allows users to review the validation results and adjust data entries as indicated. If adjustments are made, the file must be re-validated. This process is repeated until all data entries pass the validation process. ALL line items included in any import template data file must successfully validate before the file is ready to import into Beeline Enterprise.
The validation process identifies data that meets format or system specifications required within Beeline Enterprise. Validation does NOT verify that the content information is accurate—it can only verify that the content matches all system requirements as to data entry format requirements and data table hierarchy specifications. Verification that the data is accurate is a task reserved to client-side users because the data is, and always remains, the property of the client.
An Export file can go a long way to simplify the overall validation process since it can “reveal” how data is currently stored in your Beeline Enterprise instance and therefore serve as a model to follow when creating a new import file. Export files are also frequently referred to as “reverse imports”.
Step-by-step instructions for creating an import file, exporting a reverse import, validating the new import file, and importing the validated file are provided below. Check the Import/Export Template List chart located in this article to verify if the import template also allows for reverse imports. For those templates that do not include export rights, follow the instructions provided in the Header row Comment tags for guidance.
Who is authorized to Import, Export, or Validate?
Reach out to your Program Office for any questions as to import, export, and/or validation rights. These actions are permissions assigned to your user role. Please note: THESE PERMISSIONS ARE INDEPENDENT FROM CERTIFICATION LEVEL TRAINING. Completing Certification level training is not a prerequisite or requirement for the granting of import, export, and/or validations rights. The degree to which you are authorized to complete the activities included below depends on which permissions are assigned to you. If your permissions only grant you validation rights, then you will need the assistance of someone in the Program Office who has import rights to complete the import process once you have validated the import file. Permissions must be assigned to your profile to enable you to import, export, or validate files. You cannot impersonate a user to import, export, or validate in the Web Import Tool. Which Program Office staff are granted which rights is determined by your Program Office managers. Assigning the permissions to a user role profile record requires assistance from your Beeline Representative.
Download the template and populate the data fields.
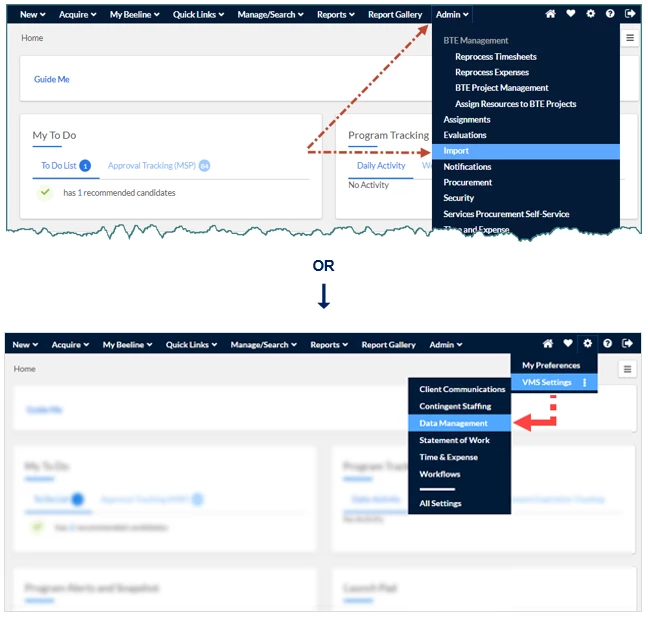
Access to download an import template file is located under the Admin Header Menu or via the Self-Service Data Management selection list located under the Preferences Menu. Both methods are detailed below. System configurations and your user role settings determine which access method is available to you.
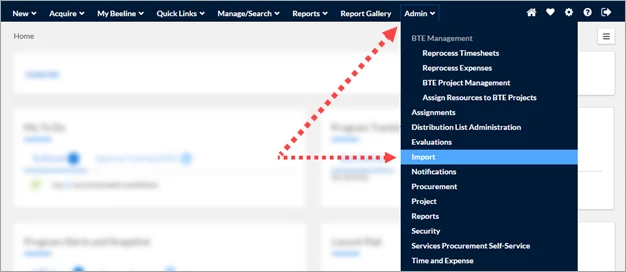
Option 1 – Admin Header Menu:
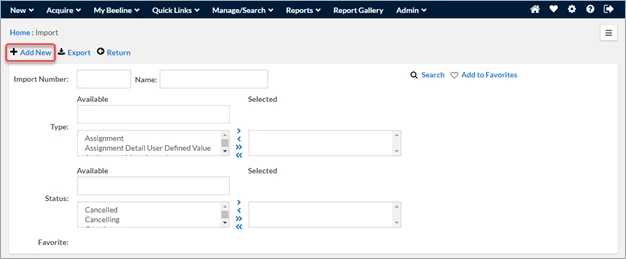
- From your home dashboard, click Admin in the Header Menu bar, then click Import. The Import screen displays.
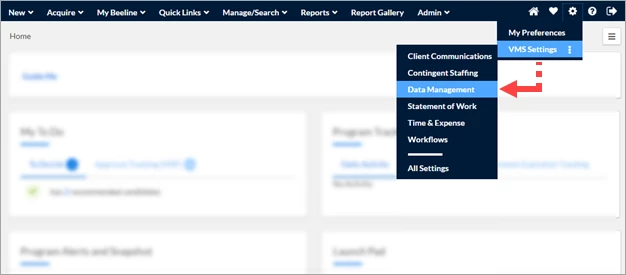
Option 2 – Preferences Menu:
- From your home dashboard, click the gear icon to display the Preferences menu.
- Hover over VMS Settings, then click Data Management in the fly-out panel. The Data Management screen displays.
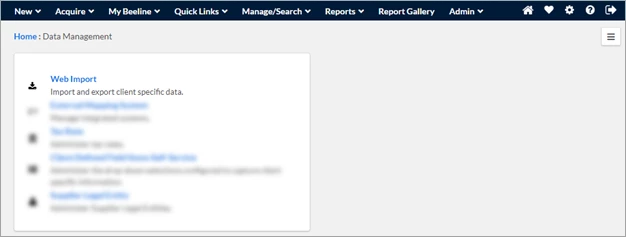
- Click Web Import in the list of options. The Data Management : Import screen displays.
From the Import List screen:
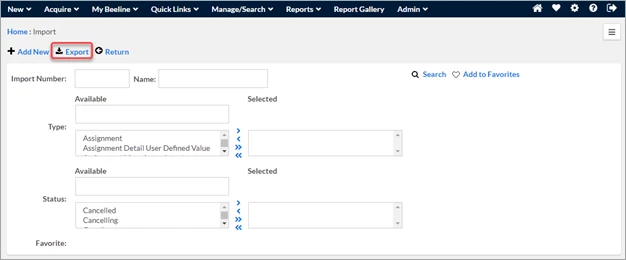
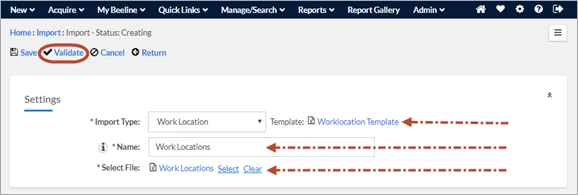
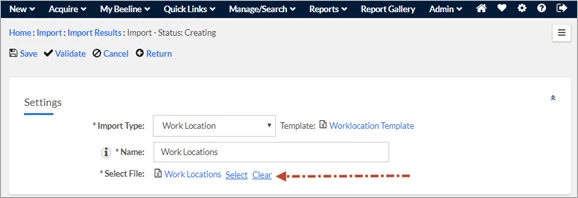
- On the Import list screen, click Add New. (Note: The Add New link is only visible to users granted Web Import Tool access rights.) The Import – Status: Creating screen displays.
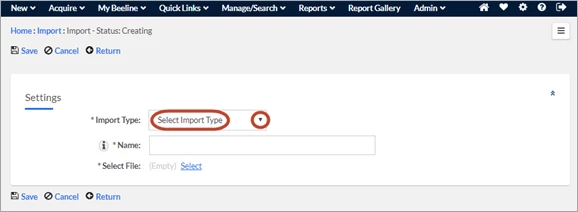
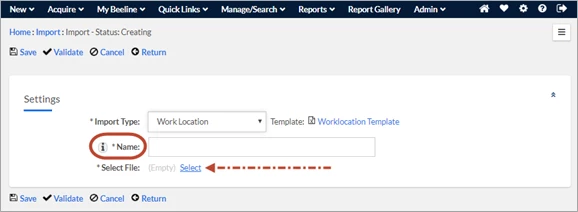
- On the Import – Status: Creating screen, expand the Import Type drop-down list and select the import template you need. Once your selection is made, a download link for that import template automatically displays to the right of the Import Type field as shown in the second screenshot below. Notice that the Validate button is now visible as an Action button as well as the template download link next to the Import Type field.

- Click the template name hyperlink to download the import template.
- Click Cancel or Return to exit the Import – Status: Creating screen.
- Use the “Save As” option to rename and save the template as your import file. Please follow any file-naming conventions required by your program. Use a filename that CLEARLY defines the contents of this template file, especially if someone else will be the importer and needs to select the file from the list screen.
- Follow the format requirements as indicated in the import template’s header row. Simply hover over the header cell in each template column and the requirements display as Comments. Once your data entry into the template is complete, the next step is to validate your data file.
- Optional: Extract a sample file (i.e., reverse import) of your system data to use as a reference aide by following the instructions in the Export section below.
Please note: Not all import templates include export rights. Check the Import/Export Template List chart located in this article to verify if this option is available for your import template.
Export a “reverse import” to use as a reference aide.
- Use either the Admin/Import or the Preferences/VMS Settings option explained in the Download section above to navigate to the Import list screen.
- Click Export. The Export Screen displays.
NOTE: If you do not see the Export option, reach out to your Program Office for assistance. (Export is a separately assigned user role permission.)
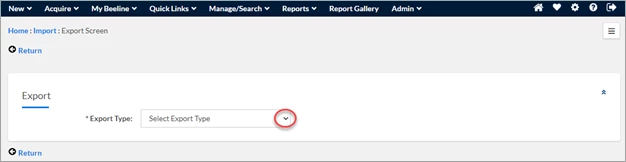
- Expand the Export Type drop-down list and select the export Type to match your intended import. The screen refreshes to display data fields specific to that data template. Notice that Beeline required fields are indicated by an asterisk (*). (The example shown below is based on the Supplier template.)
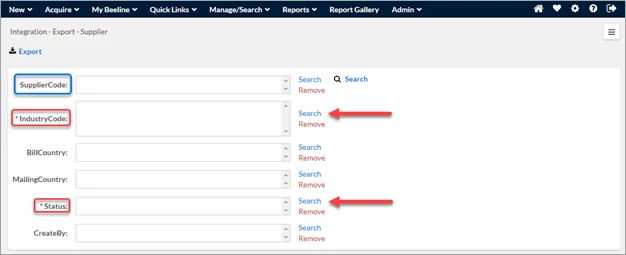
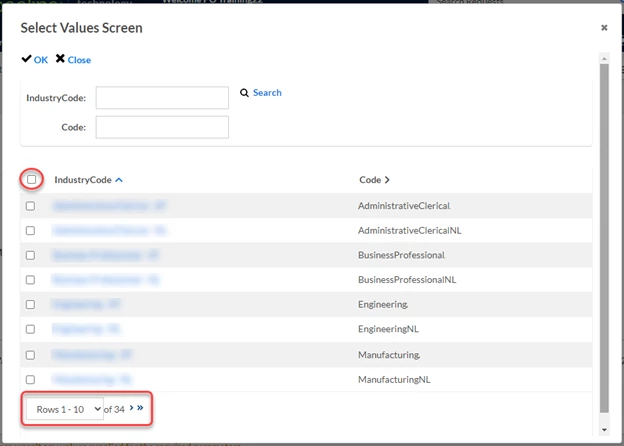
- Click Search to the right of each Required field and then make your selections from the pop-up Select Values Screen as to which categories should be included in your export file. Use the checkboxes to select individual items or the checkbox in the header row to select all items.
TIP: Check the results total at the bottom of the list to make sure you have reviewed all possible items for your selection list.
- Click OK to save your selections and return to the Export screen.
- Repeat Steps 4 and 5 until you have made your selections for all Required fields. If you want your export file to include examples of non-Required fields, follow the same process to make your selections. Notice that SupplierCode is not designated as a Required Field. It is required to IMPORT a Supplier record, but not for an export file, although the information would be helpful to include to use as an example.
- Now click Search for the entire Export file. The screen refreshes to display a results list to match the selections you made.
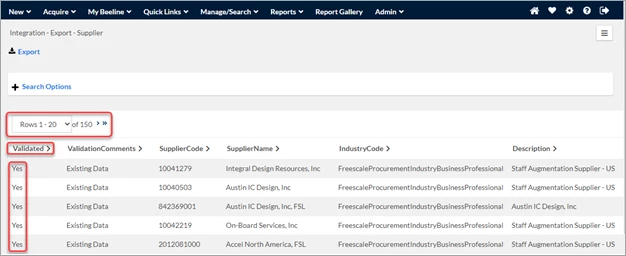
- Review the list and click Search Options if you need to make adjustments. Notice that the data has been previously validated—which makes it an excellent resource to consult when filling out your import file.
- Click Export to download your file in xlsx format.
- Use standard Excel® practices to open and review your exported file. Not only does the export file show you how data has been entered previously into Beeline data tables; it also provides an example so that your data entries can be consistent and indicates which fields can be left blank without triggering a validation error.
TIP: Export files use a generic filename label. Save or Rename the file using a filename that is more descriptive for your purposes.
Upload and validate your import file.
- Use either the Admin/Import or the Preferences/VMS Settings option explained in the Download section above to navigate to the Import list screen.
- On the Import screen, click Add New.
NOTE: The Add New link is only visible to users granted Web Import Tool access rights. You cannot impersonate a user who has these rights, the permissions must be assigned to YOUR profile record.
- Expand the Import Type drop-down list to select the import “type” that matches your import file.
Do not leave this field at the default “Select Import Type” setting or your import will not validate properly.
- Enter the name of your import file in the Name field. This is now your data-loaded import file you previously downloaded as a template. Follow any file-naming conventions required by your program.
- Click Select next to the Select File label and use your browse options to locate your import file.
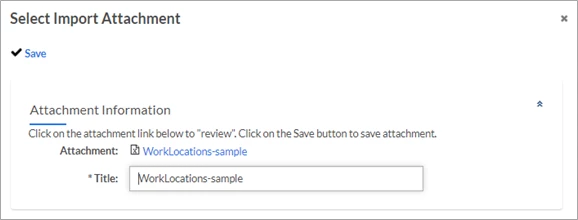
- Click Upload in the Select Import Attachment pop-up window to import your file.
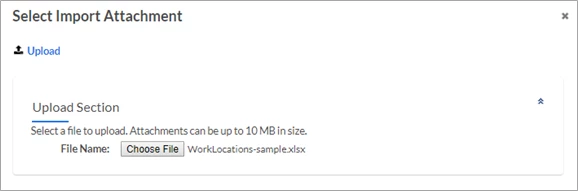
- Click Save in the next Select Import Attachment pop-up window to complete the import process.
Notice that this window includes an Attachment hyperlink and a Title field. You can review your file by clicking the hyperlink or you may adjust the text you entered in the previous Name field by entering revised content in this Title field.
- The screen refreshes to display the Import – Status: Creating screen. Verify that the Import Type selection matches your import file “type”. As noted above, do not leave this field at the “Select Import Type” default setting or your import will not validate properly.
- Confirm that the Name entry is the filename you want to use for this file. Regardless of the filename you selected during the Select process, it saves your file using the content in the Name or Title field.
- Click Validate to begin the validation process now. Your file is automatically assigned an Import Number for tracking purposes and added to the display list on the Import screen.
Optional: Click Save to store your file to validate at a later time. Use this option when importing large files that need to be processed after standard business hours. - When you click the Validate button, it triggers the validation process. Your file goes into the validation utility queue and the status of your file updates to “Pending Validation”. A banner message indicates the status of your file and updates when the validation process is complete. You may leave this screen open to monitor the process of your validation or you may click Return to exit and return later. The validation process continues to run in the background.
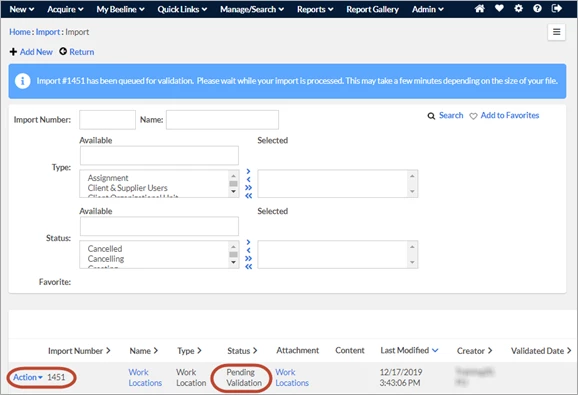
- During the validation process, the status changes to one of the following options based on the import results:
• Pending Validation: File is in queue for validation utility process.
• Validation Failed: File has errors that need to be corrected.
• Validated: File has passed validation with zero errors.
• Importing: File import is in process.
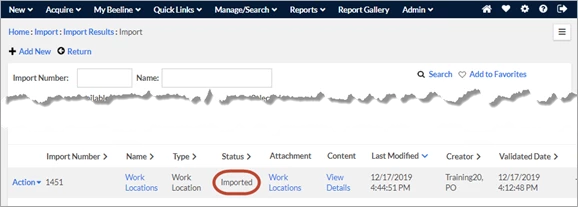
• Imported: File has been validated and imported.
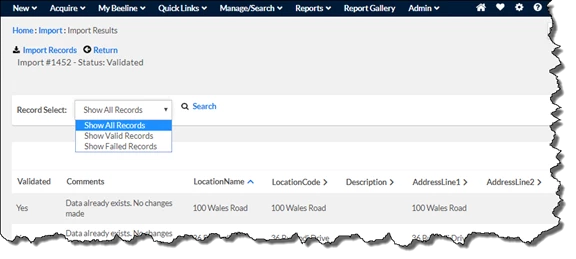
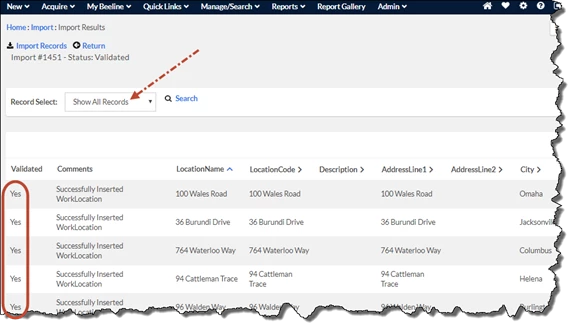
- After the validation process is complete, click View Details in the Content column to open your file and review the validation results. Results display as separate line items.

Notice that the View Details screen includes two new columns, Validated and Comments. The Validated column indicates a Yes or No.
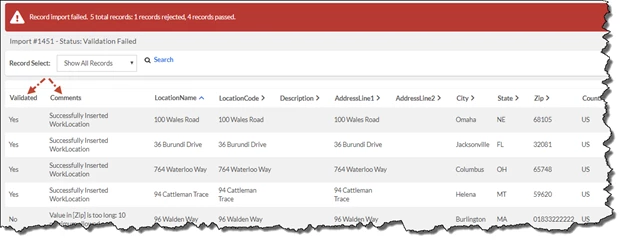
- For all No results, review the information in the Comments column to determine what adjustments you need to make before you re-validate the import file.
- For all Yes results, review the Comments information to ensure that the validation result is the EXPECTED result.
For example, if your intent was to “add” a new record but the validation comment indicates that the record was “updated” or “replaced”, then you need to check the data in Beeline Enterprise to resolve the inconsistency. REMEMBER, data can originate from multiple sources and/or users (for example, manual entry, import file, feed file, utility program, etc.,) within Beeline Enterprise but all client data is stored within a single production environment. You need to ensure that the data you import is compatible with the data already in place or generated from other sources. Validation results for Timesheet imports are explained in the Appendix, “Event-Driven Import Templates” section, since they include “conditions” that are unique to timesheet entry.
- Use the Record Select pull-down menu to filter which records you want to view. Options include Show All Records, Show Valid Records, or Show Failed Records.
- If your validation includes failed records, review the content in the Comments column to determine what adjustments need to be made to your original import file. Check the “Beeline CWS Import Error Guide” workbook for additional information related to validation comments and how to resolve them. Each tab in this Excel® workbook is specific to a template. Please be sure to consult the tab that matches your import template. Click to download this guide.
- If your file passes the validation, it is highly recommended that you review all line items in your import file to ensure that the information you plan to import is accurate. The validation process is data processing that checks for FORMATS and Beeline Enterprise SPECIFICATIONS; it cannot verify that the content entered in the template is accurate information.
- When you have finished making adjustments to your template file, click Reset Status to exit the validation screen and return to the Import – Status: Creating screen.
- Click Clear to remove your prior import file, then use the same select. upload, and validate steps to process your revised (corrected) import file.
- Repeat this process until ALL line items in your import file pass validation. Note: Depending on the complexity of the template, it is normal to go through multiple validation attempts to achieve ultimate success!
Import the successfully validated file.
Once all line items in an import file have successfully validated, it is ready for import into a Beeline Enterprise environment. We strongly recommend that all validated import files be imported into a client-specific test environment (UAT) for review prior to their import into your production environment. Please reach out to your Beeline COM (Client Operations Manager) for assistance with project test environments. Process steps for importing validated files vary based on the assigned Web Import Tool usage rights granted to client-side users.
- Validate Only* – users with this level of access may validate files but need to reach out to their Program Office to identify who has import rights and can import your validated file.
- Validate with Import Right* – users with this level of access have the ability to import validated files.
*If you are not sure whether you have been assigned validation/import permissions, check with your Program Office. If you are tasked with importing a file created by someone else, work with your Program Office as to visibility rights to the file.
Validate Only - Steps to Import:
- Use either the Admin/Import or the Preferences/VMS Settings option explained in the Download section of this document to navigate to the Import list screen.
- On the Import screen, locate the file to be imported in the displayed list or use the Search Options to locate the file.
- Verify that the file status indicates “validated”.
- Click View Details in the Content column. The screen refreshes to the Import Results screen.
- Confirm that the Record Select field is set to “Show All Records” and that all displayed line items indicate “Yes” in the Validated column.
- Review all line items in your import file to ensure that the information you plan to import is accurate. The validation process verifies the data meets FORMAT and Beeline Enterprise REQUIREMENTS; it cannot verify that the data is accurate information.
- Notify the designated Importer that the file is validated and ready for import; include the file number.
NOTE: Each Program Office should have at least one user who has import rights.
Validate with Import Rights - Steps to Import:
- Use either the Admin/Import or the Preferences/VMS Settings option explained in the Download section of this document to navigate to the Import list screen.
- Complete Steps 2 through 6 as described in the “Validate Only” section above.
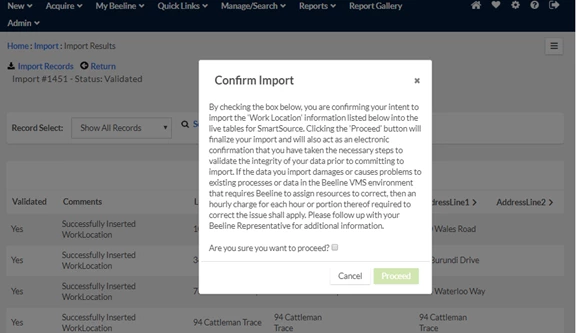
- Review all line items in the import file to ensure that the information you plan to import is accurate. The validation process is data processing that checks for FORMATS and Beeline Enterprise SPECIFICATIONS; it cannot verify that the content entered in the template is accurate information. You will be prompted during the import process to accept responsibility for the data you import—including any fees assessed to “correct” imported data errors.
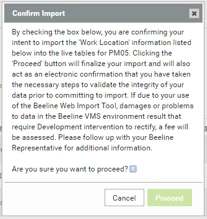
- Click Import Records to begin the import process.

- A pop-up window displays requesting confirmation. Click OK to proceed.
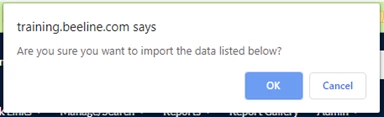
- A second confirmation pop-up window appears. This window includes a checkbox to indicate that you wish to proceed and that you accept responsibility for the data you are about to import. Click the checkbox and then click Proceed to continue. Note: each import process requires acceptance on BOTH confirmation windows.
- The screen refreshes back to the Import screen. A status banner indicates that your file is queued for import. The status message updates when the import process is complete. The status of the file updates to: Imported. You may leave this screen open to monitor the process of your import or you may click Return to exit and return later. The import process continues to run in the background.
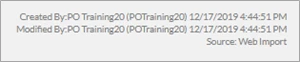
- Once completed, import results can be verified by locating any of the imported records using any of the Header Menu bar options (for example, Manage Search or Admin/Security). Locate a record you imported and then scroll down to the lower right corner of the record and you will see information that indicates the user, the date, and the time the record was “Created By” and “Modified By”. It will also indicate that the “Source” was a “Web Import”.
Working with data: tips and advisories
- REQUIRED FIELDS: When you open the downloaded template file, hover over each column header field to view instructions on how to enter data into the template.
Note: required fields for data updates are indicated by an asterisk (*) in the column header. Required fields for new records are noted when you hover over the header row comment tags. - CLIENT REQUIRED FIELDS: As noted, required fields are identified by an asterisk or in the Comment tags but your program may have additional fields that are “required” for your specific program but are not designated as such on the Beeline Enterprise templates. For example, the Cost Center Owner is not a required field but for some clients the Cost Center Owner is the Timesheet Approver, which makes this field “required” for that program’s purposes. Be aware of any instances where your program might have un-designated “required” fields and make sure you enter template data accordingly.
- STORED TEMPLATES: Templates are subject to change without notice so ALWAYS download a new template file for each import process to make sure you are using the most current version rather than updating a stored template file you previously imported!
As a “best practice”, however, you should download and store copies of all import files in a location that is accessible to all Program Office staff who have Web import Tool access rights. These files can be used to track your system updates and as a sample file to create new import files in the future—take care to use a new download of the template and not just a copy/paste of this previous file to ensure that the new file reflects CURRENT data settings. Do not rely on the imported files stored within Beeline Enterprise because they are purged on a regular basis.
- “CREATOR” vs. “IMPORTER”: If the person who creates/validates the import file does not have import rights, then the Program Office manager with visibility to all import files (Admin – Import View All) needs to facilitate access to the validated file so that the designated Importer can access the file from the Import List screen and complete the import process.
- COMMENT TAGS: Follow the instructions in the Comment tags attached to the Header fields as to data entry requirements. Failure to do so will cause your import file validation to fail. Remember—you are responsible for ALL data you import into ANY client production site. This means that YOU will be responsible for correcting any issues resulting from, or caused by, “bad data” you import into a Beeline Enterprise production site. Take the time to ensure that the data you populate into an import template is the CORRECT data. The time and effort it takes to “correct” data after it is imported is never time well-spent and should any of this data get associated to a finance-related record, it can never be deleted once invoiced since all finance-related records are retained in the financial datawarehouse for audit purposes.
- WHICH IMPORT PRECEEDS ANOTHER: Be aware that some templates are more complex than others and some templates need to be imported in a specific order. There are too many details to list them all here. Check the Data Imports: How to Guide for guidance.
- ADJUSTMENTS TO THE TEMPLATE LAYOUT: NEVER change the arrangement of the columns, add or delete columns, or hide columns in a template. If it is not designated as a required field and it is not a field that is relevant to your program, then leave it blank. The validation tool requires that ALL template fields are included on every import file and that the fields are arranged in the same order as the default template.
- RATE CARD IMPORTS: All Rate Card imports must include a default rate card and the line items for the default rate card must be listed BEFORE supplier-specific rate cards. The only exception is when ALL requisitions will be released to the SAME supplier, which is a rare event. The default rate card is assigned to the initial request; the supplier-specific rate cards are assigned to the respective candidate submit.
- DATA FIELDS WITH “NAMES”: The importance of consistent data entry when populating “Name” fields cannot be overstated. Examples include First Name, Last Name, or Middle Name, but it could apply to any data field used as a “name” label. Develop standard protocols and enforce them! Avoid duplicate entries since they can negatively impact downstream system functionality such as Resource Matching, Tenure Tracking, Candidate History, budget-related reporting, report results in general, and Beeline Analytics reports. Remember, the Import Tool is a processor that validates data based on format and Beeline requirements. This data populates throughout Beeline Enterprise including dashboards, <search> results lists, system reports, and Beeline Analytics so the importance of proper data entry cannot be overstated!
For example: JOSE VALDEZ, Jose Valdez, jose valdez, and José Valdez could be the very same person, but the system processes these names based on format and therefore would create a separate record for each format (e.g., ALL CAPS, Mixed Case, lowercase, names with diacritic letters). If you copy/paste name entries from a third-party source, take care that the original does not include letters with diacritics or characters that are not standard to an English language keyboard. In the digital world, every letter has a unique code, and EVERY variation of that letter has a unique code as well. Therefore, E, e, é represent three different unique codes. The system accepts the text as entered and although the subsequent record can be selected/submitted, any <search> will never generate a “match” since a standard English keyboard does not include diacritic letters or non-standard special characters. Search results will be an EXACT match to your typed entry. - HYPHENS AND DASHES: A variation on the avoidance of diacritics described above, is the careful use of hyphens to separate words. Use a single hyphen and ONLY a single hyphen, never two adjacent hyphens. Why? Because Word® and Excel® frequently convert hyphens used as spacers to either an “en” dash or an “em” dash and the validation process typically accepts one format but not the other. A hyphen is the width of a single space, an “en” dash is a space and a half, while an “em” dash is two spaces in width. Stick with a single hyphen and your entries should not end up in the Error List.
| Hyphen | En Dash | Em Dash |
| - | – | — |
| Used for combined words and to separate numbers that are not inclusive (e.g., phone numbers, 803-773-1212). | Used for date ranges or in mathematical formulas. January 1 – June 30 | Used to emphasize a strong break in the content of a sentence. |
- COMMAS WITHIN A DATA FIELD: Traditionally, the most common format for a data export file was .csv (comma separated value) since it was the standard export format for Excel. The format has changed to xlsx but care still needs to be taken with how you use a Beeline export file as an import into a third-party system. If the third-party system is based on .csv functionality, the import will <break> at every comma by shifting to the next column. If you include a comma WITHIN a data field, the column alignment in your third-party file will be out of alignment because the import process will <break> at the comma entered, rather than the end of the data field. This is frequently encountered with Last Name data fields. John Smith, Jr. should have a Last Name data entry of Smith Jr., not Smith, Jr in order to avoid the potential for this error. In general, it is best to avoid using any punctuation internally in any data field that could be used as a delimiter in an extract/import process to ensure the transfer of data runs as smoothly as possible.
- SORT ORDERS: The visible display for any <search> results list is alphabetical for text and descending numeric for numbers. Depending on several factors (program language, code, server settings) an alphabetical list could be separated into sections based on the format used for the letters. In a strict ASCII (American Standard Code for Information Interchange) sort (i.e., ACSIIbetical), all UPPERCASE letters precede all lowercase letters precede all Mixed Case letters—and numbers precede all letters. If you consider the case of Jose Valdez (See: DATA FIELDS WITH “NAMES” entry above.), this could result in three separate sections in a single alphabetical list—all caps items would sort first, followed by all lower case items, and the mixed case items at the end. Just be mindful when working with data from other systems that the data you import into Beeline Enterprise should generate a SINGLE sort in the results list.
- LEADING INDICATORS: Supplier company names that begin with “A”, “An”, or “The” can be problematic in alphabetical lists. A, An, and The are known as leading indicators. Since digital processing has no comprehension of the meaning of words, it treats these letters like any other, even though to the human reader, their usage in this instance is strictly grammatical. A and An are the least problematic since they alpha sort near the top of your Supplier list—“The” is the problem of the trio. The Eastridge Group is the legal name of a staffing agency. The template instructs you to enter the Supplier’s legal name. If your Supplier list requires significant scrolling, how many of your users are going to scroll down to the “T” section when looking for this Supplier—especially when they scrolled through the “E” section first and saw no entry for “Eastridge”? And how long before someone creates a separate Supplier profile for “Eastridge Group”—which risks negatively impacting system report results, not to mention budget and invoice tracking since you now have TWO profiles for the same Supplier. Spare yourselves the misery! Develop a Program Office policy for leading indicators and broadcast it to all users so they know where in a list to look for these “exceptions”.
- FEED / INTEGRATION FILES: Does your program use feeds or integration files to update your client data? If so, factor that into your manual import process. Client Users, OUs, and Cost Centers are the most common feed files, however there can be a variety of others. Depending on the settings/actions assigned to the integration process, the data you processed in an import file could easily be changed by a subsequent scheduled feed or integration. Check with your Program Office as to scheduled feeds or integrations to avoid overlays.
Working with data: other resources and guides
Data Imports: How to Guide
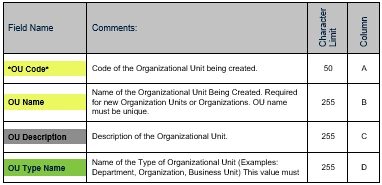
The Data Imports: How to guide lists the data import templates in the order in which they should be imported into Beeline Enterprise. It provides insights into how the data fields relate to a single import template as well as how the various import templates relate to each other. Beeline Enterprise is based on data hierarchy tables, and it is essential to understand these data relationships when working with import templates. The table layout for this guide includes a separate column for Field Name, Comments, Character Limit, and Column. Required Beeline Enterprise fields are identified by an asterisk (*).
Field Names are color-coded as follows:
- Yellow - required Client data
- Green - required Beeline data
- Gray - optional data
|
|
|
Web Import Tool: Sample Data Files
Sample data files can be a useful tool for learning how to populate data into an import template file. They are provided for instructional purposes only and should not be used as a substitute import file. ALWAYS use a standard Beeline Enterprise import template downloaded from the Web Import Tool to ensure you have the latest version of a template.
Sample files are populated with generic data based on standard Beeline Enterprise terminology. If your program uses terminology key functionality to customize text to be client-specific, then a reverse import could be the better option to create a sample file.
Standard sample data files can be retrieved here.
Instructions on how to create a reverse import are included in this article.
Standard State and Country Codes
Standard Code Lists for State and Country Codes, US County Codes, and Country/ISO Codes are provided below. Use of codes should be consistent throughout your data tables.
| Standard Codes | ||
Web Import Tool: Validation Errors
The import tool validation process checks the data in the import file to determine if it meets the data requirements in Beeline Enterprise. Any line item in the file with data that does not match the expected format rules and inclusion requirements will generate an “error”. All errors need to be resolved before the file can be imported. You may need to repeat the validation process several times before you have a file that “passes” without any errors. Our Beeline CWS Import Error Guide lists the most common errors and how to resolve them.
Click to download the Beeline CWS Import Error Guide workbook.
Web Import Tool: Template List including Reverse Import
All templates can be used to import data into Beeline Enterprise; however, not all import templates can be used to create reverse imports (i.e., data exports). Check the list located here to identify which templates can be used for data exports.
Reverse imports can be used for multiple purposes. They can be as an example to follow when entering data for a new Web Import Tool import file. They can be used as the basis to design system feed files and/or API interfaces. They can extract data that needs to be transferred from one system to another.
The advantage of the reverse import is that it eliminates the element of guesswork when creating an import file since the file you create is based on data entries that have already successfully passed through the import validation process.
Web Import Tool: Import Screens and Details
The Beeline Enterprise Import screen is used to track activity and post results once files are processed through the Web Import Tool. A detailed description of the Import Screen layout and functions is available here.
As a “best practice”, we recommend that you download and store copies of all your import files in a location that is accessible to all your Program Office staff who have Web import Tool access rights. These files can be used to track your system updates and as a sample file to create new import files—however, care should be taken that all new files reflect CURRENT data and not just a copy/paste of a previously used file.
Event-Driven Import Template Fields
Most data fields are strictly informational, and the content entered only needs to be accurate and reflect the correct format requirements to pass the validation rules. However, some data fields are event-driven and also need to reflect the action taken to create the data entered. The Timesheet import template is an event-driven template where you will need to include the status of the timesheet header for the validation process to determine the correct data entry. Details for entering and adjusting these specialized fields is available here.
Web Import Tool: Glossary of Terms
As previously mentioned, import templates are based on standard Beeline Enterprise terminology. If your program uses terminology key functionality the column headers in the import templates will not match the data field labels you see in your Beeline Enterprise production instance. Run a “Terminology Keys and Values” reverse import (Instructions are provided in the “Export a ‘reverse import’...” section of this article.) to use as a guide when using the glossary of terms available here.
| Persona | Module | Date Posted | Feedback? Email us: |
| Admin | All | Beeline Enterprise |