
Evaluate candidates faster and hire with confidence.
Finding the right candidate at the right time is essential to the success of your contingent workforce program. Candidate Evaluation provides a centralized workspace where you can review candidate qualifications, research candidate history, compare submissions, and take action—all without leaving the request.
By bringing candidate information, supporting documents, evaluation tools, and hiring actions together in one experience, Candidate Evaluation helps you make informed decisions faster and select the best-fit candidate with confidence.
Jump to what you need
Why it matters
- Bring candidate information, evaluation tools, and hiring actions together in a single workspace.
- Reduce time spent switching between screens, documents, and candidate records.
- Make more informed hiring decisions using candidate qualifications, work history, compliance information, and supporting documents.
- Improve consistency when evaluating and comparing candidate submissions.
- Prepare for interviews more efficiently with AI-powered interview question generation.
- Streamline candidate review and selection activities.
Who it's for
- Hiring managers evaluating candidates for open requests.
- Program office users responsible for reviewing and selecting candidates.
- Other authorized users involved in candidate evaluation activities.
How it helps
Candidate Evaluation helps you:
- View request details, candidate information, and supporting documents in a single workspace.
- Compare candidate qualifications against request requirements more efficiently.
- Research candidate history, tenure, assignments, ratings, compliance information, and activities without leaving the request.
- Review resumes and other attachments directly within Candidate Evaluation.
- Sort, filter, and search candidate submissions to quickly identify the strongest candidates.
- Generate AI-powered interview questions based on candidate resumes and request requirements when Interview Question Generator is enabled.
- Take action on individual candidates or multiple candidates from a single location.
- Make faster, more confident hiring decisions.
Action required
Candidate Evaluation is automatically available with the Contingent Staffing module in Beeline Enterprise. Your Beeline Administrator can choose to turn on bill rate colors in Candidate Evaluation via self-service. Learn how!
How to steps
Information in this article reflects a standard Enterprise configuration. Your Enterprise platform is based on your organization’s configuration. Settings and/or data visibility rules may vary slightly from what is described.
To use Candidate Evaluation to appraise and act on candidates submitted to a request, complete these steps from your Request dashboard.
TIP: Your experience from Candidate Evaluation varies based on your role.
Launching Candidate Evaluation
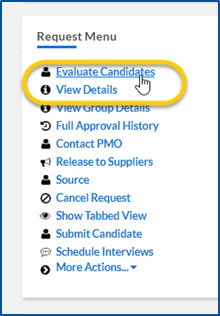
As a hiring manager or program office user, you can launch Candidate Evaluation using any of these options:
- From the Request Menu on the Request dashboard.
- From the Action list in the Candidates section on the Request dashboard.
- From the Evaluate Candidates link in the Request tabbed view.
The Candidate Evaluation workspace displays.
TIP: The first time you open Candidate Evaluation, you might want to customize the tool to make sure the data you want displays prominently.
Reviewing request details
Use the Request Details panel to understand the position requirements before evaluating candidates.
- Open Candidate Evaluation.
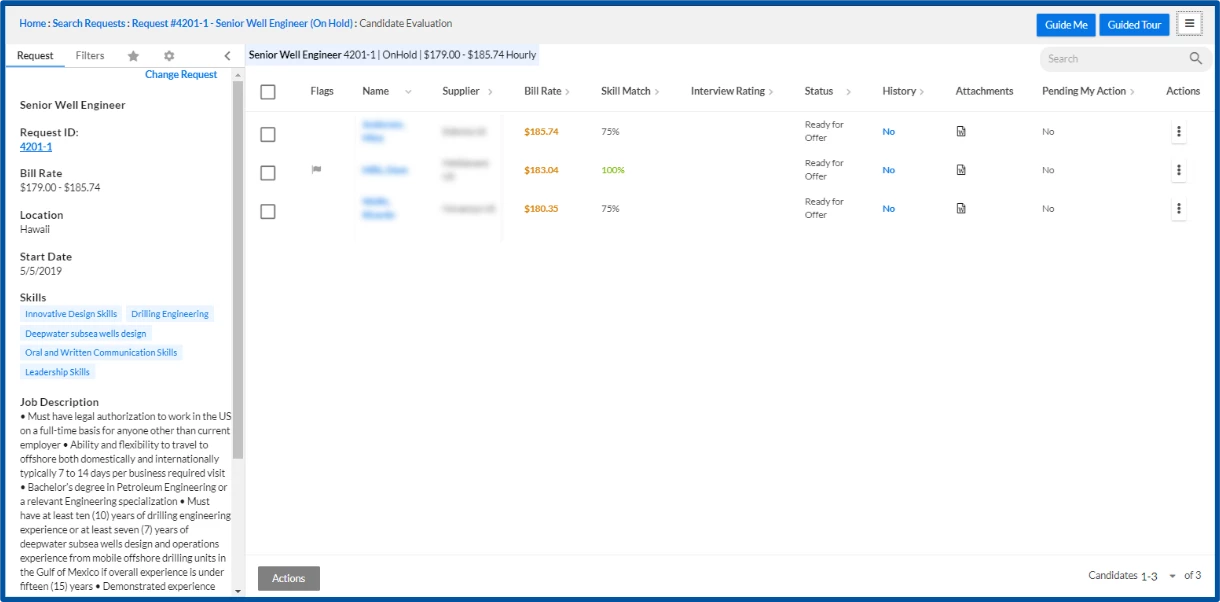
- Review the information in the Request Details panel.
What this does: Displays key information such as bill rate, location, start date, required skills, and job description.
Why this matters: Helps you understand what qualifications and experience you're looking for when reviewing candidates.
In simple terms: This is your reference point for determining whether a candidate is a good fit.
-
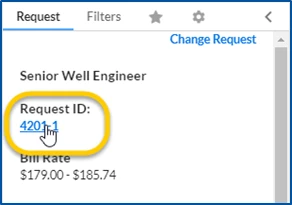
Select the Request ID near the top of the Request Details panel to view additional request details. The View Position–Details dialog displays.
What this does: Opens additional request details.
Why this matters: Provides deeper context about the position and requirements.
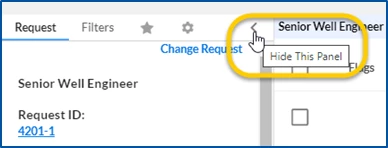
- Optional. Collapse the Request Details panel to create additional workspace.
What this does: Creates more space for reviewing candidate information.
Why this matters: Helps you focus on candidate comparisons and evaluation activities.
Reviewing candidates
Use the Candidate List to identify and compare candidate submissions.
- Review all candidates submitted to the request in the Candidate List.
What this does: Displays all candidates submitted to the request.
Why this matters: Gives you a complete view of available candidates for consideration.
- Optional. Sort candidates by a column such as Bill Rate, Status, or Candidate Name.
What this does: Reorders the candidate list using your selected criteria.
Why this matters: Helps you quickly identify candidates that meet your priorities.
- Optional. Select a column heading to sort the list by information such as Bill Rate, Status, or Candidate Name. The Candidate List is sorted based on your selection.
What this does: Reorders the candidate list using your selected criteria.
Why this matters: Helps you quickly identify candidates that meet your priorities.
TIP: Bill Rate font colors provide an at-a-glance summary of how a candidate's rate compares to the request's bill rate range. Red indicates the rate is above the range, orange indicates the rate is within the range, and green indicates the rate is below the range.
- Optional. Use Filters.
What this does: Narrows the list to candidates matching specific criteria.
Why this matters: Makes it easier to focus on the most relevant candidates.
- Optional. Use Search.
What this does: Locates a specific candidate or narrows the list based on entered text.
Why this matters: Saves time when working with large candidate pools.
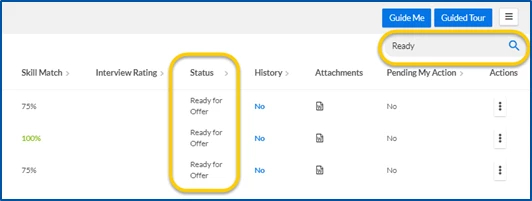
TIP: Bill rate colors provide an at-a-glance comparison to the bill rate range. Red indicates rates above range, orange indicates rates within range, and green indicates rates below range.
Researching candidates
Review detailed candidate information before making a decision.
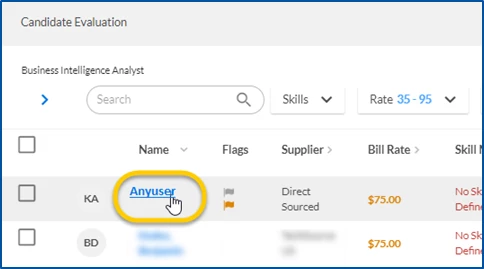
- Select a candidate's name. The Candidate dialog displays and opens to the Details tab by default.
What this does: Opens the candidate record.
Why this matters: Gives you access to all available details about the candidate.
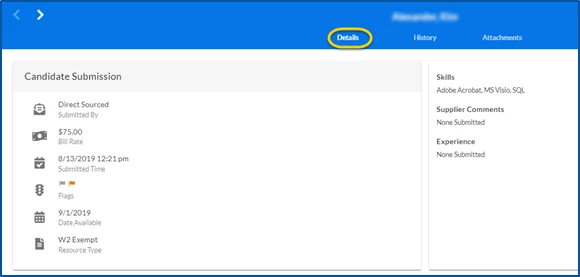
- Review the Details tab.
What this does: Displays submission information, supplier information, bill rate, and candidate details.
Why this matters: Helps you understand the candidate's submitted qualifications and basic profile.
- Select the History tab. The candidate's history information displays.
What this does: Displays assignment history, request history, ratings, tenure information, activities, and compliance details.
Why this matters: Provides additional context to support informed hiring decisions.
In simple terms: This is the candidate's track record within the system.
- Select the Attachments tab.
What this does: Displays resumes and supporting documents without leaving Candidate Evaluation.
Why this matters: Allows you to review qualifications and supporting information in context.
- Optional. Download an attachment.
What this does: Saves a copy of the selected document to your device.
Why this matters: Enables offline review or sharing according to your organization's processes.
- Use navigation arrows to move between candidates.
- Close the candidate record when finished.
Generating interview questions
If Interview Question Generator is enabled, you can generate AI-powered interview questions while evaluating candidates. For complete steps, see Interview Question Generator: Getting started.
- Open a candidate record.
What this does: Provides access to candidate-specific interview preparation tools.
Why this matters: Interview questions are generated using the selected candidate's information.
-
Select the Interview Questions tab.
What this does: Opens the AI-powered interview question workspace.
Why this matters: Allows you to generate and manage interview questions for that candidate.
-
Select Generate Interview Questions. AI-generated questions display.
What this does: Analyzes the candidate's resume and request requirements to create tailored interview questions.
Why this matters: Helps you prepare for interviews more quickly and ask more targeted questions.
In simple terms: The system does the initial interview prep for you.
-
Optional. Review, reorder, hide, or add questions.
What this does: Lets you customize the interview question set.
Why this matters: Ensures interview questions align with your hiring goals and interview style.
Acting on an individual candidate
After reviewing a candidate, you can take action directly from Candidate Evaluation. Available actions vary based on your organization's configuration and your permissions.
- Open the candidate record. The Candidate dialog displays.
- Expand the Actions menu. The list of available candidate actions displays.
What this does: Displays the actions available for the selected candidate.
Why this matters: Allows you to take the next step in your organization's candidate review process.
In simple terms: This is where you choose what happens next for the candidate.
- Select the action you want to perform. The selected action opens.
What this does: Initiates the selected candidate action.
Why this matters: Enables you to move the candidate through the hiring process according to your organization's workflow.
- Complete any required fields or prompts. The action is completed and the candidate record is updated.
What this does: Captures the information needed to complete the action.
Why this matters: Ensures the action is processed correctly and the candidate record is updated accordingly.
Acting on multiple candidates
Use bulk actions to save time when working with multiple candidates.
- Select the checkbox next to each candidate you want to update.
What this does: Identifies the candidates that will be included in the bulk action.
Why this matters: Allows you to perform the same action on multiple candidates at once.
In simple terms: You're building a group of candidates to update together.
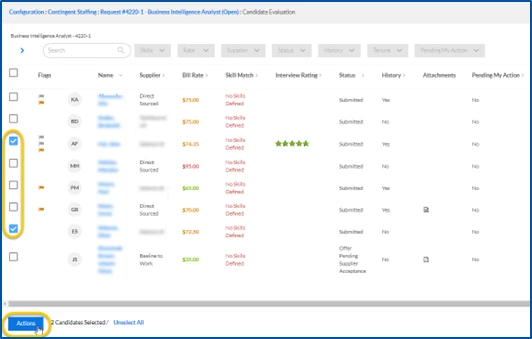
- Select Actions. The available bulk actions display.
What this does: Opens the list of available bulk actions.
Why this matters: Provides a faster way to manage multiple candidates without updating them individually.
- Choose the action you want to perform.
What this does: Applies the selected process to all chosen candidates.
Why this matters: Reduces repetitive work and improves efficiency when managing multiple candidate submissions.
- Complete any required prompts. The selected action is applied to all chosen candidates.
What this does: Captures any information required to process the action.
Why this matters: Ensures the action is applied correctly to all selected candidates.
- Optional. Select Unselect All to clear your selections and choose a different group of candidates.
Key takeaways
Candidate Evaluation provides a centralized workspace for reviewing, comparing, and acting on candidate submissions. By combining request details, candidate information, historical data, supporting documents, and AI-powered interview preparation tools in a single experience, Candidate Evaluation helps you make informed hiring decisions faster and select the right candidate with confidence.
| Persona Hiring managers, program office user, personnel evaluating candidates | Modules Contingent Staffing Hiring Manager Experience | Documentation release Beeline Enterprise | Q1 2026 | Feedback? Email us: |