Your program may be using Beeline’s user-defined cost allocation methodology to capture and track extended workforce costs effectively and precisely.
That methodology helps your organization assign costs to activities and items for which they need to measure spend separately, such as requests, assignments, projects, timesheets, milestone payments, units of measure (UoMs), and statements of work (SOWs).
As a hiring manager or program office user, having a cost allocation methodology gives you access to cost allocation details when you need them—making it easier to consistently distribute and accurately manage non-employee costs across all financials in Beeline Enterprise.
Your experience overview
Here are some ways you’ll experience your program’s methodology as you complete actions in Enterprise.
Distribute costs accurately using different allocation types
Select the correct cost allocation option when you’re editing a request, assignment, project, timesheet, milestone payment, UoMs, or SOWs to accurately track and align costs to your program’s in-house systems. Your program can support percentage, unit or amount allocation types.
Understand and leverage default cost-allocation-related values
Your organization’s cost allocation methodology can include templates and header-level segments that drive the cost options available to you. It may also use client-defined fields (CDFs) in cost allocation segments and cascading CDF dropdown lists to precisely track how costs are assigned to various business units.
Templates, header-level segments, CDFs, and cascading CDFs dropdown lists are all tied to your program’s in-house systems and processes to synchronize cost data across your enterprise systems.
To make it simpler and more efficient for you to enter cost-related details, default cost values can be set up on your profile as a hiring manager, a project manager, an SOW owner, or an actively logged-in user. Default values automatically populate in cost allocation-related fields as you complete tasks in Enterprise. Find out what your defaults are.
Your program can also define one default entry for a CDF dropdown list when a single value is commonly used or preferred. In addition, your program can configure defaults for cost-related information based on your profile AND define one default entry for a CDF dropdown list.
Here’s how those features work together.
Single default value for CDF dropdown lists
Default values based on a user’s profile
Your experience
Setting configured
Yes
No
The program’s preferred default cost allocation segment value automatically displays in a cascading CDF dropdown list. You can still select a different cost allocation segment from the cascading CDF dropdown list.
Yes
Yes
The default cost allocation segment associated with your profile automatically displays in the cascading CDF dropdown list. You can still select a different cost allocation segment from the cascading CDF dropdown list.
No
No
You must select values.
Master client-defined fields (CDFs) in cost allocation strings
CDFs allow your program to precisely track how costs are assigned to various business units. But sometimes you might not be sure which CDF to use.
Use the Description field, the Search link and the Information tooltip on the Client Defined Field Item Select dialog to help you decide which CDF to choose.
TIP: The Client Defined Field Item Select dialog displays when you select the Search icon in the Cost Allocation section of a relevant page.
Effective date cost allocation strings and increase accurate invoicing data
Effective dating cost allocation strings ensures that only valid cost objects are available when a timesheet or an expense is created. It streamlines creating a timesheet or an expense, decreases the amount of inaccurate cost data uploaded to your in-house systems and increases efficient data entry, processing and invoicing.
As you enter cost allocation information in Enterprise, data is retrieved from your program’s in-house system, and your entries are verified for missing, invalid or inactive cost allocation segment values. So, you see messages and prompts guiding you to complete all required details more efficiently throughout your procurement and invoicing workflows.
Here’s where you’ll encounter this integration.
In messages that help you easily understand and correct invalid cost allocation information.
In cost allocation segments built on client-defined fields (CDFs) on a request or an assignment. Segments are verified and subsequent data values are automatically retrieved.
In Cost allocation segments built on a bill to cost center organizational unit (OU). Segments are verified and automatically default to the bill to cost center OU selected on a request or an assignment.
In read-only cost allocation segments retrieved via the web service or default value in a segment.
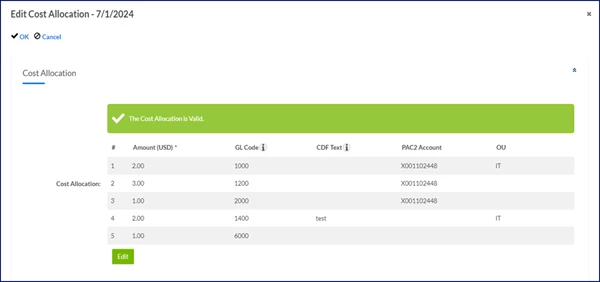
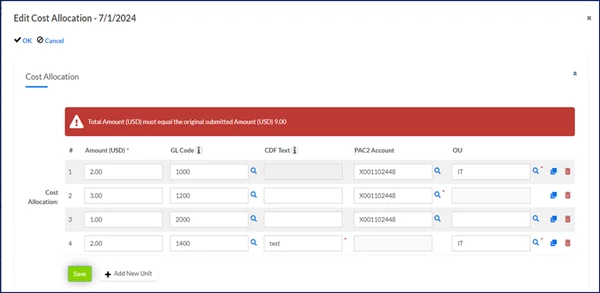
For example...
After you select the Save button in the Edit Cost Allocation dialog, a message briefly displays indicating whether your updates were successful and valid or need to be corrected.
How to steps
Viewing cost allocation defaults on your profile
Default cost values can be set up on your profile to simplify and improve entering cost-related details.
To view which default values are set up on a user’s profile, complete these steps from your Enterprise dashboard.
From the Simple Search option at the upper right of your dashboard, select Search User Profiles and then select the Search icon to locate the user whose profile you want to view. Search results display at the bottom on a Search User Profiles Advanced page.
Select the link for a user’s profile. A User Profile page displays.
Select Edit. A View User Details page displays.
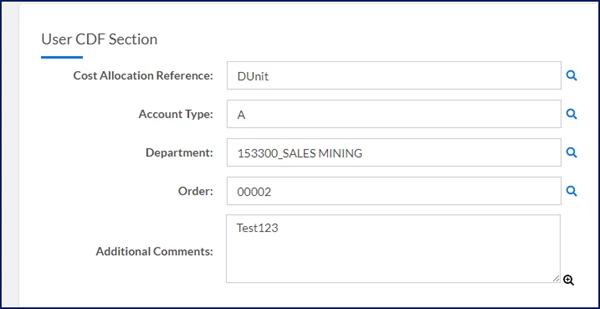
Select the Details tab and then scroll to the bottom of the page to view the default settings.
The fields in the User CDF Section on the User Profile page show defaults for several cost objects in a cost allocation string, such as cost allocation reference, cost center, project, and much more.
Adding cost allocation strings and effective dates
When you create a request or an SOW, you can add the applicable cost allocation strings to ensure costs are tracked correctly. You can modify cost allocation details on a request any time before onboarding. Once a candidate is onboarded and an assignment is created, cost allocation details are locked in on an assignment.
You can also set effective dates for cost allocation strings and ensure that only valid strings are available when a timesheet or an expense is created. Currently, effective dating cost allocation strings is available only in the Contingent Staffing module.
TIP: Effective dates are based on your program’s in-house accounting and Enterprise Resource Planning (ERP) systems.
To add cost allocation strings and set effective dates, complete these steps from your Enterprise dashboard.
This topic shows you how to set add a string and set an effective date when creating a requisition where units are used to allocate costs.
TIP: Data may automatically display in some fields based on your profile. In addition, the cost allocation information may or may not include a Cost Allocation Reference list from which you can select a different template.
Initiate your requisition using one of these options: Beeline Classic
Select New and then select the requisition type from the New Request list. A Create Request page displays.
OR Hiring Manager Experience
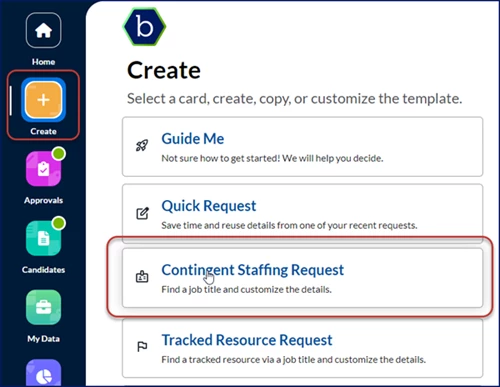
Select the Create app, and then select the Contingent Staffing Request card.
A Create page displays.
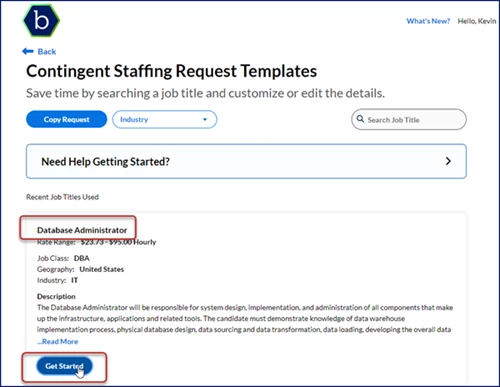
Optional: If available filter your job title search by Geography and Industry.
Enter criteria in the Search Job Title field.
Locate the job title you want, and then select Get Started.
Complete the Position Options and the Position Contacts sections, and then select Next.
Follow your program’s guidelines for completing the required fields in the Summary Information, the Position Information, and the Rate Details sections.
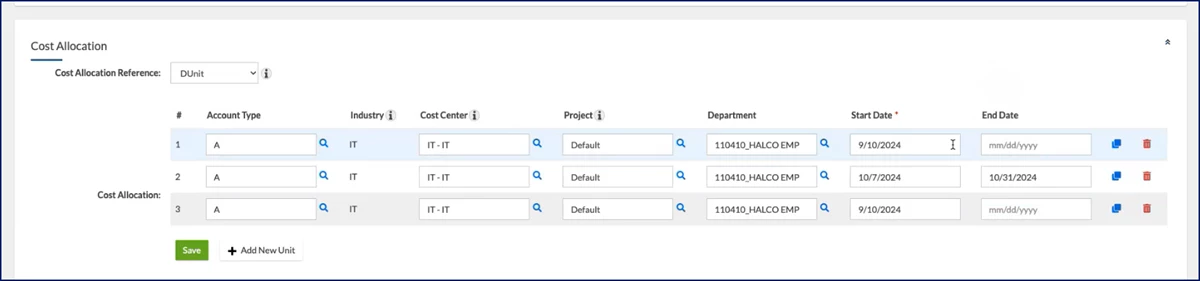
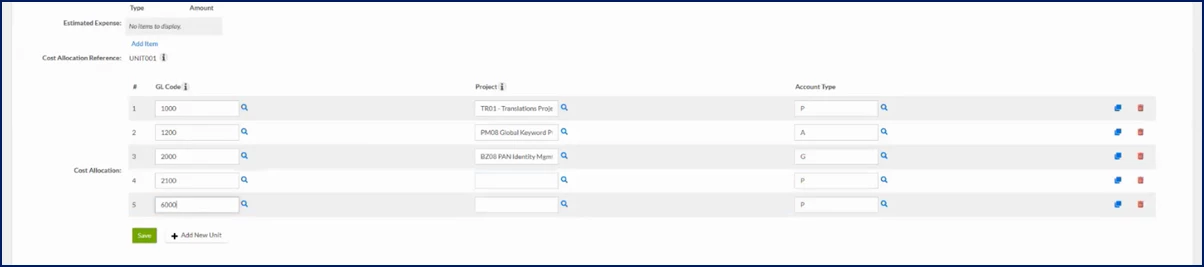
In the Cost Allocation section, complete these steps:
Optional: If your program uses multiple templates and the one you want isn’t selected, choose the applicable template from the Cost Allocation Reference list. You may have different templates based on various allocation types (percentage, unit or amount) available to you. TIP: If you select a different template composed of the same segments, the defaults set up on your profile are applied.
Enter or make selections from the cost allocation segments that display, such as Account Type, Industry, Cost Center, and more. TIP: Segments may be required, optional or read-only fields.
Optional: If you need to adjust the date the cost allocation string becomes effective, use the Start Date calendar to choose the date. By default, the assignment start date displays in the Start Date field.
Optional: Use the End Date calendar to designate the date after which the cost allocation string will no longer apply to the assignment. If you don’t specify an end date, that date defaults to the request end date.
Optional: Use the Add New Unit link to add another cost allocation string with different effective dates. TIP: Throughout the duration of an assignment, at least one cost allocation string must be in effect.
Optional: Use the Copy or Delete icons to duplicate or remove a string, respectively.
Follow your program’s guidelines for completing the required fields in the remaining sections and submitting your requisition.
Your submitted requisition follows your organization’s normal approval workflows.
Viewing expired cost allocation strings
Effective dating cost allocation strings ensures that only valid cost objects are available when a timesheet or an expense is created. However, you can still view and examine historical financial allocations associated with an assignment when you need to.
To examine historical financial allocations and view expired strings associated with an assignment, complete these steps from your Enterprise dashboard.
Prerequisite: Your Enterprise site must be configured to allow you to edit cost allocation details.
This topic shows you how to view expired cost allocation strings in Beeline Classic from the Assignment Edit Details dialog when you’re editing an assignment. You can also view historical cost strings associated with the assignment when you’re amending an assignment.
If you’re starting in the Hiring Manager Experience, use the Go to Classic link at the upper right of the Home page.
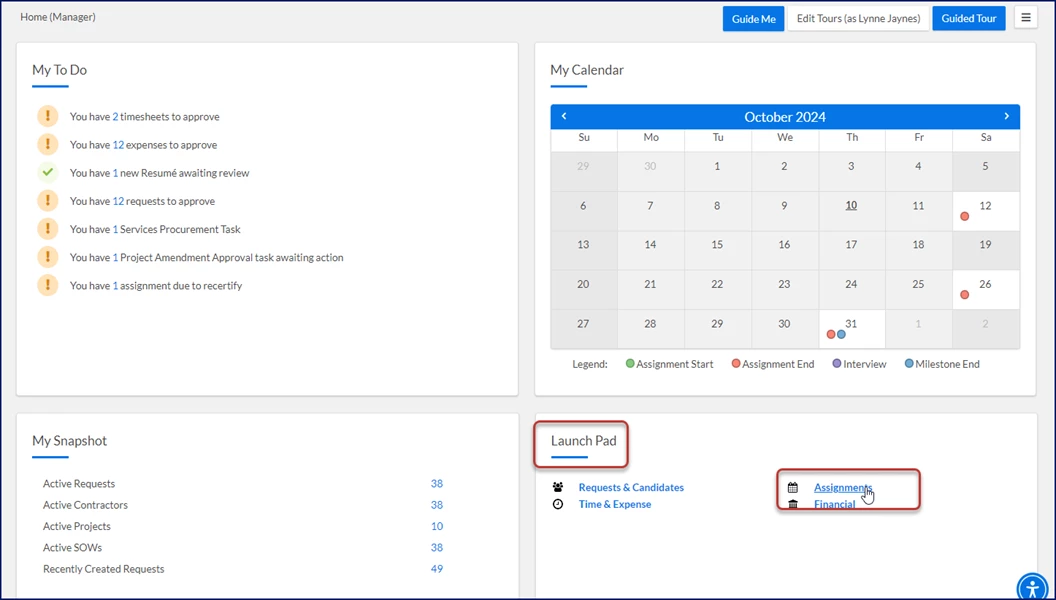
From the Launch Pad quadrant, select the Assignments link.
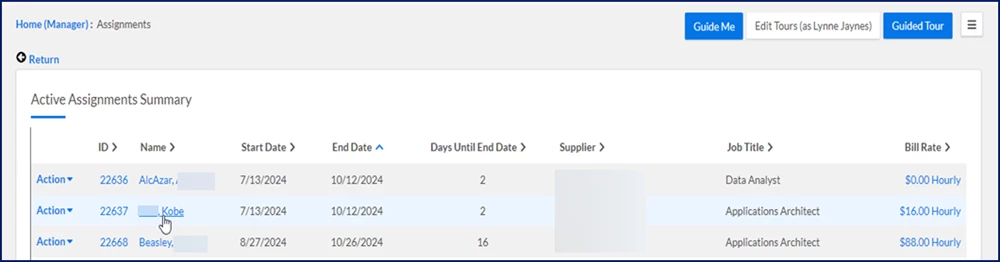
An Assignments page displays.
Locate and select the Name link for the assignment you want to view.
An Assignment page displays.
From the Assignment Menu, select View Details. An Assignment Edit Details dialog displays.
Select Edit.
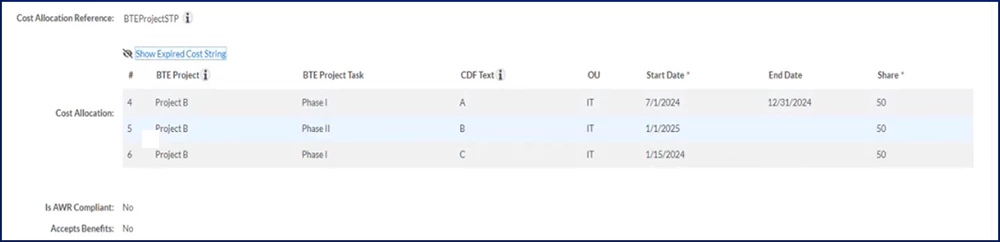
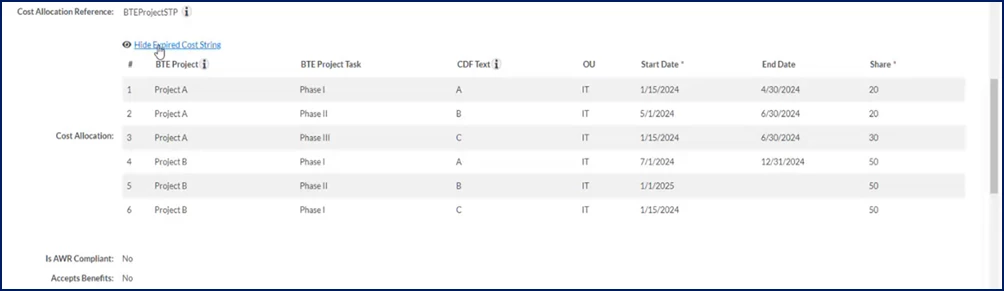
Select Show Expired Cost String to view all historical cost strings associated with the assignment.
Expired cost allocation strings display.
Select Hide Expired Cost String to show only active cost strings associated with the assignment.
Managing cost allocation on timesheets
As a timesheet approver, you can edit cost allocation details before you approve a timesheet. For example, you may need to remove a cost allocation code because it wasn’t valid on the date it was used.
Cost allocation is supported for all time-entry modes, such as time-in/time-out, hourly, daily, weekly, and monthly time tracking.
Based on your program’s in-house systems and business processes, you may encounter different cost allocation codes on each daily time entry or only a single cost allocation code for all entries in a given week. When a single cost allocation code applies to all entries in a given week, you can use the Cost Allocation View link on the Approve Timesheet dialog to see cost allocation summaries.
When different cost allocation codes for daily time or expense entries are supported, select the Gear icon that displays when you click into an entry from a Beeline Time & Expense page to open the Edit Cost Allocation dialog and change values.
To manage cost allocation details before you approve a timesheet, complete these steps from your Enterprise dashboard.
Prerequisite: Your Enterprise site must be configured to allow you to edit cost allocation details.
This topic shows you how to edit cost data from Beeline Classic on a time-in/time-out timesheet that uses an amount cost distribution.
If you’re starting in the Hiring Manager Experience, use the Go to Classic link at the upper right of the Home page.
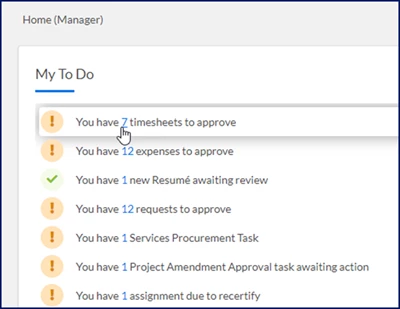
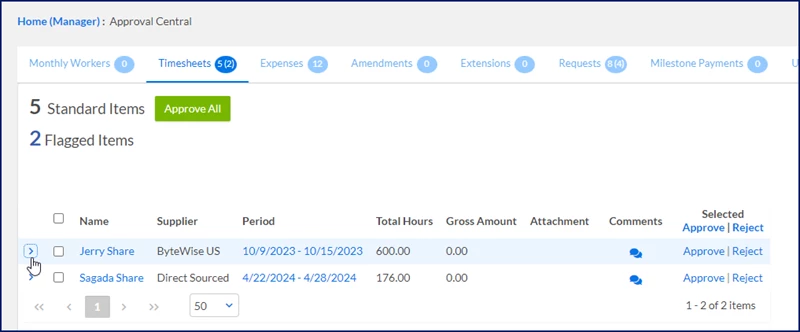
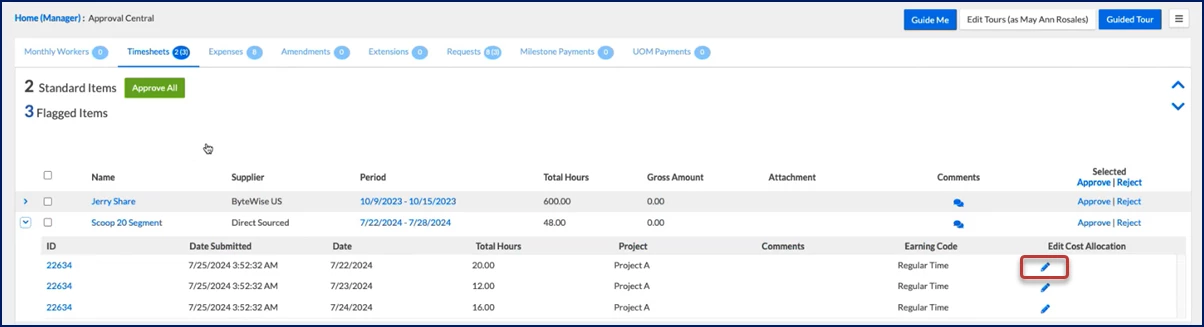
From your My To Do quadrant, select the link to timesheets pending approval. An Approval Central page displays.
Expand the Arrow to the left of the contingent talent’s name for whom you want to review timesheets.
On the row showing the timesheet you want to review, select the Edit icon.
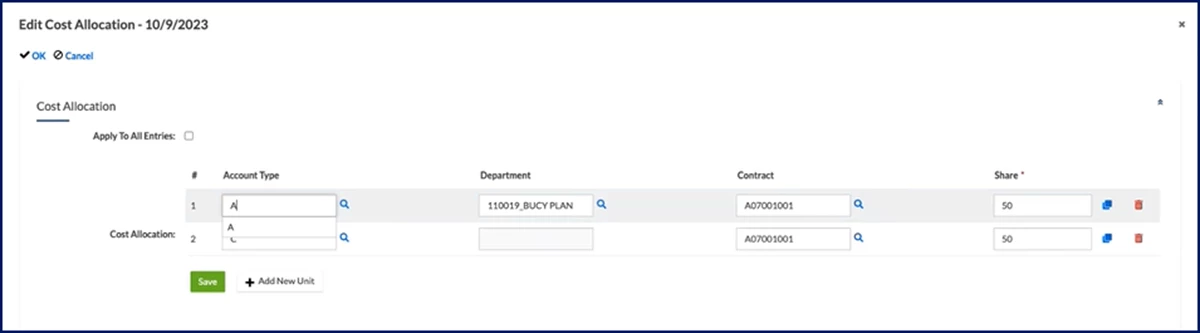
Select Edit. An Edit Cost Allocation dialog displays.
Alter the cost allocation details you want to. TIP: You cannot alter the hours submitted on a timesheet; you must reject the timesheet.
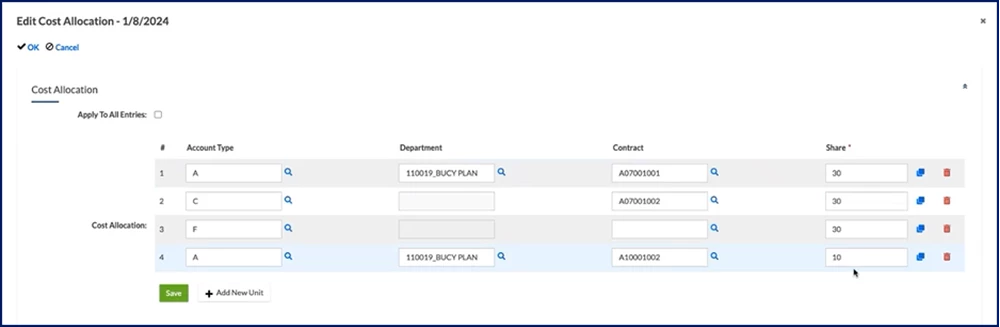
If the timesheet has a percentage cost distribution, you can update all cost segments and the share of an expense distributed to each cost allocation string. The dollar amount of the expense is distributed across the strings based on the assigned percentage.
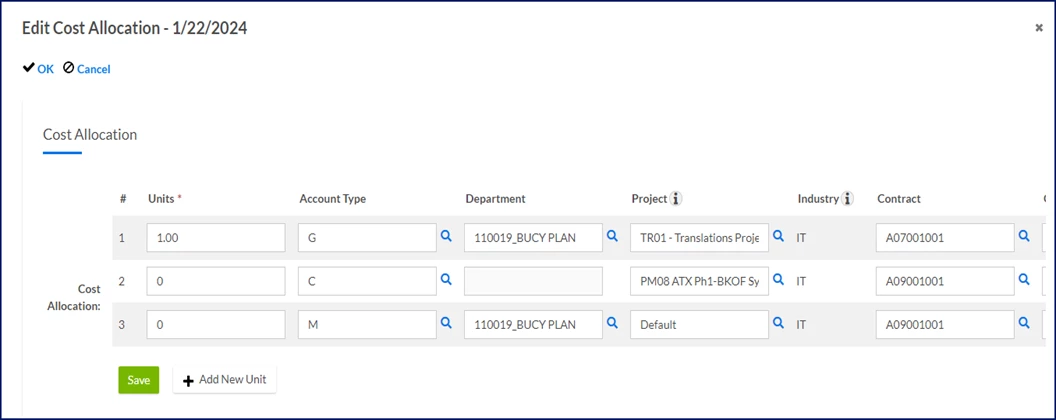
If the expense has a unit cost distribution, you can update all cost segments and the portion of an expense distributed to each cost allocation string.
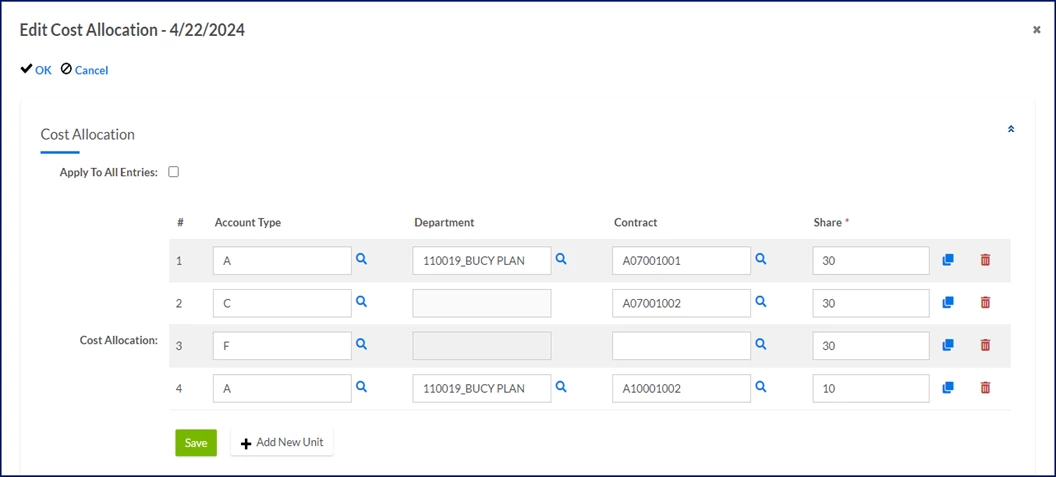
If the expense has an amount cost distribution, you can update cost segments and the monetary value of an expense distributed to each cost allocation string.
Optional. Use the Copy or Delete icons to duplicate or remove a string, respectively.
Select Save.
Managing cost allocation details on an expense
As an approver, you can edit cost allocation details on an expense before approving it and help your program track costs accurately. For example, you may need to remove a cost allocation code from an expense because it wasn’t valid on the date the expense occurred.
To edit cost allocation details on an expense before you approve it, complete these steps from your Enterprise dashboard.
Prerequisite: Your Enterprise site must be configured to allow you to edit cost allocation details.
This topic shows you how to edit cost data from Beeline Classic on an expense that uses a unit cost distribution.
If you’re starting in the Hiring Manager Experience, use the Go to Classic link at the upper right of the Home page.
From your My To Do quadrant, select the link to expenses pending approval. An Approval Central page displays.
Select the Standard Items link to refresh the page.
Expand the Arrow to the left of the contingent talent’s name for whom you want to review expenses.
On the row showing the expense you want to review, select the Edit icon. An Edit Cost Allocation dialog displays.
Alter the cost allocation details you want to. TIP: You cannot alter the amount submitted on an expense; you must reject the expense.
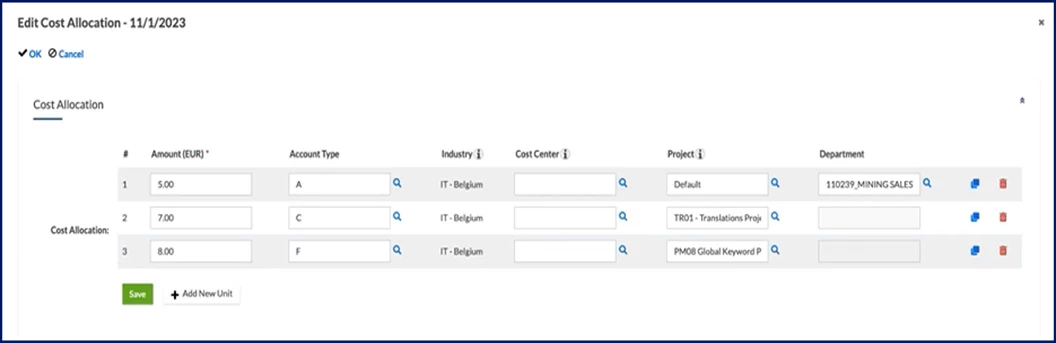
If the expense has a percentage cost distribution, you can update all cost segments and the share of an expense distributed to each cost allocation string. The dollar amount of the expense is distributed across the strings based on the assigned percentage. Editing percentage cost allocations on an expense
If the expense has a unit cost distribution, you can update all cost segments and the portion of an expense distributed to each cost allocation string. Editing unit cost allocations on an expense
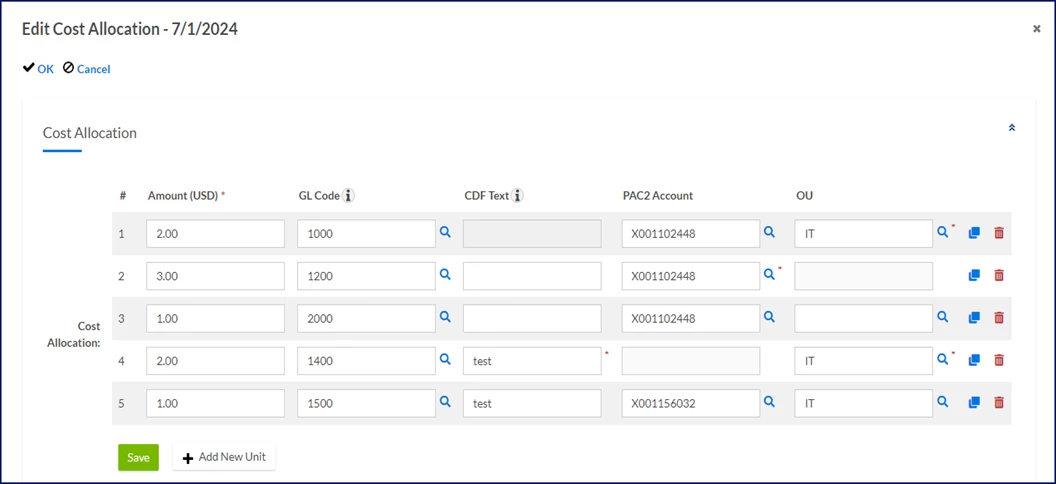
If the expense has an amount cost distribution, you can update and cost segments and the monetary value of an expense distributed to each cost allocation string. Editing amount cost allocations on an expense
Optional: Use the Copy or Delete icons to duplicate or remove a string, respectively.
Select Save.
Adding cost allocation details to an SOW
As an SOW owner or a project manager, tracking cost allocation details is easier. You enter them once under the General Information tab on an SOW and they persist to all SOW financials.
You can even add cost allocations for milestone payments, units of measure (UoMs) and SOW resources. Plus, you can still edit cost allocation values on individual SOW financials when you need to.
TIP: Existing force flags for cost allocation on project units of measures are not affected by this feature.
To add cost allocation details to an SOW, complete these steps from your Enterprise dashboard.
Prerequisite: Your Enterprise site must be configured to allow you to edit cost allocation details.
This topic shows you how to add cost details to an SOW from Beeline Classic.
If you’re starting in the Hiring Manager Experience, use the Go to Classic link at the upper right of the Home page.
From the New menu, select an SOW template from the New SOW list. A Welcome page displays.
Select Start SOW. A SOW Draft page displays showing the General Info tab by default.
Follow your program’s business processes for completing the required fields.
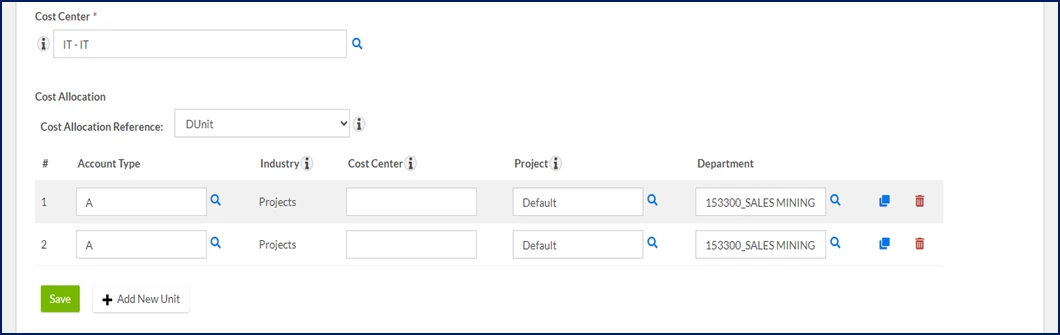
Scroll down to the Cost Allocation section. Information is automatically populated based on your profile and your program’s configuration.
Optional. Select a cost allocation template from the Cost Allocation Reference list.
Complete the required segments for the cost allocation string. Segments vary based on your organization’s cost allocation template and in-house systems.
Optional. When available, select the Search icon to locate the value you want to choose for a segment.
Optional. Use the Copy or Delete icons to duplicate or remove a string, respectively.
Select Add New, and then complete the required segments for the cost allocation string.
Repeat step 9 for each additional cost allocation string you want to add.
Select Save in the Cost Allocation section.
Select Next to continue building your SOW.
Follow your program’s business processes for adding all data required for your SOW.
Amending an assignment and changing cost allocation details
Once a candidate is onboarded and an assignment is created, cost allocation details are locked in on an assignment. You must amend an assignment if you want to change the cost allocation details.
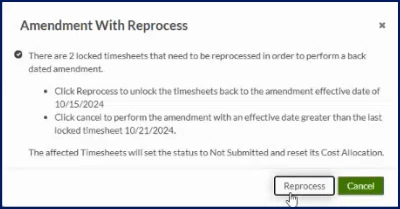
If you’re amending an assignment with submitted, approved or invoiced financials, a warning displays. You're alerted that the status of any existing financials will change, that existing timesheets and/or expenses must be reprocessed, and that costs must be reallocated on existing financials if you proceed with your amendment. You cannot proceed with your amendment without acknowledging the warning.
TIP: If your organization uses the Batch Reprocessing feature, the warning displays for all assignment amendment with submitted, approved or invoiced financials.
To amend an assignment and change the cost allocation details, complete these steps from your Enterprise dashboard.
Prerequisite: Your Enterprise site must be configured to allow you to edit cost allocation details.
This topic shows you how to amend cost allocation details from Beeline Classic for an assignment that uses a unit cost distribution.
If you’re starting in the Hiring Manager Experience, use the Go to Classic link at the upper right of the Home page.
Initiate your amendment using one of these options: Beeline Classic
From the Simple Search option at the upper right of your dashboard, select Search Assignments and then select the Search icon to locate the user whose profile you want to view. Search results display at the bottom on a Search Assignments page.
Locate the assignment you want to change, and then select the Assignment ID link. An Assignment page displays.
Select Amend from the Assignment Menu section. A Modify Assignment page displays.
OR Hiring Manager Experience
Select the My Data app, and then select the Assignments link. An Assignments page displays.
Locate the assignment you want to change, and then select Amend from the Take Action list. A Modify Assignment page displays.
Select the Amend checkbox in the Modification Type section.
Select Next.
Optional. If you’re amending an assignment with submitted, approved or invoiced financials, a warning displays alerting you to the consequences if you proceed. Select Reprocess to continue with your amendment.
Select an explanation for the amendment from the Modification Reason list.
Enter details about the amendment in the Comment field.
Choose an option from the Budget Adjustment list.
In the Amendment section, select Edit on the Cost Allocation row.
Complete the required segments for each cost allocation string you’re altering.
Optional. Use the Copy or Delete icons to duplicate or remove a string, respectively.
Complete any remaining required fields on the Modify Assignment page.
Select Next. An Amendment Summary page displays.
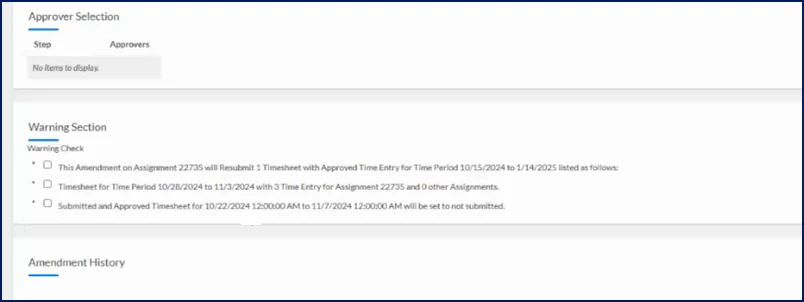
Optional. If you’re amending an assignment with submitted, approved or invoiced financials, alerts display in the Warnings section. You must select the checkbox to acknowledge each alert before you can proceed.
Another warning displays asking you to confirm your actions. Select OK to proceed with your amendment.
Select OK at the bottom of the Modify Assignment page.
Your amendment is routed for approval per your organization’s approval workflows. After the amendment is approved, the status of any existing financials present when your amendment is processed is changed to Not Submitted. Those timesheets and/or expenses must be reprocessed and costs must be reallocated.
Please complete the following fields as part of your Beeline Community registration. Unless noted as private, this information will be displayed on your user profile within the community.