
You can define Time Classification Schedules with drivers and rules to support an advanced level of highly‑complex time allocation and multiple earning codes. Using Time Classification Schedules can help drive compliance with localized labor rules related to overtime, holiday pay, shifts, day of the week, roles, union agreements, regulations and other policies.
Initially, Beeline will configure your Time Classification features. Later as a program office user, you can manage Time Classification features via Self-Service.
Caution: Be sure to gather information about your time classification requirements before you create a schedule. After a time classification schedule is created, you can edit only the End Date and the Display Order.
Setting up time classification features in Beeline Enterprise involves these steps.
To set up time classification features for your organization, complete these steps from your Enterprise dashboard.
- Select Preferences > VMS Settings > Data Management. A Data Management page displays.
- Select Time Classification. A Time Classification page displays showing you the time classifications set up for your organization.
- Click Add New. An Add Time Classification Schedule page displays.
- Continue with Adding General Information.
Adding General Information
Your Time Classification Schedules must include some general information, such as a title, a code, and a display order. Time Classification Schedules must also include Drivers and Rules.
- Enter a title for your time classification schedule in the Name field. The name you enter displays in the list of time classifications created for your organization on the Time Classification page.
- Enter a descriptive abbreviation for your time classification schedule in the Code field. The code name you enter displays in the list of time classifications created for your organization on the Time Classification page.
- Optional. Add a description of your time classification schedule in the Explanation field.
- Select the date you want the time classification schedule to go into effect using Effective Date Calendar.
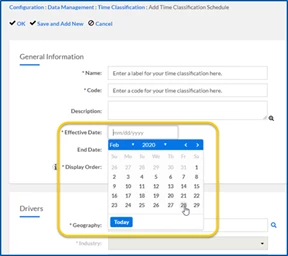
- Optional. If you want the time classification schedule to be effective only for a specific period, use the End Date calendar to specify when the time classification schedule will no longer be used.
- In the Display Order field, enter a numeric value used to prioritize your time classification schedule when a timesheet matches multiple drivers in more than one time classification schedule. The lower the display order the higher the priority.
For example, when a timesheet matches multiple drivers in more than one schedule, the time classification schedule with the lowest display order is used to classify the time entries.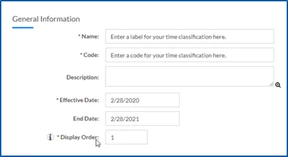
- Continue with Adding Drivers.
Adding Drivers
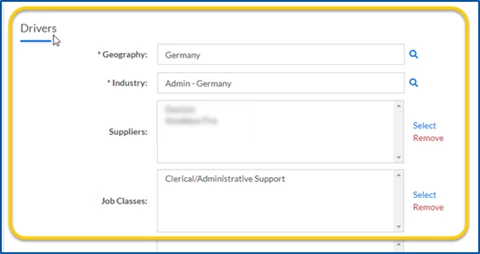
You can set up Drivers, such as supplier, job class, job title, and more, to add granularity about how and when a Time Classification Schedule is applied to timesheets. For example, you might set up Time Classification 1 that applies to the United Kingdom, Industry A and Supplier A. And then set up Time Classification 2 that applies to the United Kingdom, Industry A and Supplier B.
- From the Geography field, select the region to which your time classification schedule applies. You can also use the Search icon to find the geography you want.
- From the Industry field, select the business to which your time classification schedule applies. You can also use the Search icon to find the industry you want.
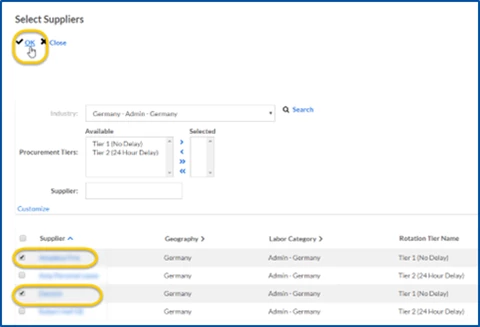
TIP: Geography and Industry are required drivers. You can choose one or more additional drivers; for example, you can include Suppliers and Job Classes in addition to Industry. - Optional. When your time classification schedule applies to specific suppliers/vendors, click the Select link to open a Select Supplier dialog. Next, choose the suppliers you want to add a driver. Then select OK. The suppliers you chose are added to the Suppliers list as a driver for the Time Classification Schedule you’re building.
- Optional. When your time classification schedule applies to specific occupation categories, click the Select link to open a Job Class Selection dialog. Next, choose the job categories you want to add to as a driver. Then select OK. The occupation categories you chose are added to the Job Classes list as a driver for the Time Classification Schedule you’re building.
- Optional. When your time classification schedule applies to specific occupation types, click the Select link to open a Job Title Selection dialog. Next, choose the occupation types you want to add as a driver. Then select OK. The occupation types you chose are added to the Job Titles list as a driver for the Time Classification Schedule you’re building.
- Optional. When your time classification schedule applies to specific kinds of requests, click the Select link to open a Select Request Types dialog. Next, choose the kind of request you want to add as a driver. Then select OK. The kind of request you chose are added to the Request Types list as a driver for the Time Classification Schedule you’re building.
- Optional: When your time classification schedule applies to specific job site states or provinces, click the Select link to open a Select State/Province dialog. Next, choose the physical work location site you want to add as a driver. Then select OK. The job site states or provinces you chose are added to Physical Work Location States list as a driver for the Time Classification Schedule you’re building.
- Optional. When your time classification schedule applies to specific job sites, select the Select link to open a Select Location dialog. Next, choose the specific job sites you want to add as a driver. Then select OK. The job sites you chose are added to Physical Work Locations list as a driver for the Time Classification Schedule you’re building.
- Continue with Adding Rules.
Adding Rules
Set up Rules to add further granularity as to how and when a Time Classification Schedule is applied to timesheets. Rules control how shift, holiday, overtime, and day of the week, or a blend of those variables, combine to determine the earning code applied to timesheet entries. For example, you might have a Time Classification Rule that associates paid holidays worked during a night shift to a PH-NS earning code. In addition, you have a Time Classification Rule that associates overtime worked during a night shift on a holiday to a different earning code, such as PHNS-OT.
- Select Add Item. The Rules pane expands to display additional controls.
- In the Display Order field, enter a numeric value used to prioritize which rule to use first when a timesheet includes entries for shift, holiday, overtime, and days of the week. The lower the display order the higher the priority.
- Choose the billing shift to which the rule applies from the Shift list.
TIP: Available shifts are those set up for the industry you selected for your time classification schedule. - Select Yes or No from the Holiday list to indicate whether the rule applies to a holiday.
TIP: Holidays are defined in the Utility Calendar with which the assignment is associated. - Select the time category, such as Regular Time, Overtime or Double Time, associated with the rule from the Overtime Classification list.
- From the Days column, select or clear the days of the week to which the rule applies.
- From the Earning Code list, choose the earning code that applies to the combination of Shift, Holiday, Overtime Classification, and Day of Week you selected.
TIP: Available codes are those set up for the industry you selected for your time classification schedule. The earning code ties all the preceding fields together and determines what rate variation is applied to the combination of variables (shift, holiday, overtime, day of week) you chose in the rule.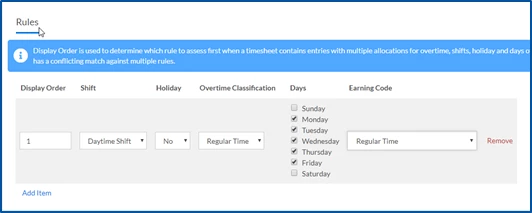
- Repeat steps 1 to 7 to add additional rules to your Time Classification Schedule.
- Select OK to save your time classification schedule.
Your time classification schedule, drivers, and rules are active in Beeline Enterprise and will be used to validate timesheets.
Editing time classification schedules
Occasionally you may want to make changes to a Time Classification Schedule. You can quickly make changes to details whenever you need to. If a Time Classification Schedule was used to classify a timesheet, you can only change the End Date or the Display Order.
To edit a time classification schedule, complete these steps from your Enterprise dashboard.
- Select Preferences > VMS Settings > Data Management. A Data Management page displays.
- Select Time Classification. A Time Classification page displays showing you the time classifications set up for your organization.
- Locate and select the Time Classification Schedule you want to change. A View Time Classification Schedule page displays.
- Select Edit.
- Change the fields you want to update.
- Select OK.
- Optional. If you changed the Display Order, a dialog displays asking you to confirm your changes. Select OK. Your changes are applied to the Time Classification Schedule you selected.
- Select Return to go back to the Data Management page.
Related articles
Documentation release: Beeline Enterprise | Q4 2023